
Explore Load Balancing, which is one of the most important concepts of System Design, with fun activities.
Have you ever wondered how Google responds to our queries in less than a second?
Millions of new search requests per second are handled by the search engine to bring up content across the Internet. Most of the users are not aware of the complexity behind the applications serving their demands 24x7.
The steady rise in high-volume traffic may lead to frequent server upgrades to keep up with the rise so that their loyal customers don’t have to face a bad experience and usability issues. But even simple hardware upgrades won’t suffice to meet the increasing demands in the long term.
So how does Google ensure that it doesn’t fail as service demands skyrockets? This is where the concept of Load Balancing comes in.
Load balancing is a technique that prevents servers from overloading with incoming network or application traffic. This is done by efficiently distributing workloads over a set or group of backend servers to improve service performance.
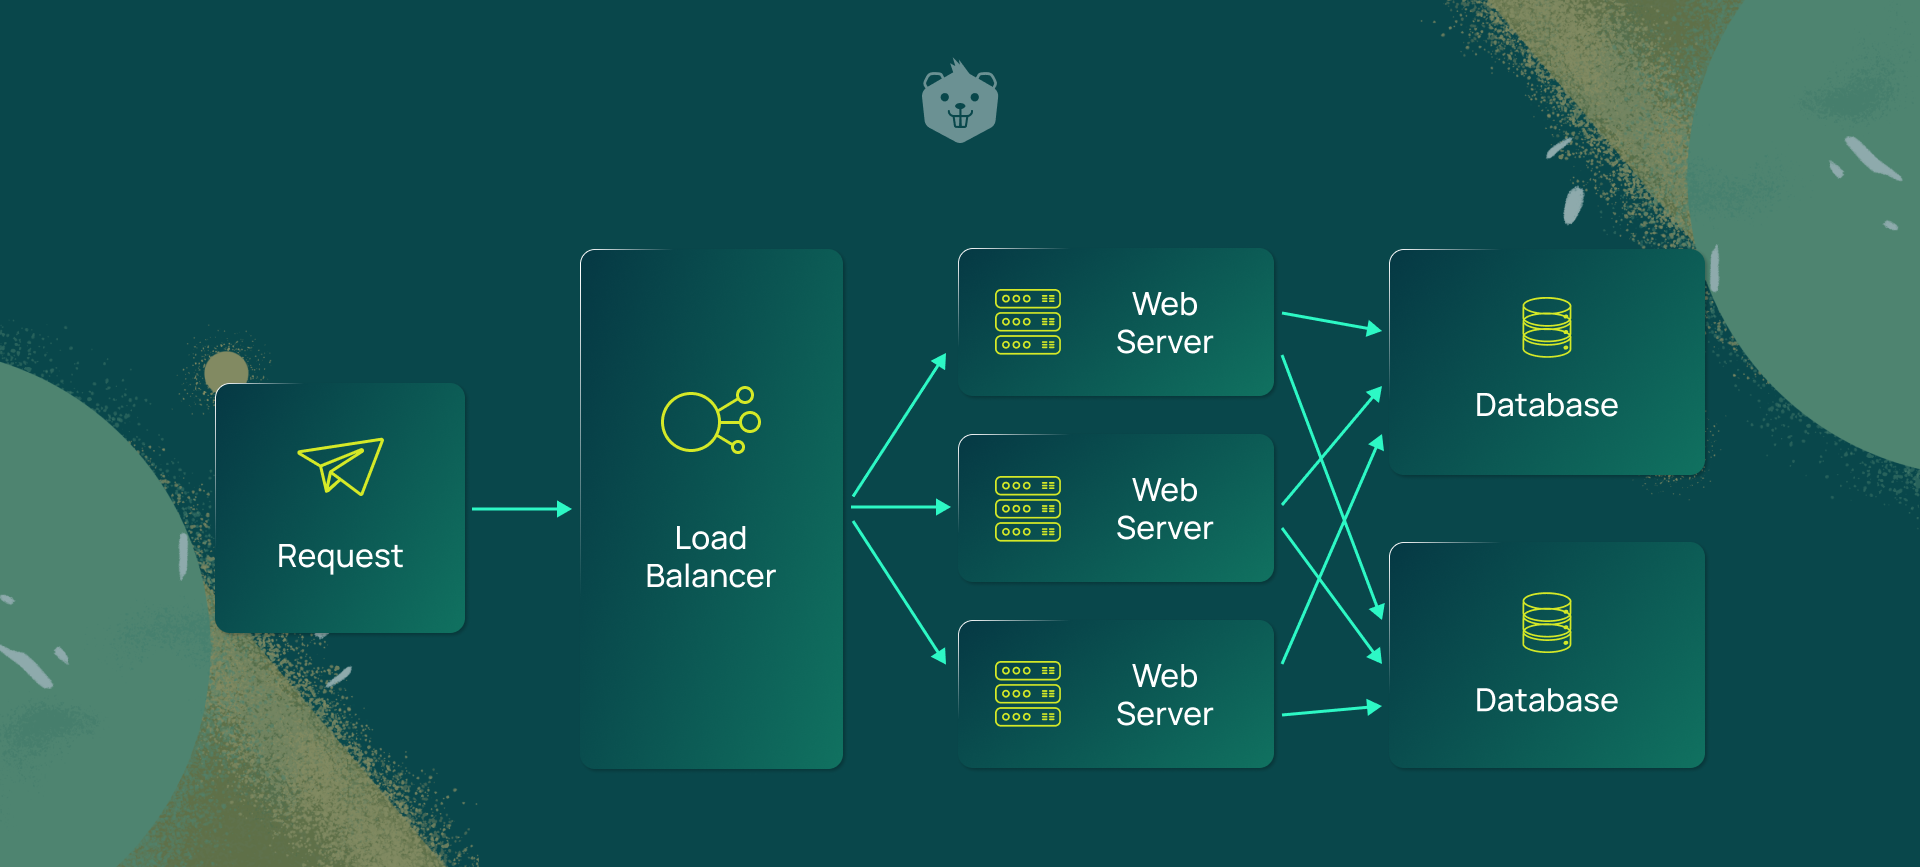
A load balancer is a service that acts as a traffic police to distribute network and/or application traffic across different servers capable of processing those requests.
This helps improve the concurrent connection capacity and effective utilization of the servers which prevent overburdening of individual servers in the network.
Load balancer regulates the traffic automatically upon failure of any server or the addition of a new server to the network group, ensuring stability and reliability. It distributes load based on predefined metrics such as geographical locations, request counts, active concurrent connections, latency, and many more.
For example: Application server farms are located across various continents like Asia, America, Europe, etc. The population of Asia will be served by the servers located in Asia. The same is true for the other continents. Here, geographical location can be considered one of the metrics to distribute the workloads using the Load Balancing technique.
In this blog, you will learn how to balance the load between Applications using HAProxy and the different available strategies. HAProxy is an open-source software that provides a high availability load balancer and acts as a proxy for TCP and HTTP-based applications.
Prerequisites
Before starting, make sure you are logged in as a user with Sudo privileges on your Linux machine and you don’t have Apache or any other web server running on port 80 or 443.
1. Install HAProxy using apt tool
$ sudo apt install haproxy -y
Once the installation is completed, HAProxy service will start automatically. Verify the status of the service using the following command:
$ sudo systemctl status haproxy
The output will look something like this:
● haproxy.service - HAProxy Load Balancer
     Loaded: loaded (/lib/systemd/system/haproxy.service; enabled; vendor preset: enabled)
     Active: active (running) since Wed 2021-06-02 07:54:57 IST; 1h 47min ago
       Docs: man:haproxy(1)
             file:/usr/share/doc/haproxy/configuration.txt.gz
    Process: 813 ExecStartPre=/usr/sbin/haproxy -f $CONFIG -c -q $EXTRAOPTS (code=exited, status=0/SUCCESS)
   Main PID: 853 (haproxy)
      Tasks: 7 (limit: 8728)
     Memory: 4.9M
     CGroup: /system.slice/haproxy.service
             ├─853 /usr/sbin/haproxy -Ws -f /etc/haproxy/haproxy.cfg -p /run/haproxy.pid -S /run/haproxy-master.sock
             └─856 /usr/sbin/haproxy -Ws -f /etc/haproxy/haproxy.cfg -p /run/haproxy.pid -S /run/haproxy-master.sock

Jun 02 07:54:57 jnana-cetana systemd[1]: Starting HAProxy Load Balancer...
Jun 02 07:54:57 jnana-cetana haproxy[853]: [NOTICE] 152/075457 (853) : New worker #1 (856) forked
Jun 02 07:54:57 jnana-cetana systemd[1]: Started HAProxy Load Balancer.
2. Install dnsutils package if not present to get information from DNS name servers using apt
$ sudo apt -y install dnsutils
3. Python3 comes pre-installed on your Linux machine.
4.Install Python Package flask using pip3, if not present, to be able to build an application service
$ pip3 install flask
Activity 1
Case Study: DNS Load Balancing in google.com
Let's start with a definition of what DNS Load Balancing is.
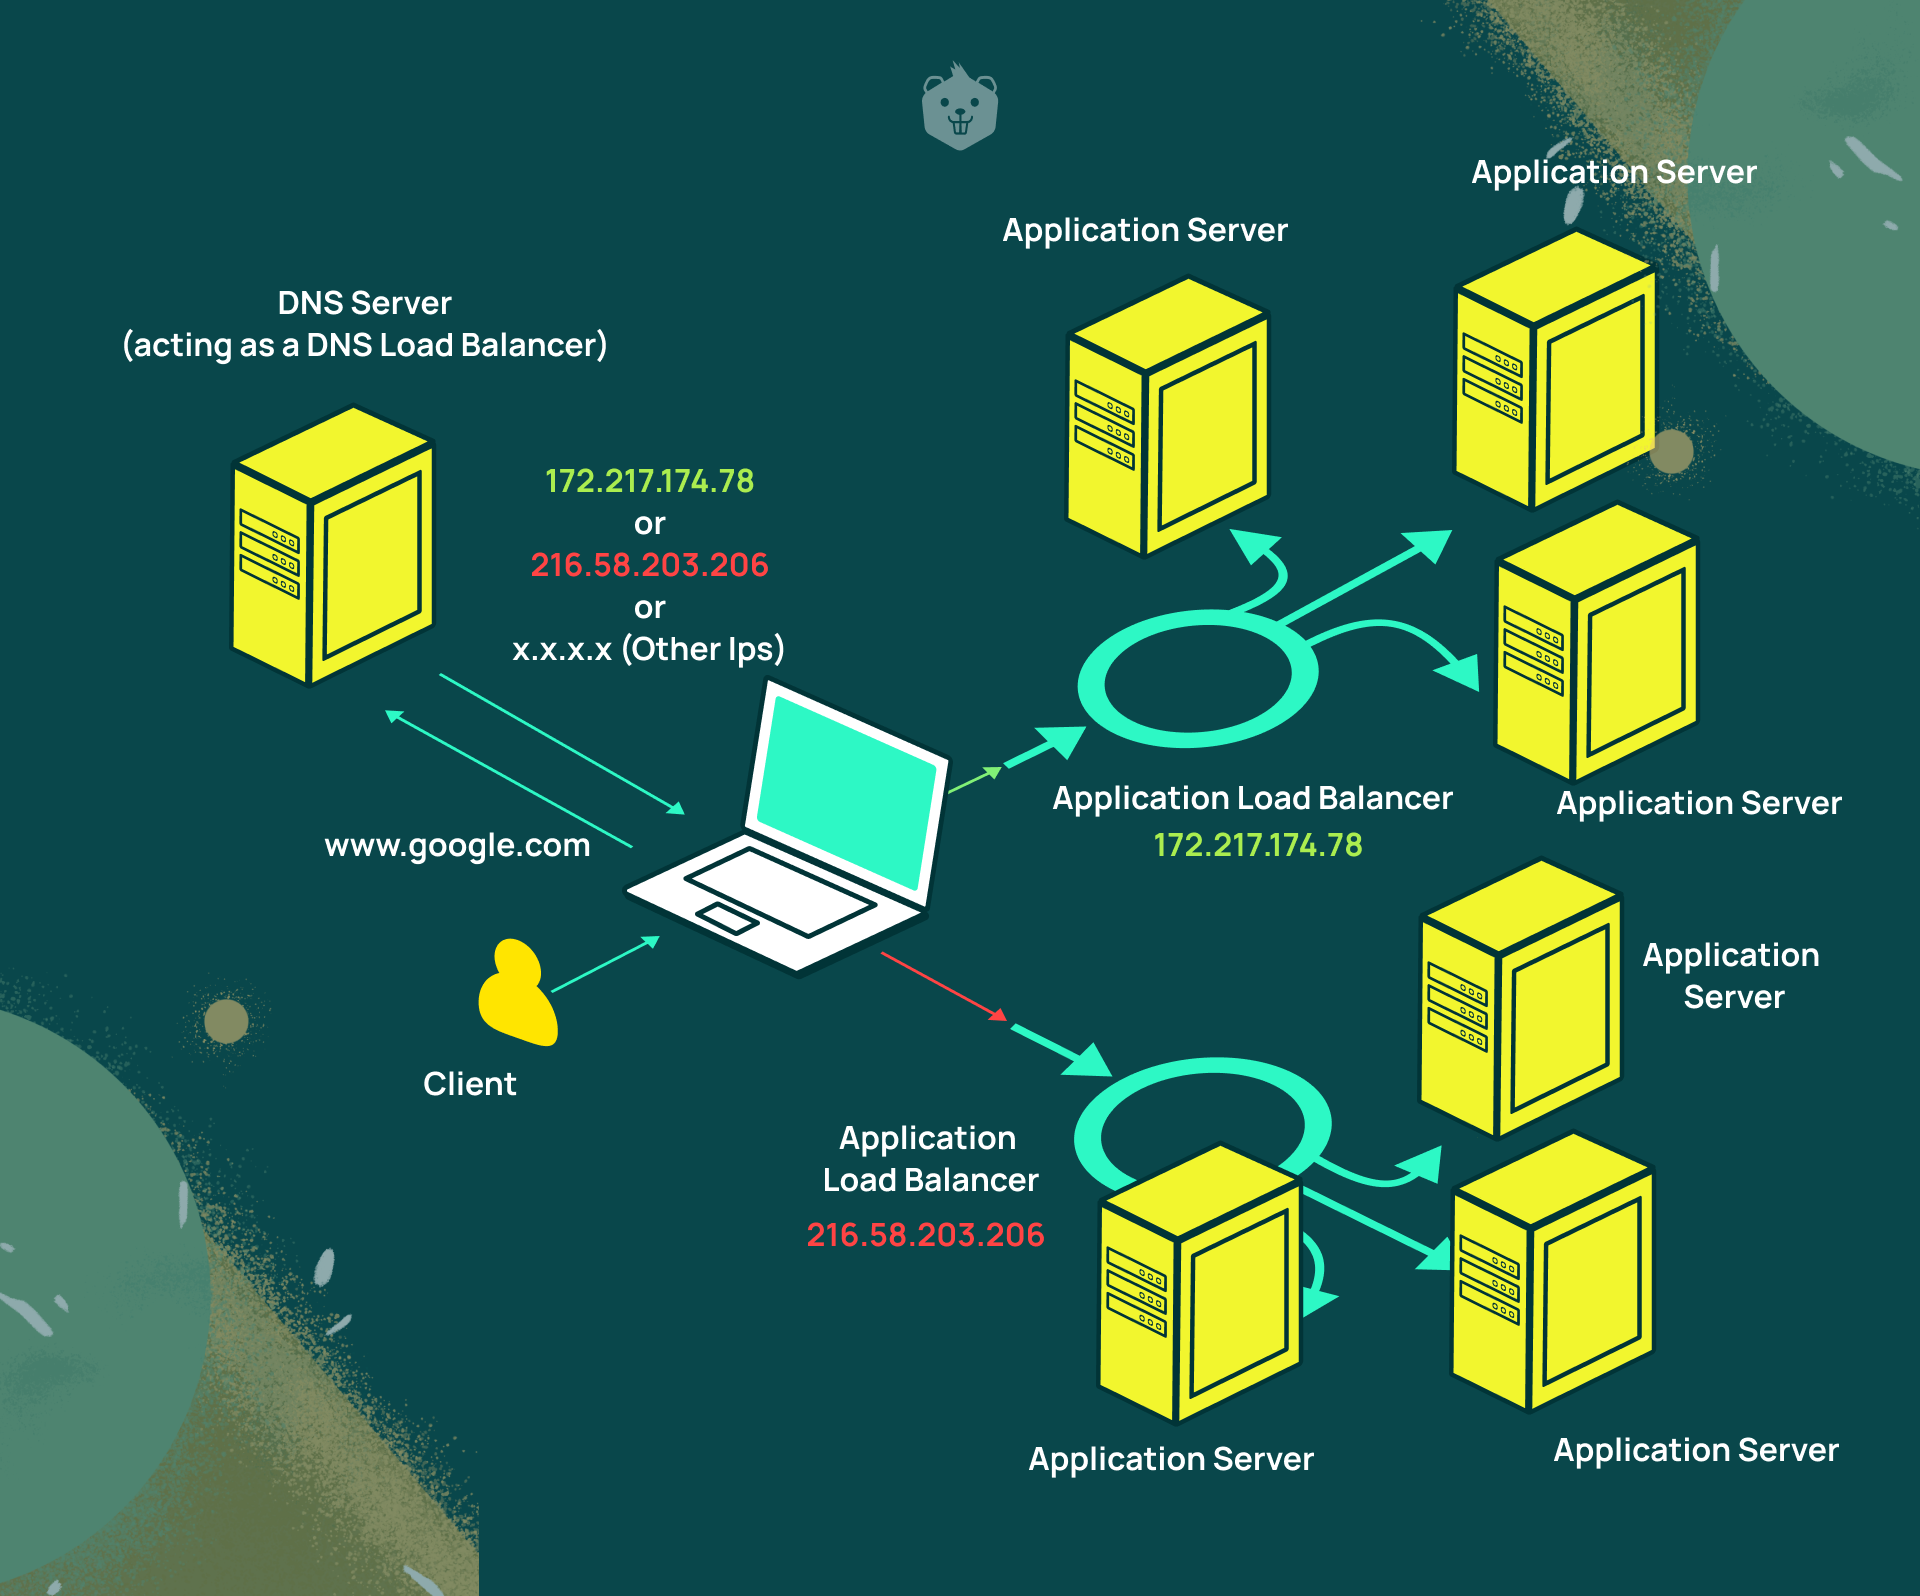
DNS-based load balancing is a type of load balancing that uses the DNS to distribute traffic across a group of server machines located across the internet. It does this by employing certain methods to provide different IP addresses in response to DNS queries.
Let’s try to grasp the above definition in a more actionable way or the way we say it at Crio - the Learn By Doing way :)
Open your favorite shell or terminal and type the following command:
$ dig google.com +short
Note: dig command is used to query DNS Information Servers. It can be used to retrieve IP Address records, query all DNS Record types, and trace the DNS Path if applicable.
The output will look something like this:
216.58.203.174
It might be strange to notice that you might not get the same result upon repetitive execution of the above command.
Each execution of the above command produced some repetitive set of IP addresses.
 $ dig google.com +short
        216.58.203.206

 $ dig google.com +short
        172.217.166.174

 $ dig google.com +short
        172.217.160.206

 $ dig google.com +short
        172.217.174.78

 $ dig google.com +short
        172.217.174.78

 $ dig google.com +short
        216.58.203.206

 $ dig google.com +short
        172.217.160.206

 $ dig google.com +short
        216.58.203.206
Let’s deep-dive into the mystery behind it.
DNS
DNS (Domain Name System) serves as an important part of the internet, providing a system to map human-readable domain names like google.com, etc. to Internet Protocol (IP) addresses like 216.58.203.174 which resembles a phone directory.
Let’s understand this step-by-step:
- DNS service can hold multiple IP addresses for the same domain name (google.com).
- By making a DNS query, you can get a list of IP addresses for the same domain name.
- With each DNS response, the IP address sequence in the list is ordered on a round robin basis
- When a web browser (or even the command line that you see above) requests a website, it will try these IP addresses one-by-one, until it gets a response back from the website.
- That's how you could get different IPs on each different DNS request for the same domain name.
NOTE: The different IP addresses in the output are the IPs of load balancers which further load balances the actual application servers of the search engine.
So, now you can go back to the original definition of DNS Load Balancing which will make much more sense after understanding it practically.
You can paste each IP Address into the browser and will notice that each of them displays Google’s homepage served by different application servers across the globe.
Try it yourself
Try the above command (dig) on various frequently used websites like
- facebook.com
- outlook.com
- yahoo.com
- etc.
and understand how the DNS load balances their services.
Activity 2 - Spin up multiple application servers
In real-world scenarios, there are application servers where each might be running on different physical hardware located geographically apart from each other.
You will simulate the scenario by launching a flask-based virtual server in a separate shell/terminal and logically separating them by assigning different port numbers to each of them.
- Copy the below Python source code app.py in any location of your choice.
from flask import Flask, request
import sys

PORT_NUMBER = sys.argv[1]

app = Flask(__name__)

@app.route('/')
def index():
	print(request.headers)
	return "Hi!! from server %s" % PORT_NUMBER

if __name__ == '__main__':
	app.run(port=sys.argv[1])

#Run the server in command line as follows:-
# python app.py <Unused port number>
#eg. python app.py 8080
- Launch a shell and run the flask server file using the following syntax:
$ python3 app.py < Unused port number >
- Launch 3 to 4 servers with different port numbers in separate terminals and make sure not to close the terminal since otherwise, it will kill the server process. Effectively, we want to have these 3 to 4 servers running simultaneously.
- The output will look something like this for each individual process in its respective shell, with different port numbers:
* Serving Flask app "app" (lazy loading)
* Environment: production
  WARNING: This is a development server. Do not use it in a production deployment.
  Use a production WSGI server instead.
* Debug mode: off
* Running on http://127.0.0.1:8080/ (Press CTRL+C to quit)
Food for thought
What would happen if you launched another server process with a port number already used by the previous instance of the process?
Let me know in the comments below :)
Activity 3 - Configure HAProxy Load Balancer
HA-Proxy is an open-source software that acts as a high-performance TCP/HTTP load balancer that can power distributed systems, web applications, and websites.
HAProxy is reportedly used by various well-known companies like AWS, Stack Overflow, Atlassian BitBucket, Slack, and many more.
HAProxy's logic comes from a config file (haproxy.cfg)
- Predefined location: /etc/haproxy/haproxy.cfg
- Command to run custom HAProxy conf:
$ haproxy -f < Path of haproxy configuration >
Instead of using the default config file, create a new configuration file named myhaproxy.cfg, with the below configuration
#global section - Parameters for the entire load balancing process (OS specific)
# maxconn - Sets the maximum per-process number of concurrent connections to <number>. Proxies will stop accepting connections when this limit is reached.
global
    maxconn 500

# Proxies section - Parameters for proxying incoming traffic to our backend cluster
# > defaults- optional parameters for all proxies
defaults
    mode http
    timeout connect 10s
    timeout client 50s
    timeout server 50s

# > frontend- A frontend defines how requests should be forwarded to backends.
frontend http-in
    bind *:3000 # The network socket address to which client will make an HTTP request to it.
    default_backend application_nodes

# > backend- servers to proxy the incoming traffic
# TODO:-
# Use "server <server_number or any name> <IP-Address of server with port number>" format to let HAProxy know about the new servers.
# Below sample server is added with port 8080 and 8081.
# Add all the server configurations with port numbers which you have spin up.
backend application_nodes
    balance roundrobin # A load balancing strategy to serve clients in round robin fashion.
    server server01 localhost:8080
    server server02 localhost:8081
    #HERE
    # .
    # .
    # N

#> listen- combine both backend and frontend (Optional)
#listen stats_page
#    bind *:8083
#   stats enable
#   stats uri /
Note that you have to fill the same port numbers with which you have spun up the Application Servers in the previous activity, in this config file.
After the required data is filled, start the load balancer with the command mentioned above, using this new configuration file.
Head to the browser and type localhost:3000 and keep on refreshing and note down the results. (You have specified that the load balancer be run at port 3000 in your config file above. So, you are hitting the load balancer which can then direct your request to one of the application servers and show the corresponding response.)


You might notice that the response is served from different application servers that you started up in Activity 2. There might be a default strategy involved which helps HAProxy decide to which server the request must be forwarded.
Note: If you need to make any configuration changes, you can use Ctrl+C to kill the active HAproxy process, make the changes to the custom configuration file and restart HAproxy.
Load Balancing Algorithms
The load balancing algorithm serves as a decision-maker that determines which backend server the traffic would be routed to, when performing load balancing operations.
Types of load balancing algorithms include:
Round robin
Round robin selects servers in a rotating sequential order with the assumption that all the machines have equal capacity to process requests. This is the default strategy used by HAProxy.
Least connections
This selects servers having the least number of active connections, assuming all connections generate an equal amount of load. This is recommended when the request is bound to have sessions with a longer duration.
Source IP hash
Source IP hash selects a server using a hash key that is formed using a combination of source and destination IP addresses present in a request. This method ensures that a connection will be returned to the same server which originally handled the request in case of unstable connections.
The “balance round-robin” line in the custom configuration file specifies the load balancing algorithm to be used.
You can also assign weights to the servers to determine the frequency with which the request forwarding will be prioritised. This is also called weighted round robin.
This can be achieved by the following steps:
Change server server01 localhost:8080 to server server01 localhost:8080 weight 4 in the configuration file.
- Similarly, append weight < Any number > ( For now only add 1 ) to all the backend application nodes.
- Head to the browser and type localhost:3000 and keep on refreshing to see the expected results (i.e. which backend application gets allocated for that request) of the weighted round robin strategy.
Food for thought
How is the weighted round robin strategy beneficial in load balancing?
List down the use cases and let me know in the comments.
Activity 4 - Health Check of Backend Servers
In real-world scenarios, the application servers might fail under certain conditions. But we don’t have to disappoint our clients who expect things to work. Let’s see how you can achieve this using Load Balancers.
Let’s try to simulate this failure scenario with the following steps:
- Kill one of the servers by sending a Ctrl + C signal from the shell.
- Head to the browser and type localhost:3000 and keep on refreshing and note down the results.


Why do you see this?
The HAProxy load balancer didn't know that one of the configured servers was not available and still attempted to forward the request to it which led to the HTTP 503 error code.
How do we make the load balancer aware of the active status of the server?
HAProxy uses a health check mechanism to decide when the backend server is in a healthy state to accept and process the incoming traffic requests.
This mechanism eliminates the overhead of human intervention to remove a server from the backend if it is not in a healthy state or becomes unavailable.
By default, this health check is as simple as trying to establish a TCP Connection with the configured IP address and port of the server to determine its current state - whether it’s listening on the port or not.
The traffic to that server will be disabled if the health check fails, since the server is unable to serve requests. The traffic to the failed server will not be resumed until it reaches a healthy state again. If all servers in the backend fail, the service will become unavailable until at least one of those backend servers becomes healthy again.
There is a check keyword that can be added at the end of the server directive in the configuration file, to enable a health check on those backend servers. You can make the changes in the following steps to enable that:
- Change server server01 localhost:8080 to server server01 localhost:8080 weight 4 check
- Change server server01 localhost:8081 to server server01 localhost:8081 check
- Head to the browser and type localhost:3000 and keep on refreshing. Note down the results.
Now HAProxy will keep on polling the servers to check whether it is alive or not and add or remove the server IP from the round robin list.
Activity 5 - Enable live monitoring and statistics
Reasons to Monitor Your Load Balancers
- Load balancers monitor and provide relevant metrics to check the performance of the system and how it is holding up for large volumes of requests.
- Load balancers can track the number of clients accessing your services and provide strong metrics for latency involved in the request-response cycle.
- With an ample amount of monitoring data collected, you can perform analysis and determine if there is any performance degradation or an operational problem that affects your web services.
- It can check the health of registered services and can inform about any potential issue before they have a chance to cause any massive failures in the system.
- It enables you to monitor traffic patterns and provide daily insights. This helps in planning for service scaling based on the traffic volume, as required. .
Uncomment the lines after #> listen- combine both backend and frontend (Optional) in the custom configuration file to enable the statistics page.
- Head to the browser and type localhost:8083 to view the stats page.
- Note that we are connecting to 8083 since that is the port we’ve configured in the config file. If you already have application servers running on this port, change this port to some other unused port and restart HAProxy. Use that changed port to access the stats page.
- Play around with the stats page by making requests to localhost:3000 or killing and restarting the server. The statistical data will be reflected on the stats page.

Try it yourself
Try load balancing with actual cloud instances of the server from AWS, GCP, whichever you prefer. It will be a challenging task to complete but, now that you know the basics, you can dive right in!
Final thoughts
Load balancers perform distribution of network and application traffic across multiple servers. It ensures reliability and availability by maintaining the performance of the servers with timely health checks. This ensures that the uptime will be maximised to ensure customer satisfaction and better utilisation of hardware investments.