Voice-based assistants are big in the industry now. Writing Alexa skills is akin to writing Android/iOS Apps, but voice-driven. This Learning Byte gives you a short overview of what it takes to build voice-based applications.
The Fundamentals
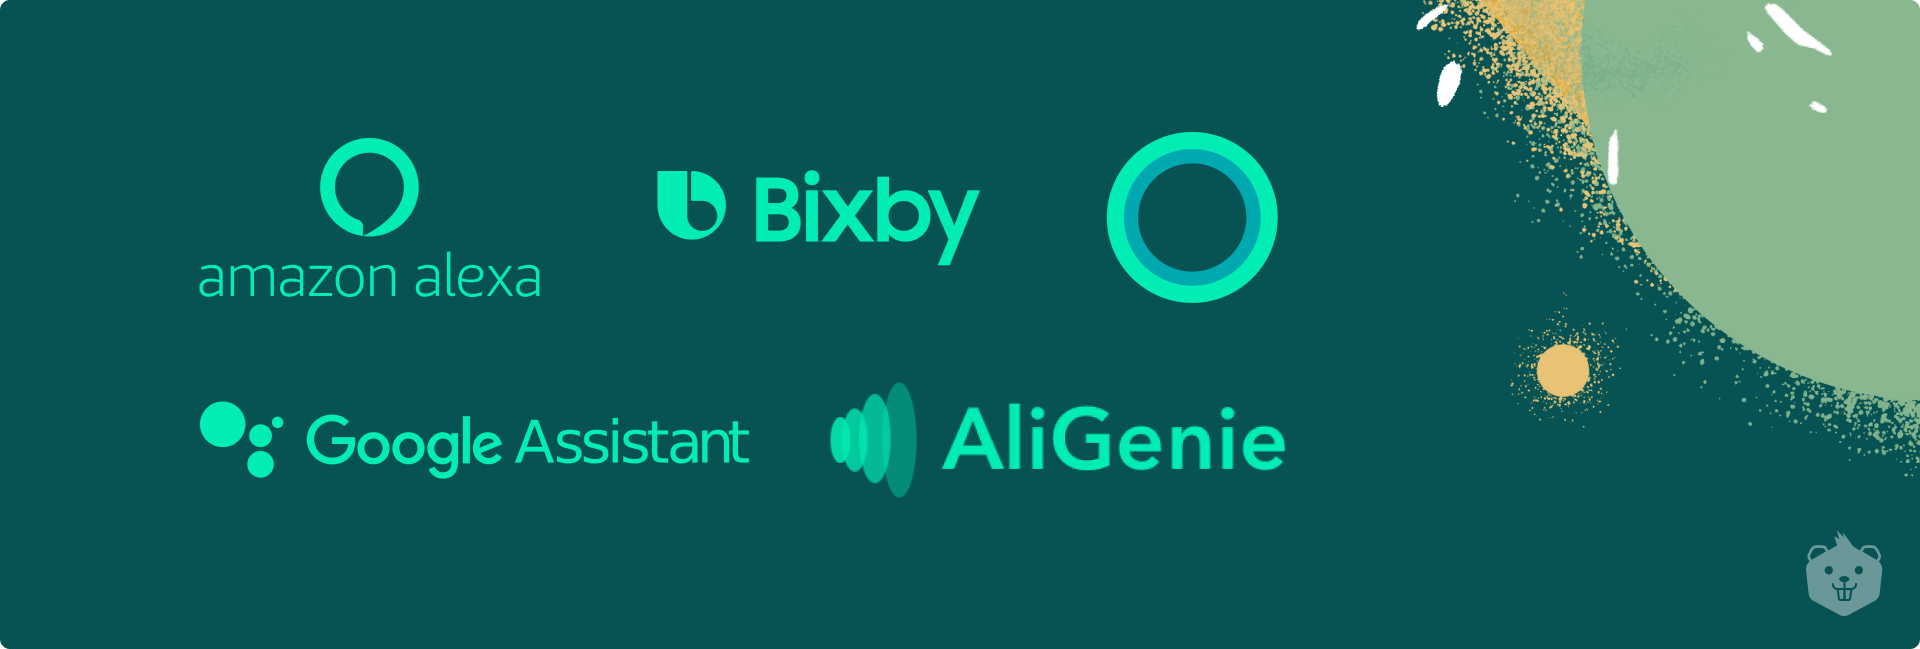
You must be familiar with voice assistants like Google Assistant, Amazon Alexa, Cortana, and Siri. It’s fascinating how they reply with an answer or perform some action based on what we speak to them. Almost like talking to a real person, don’t you think?
How do Voice Assistants Work?
What happens is that you, as a user, make a request to a voice-activated device, which streams the audio to a speech recognition service that tries to convert the audio into text. The text is then sent to the backend, which responds with a response when it has been processed.
Finally, the response is transformed into an audio clip generated by a text-to-speech (TTS) service and is transmitted back to the device, which is then played back to the user.
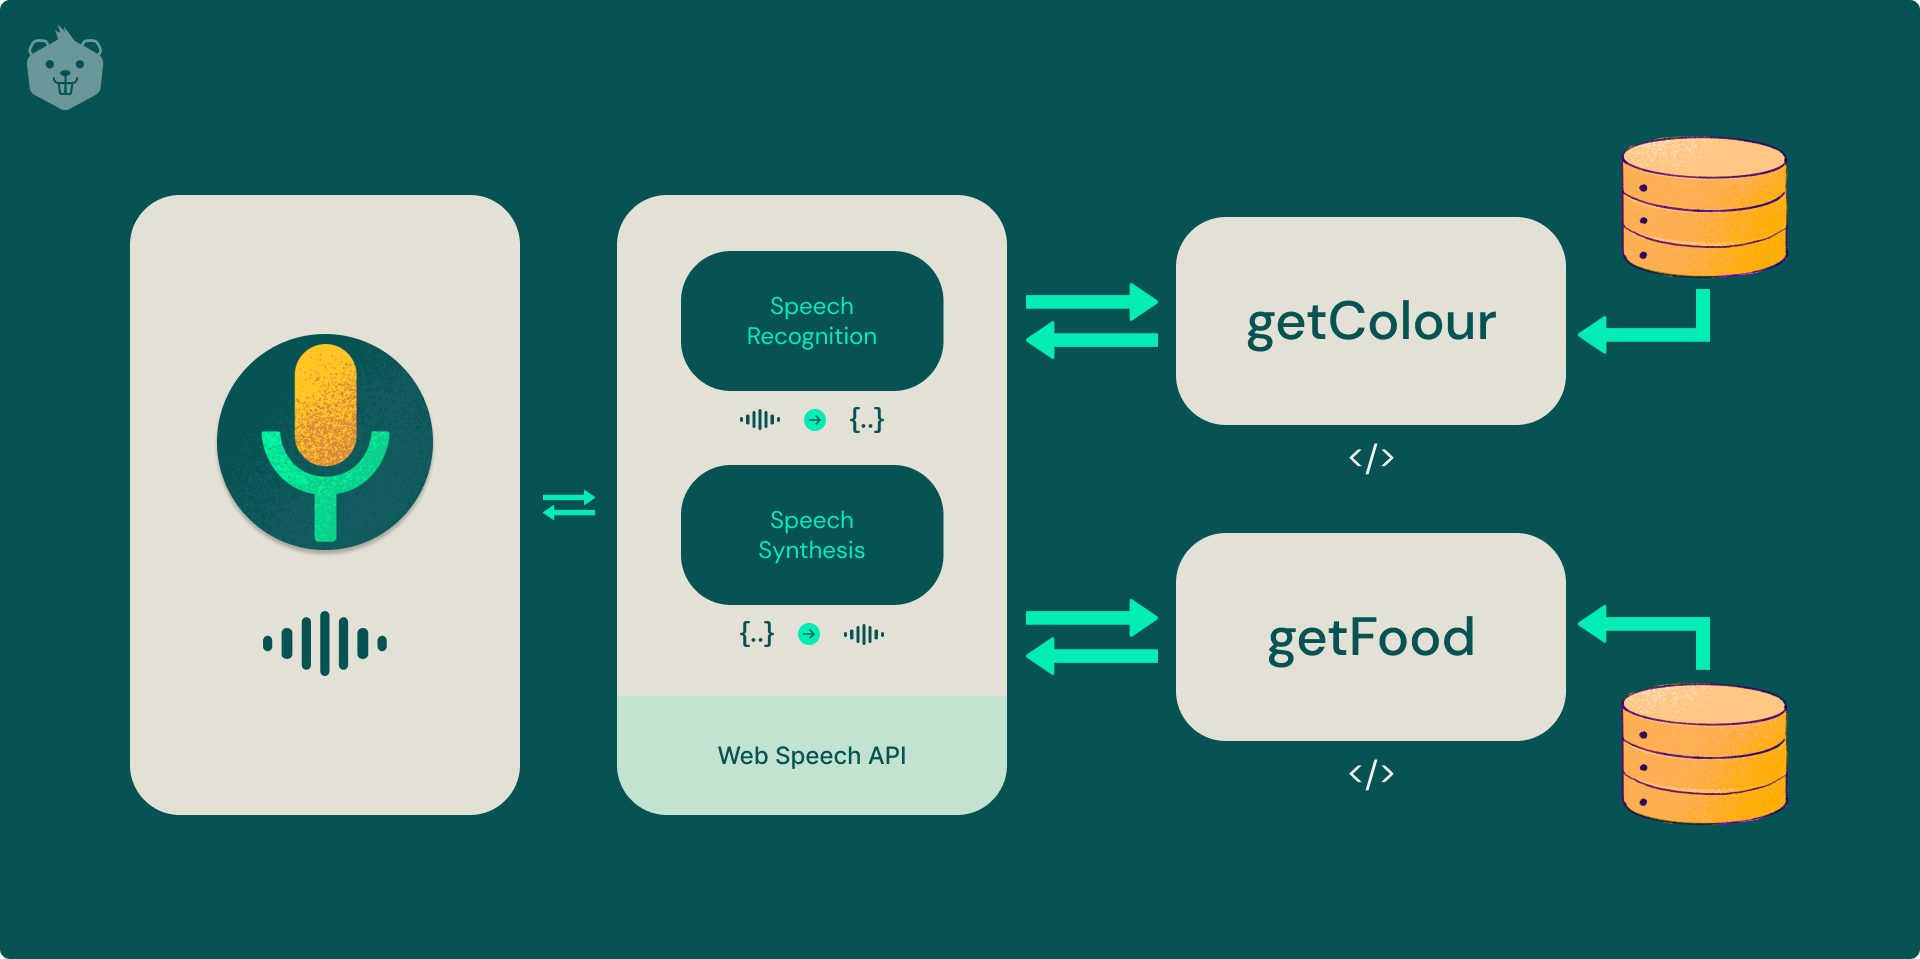
You might have noticed the use of the ‘decoupled’ in the title of this article and it becomes important to understand what it means. Traditionally, developers decided on a particular technology stack and built the entire application as a single unit or, we say, as a ‘monolith’.
A ‘decoupled’ application, however, has a number of services that tend to atomic operations and are not dependent on each other for their functioning. Services could be replaced or used elsewhere which is the preferred loosely coupled model.
In this blog, you will be building a voice assistant within a browser and build a 'skill' or an 'action' for the assistant using a serverless cloud function.
This kind of decoupling provides a good separation of concerns. Your assistant will be able to run even if the backing logic is not able to deliver performance. It will also be very easy to develop new 'skills' or 'actions' for our assistant.
By the end of this blog, you will learn how to implement this assistant by doing small tasks which may include:
- Writing code in place of TODO comments,
- Executing commands on a terminal,
- Playing around with browser nuances as we shall be using experimental features.
You will learn all this by actually doing the tasks!
The code used in the Activities and required for the Micro-challenges in this blog can be found in the companion repository on GitHub. A deployed version of the voice assistant that we are going to build can be accessed at https://decoupled-assistant.netlify.app/.
Prerequisites
It is preferred that you are aware of ES6 JavaScript and know basic HTML markup and CSS styling.
You will preferably need access to a WebKit-based web browser like Chromium, Edge, or Google Chrome. You should have an understanding of how AJAX works and how one can use the Fetch API to make calls to REST API endpoints.
NOTE: If you plan on using a Gecko-based browser like Mozilla Firefox, go to about:config and enable the following flags:media.webspeech.recognition.enable,media.webspeech.recognition.force_enable,media.webspeech.synth.enabled
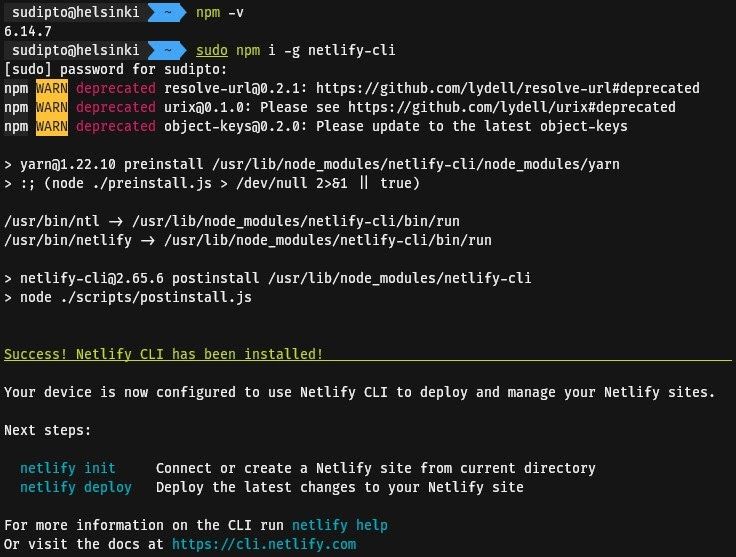
Make sure you have Node.js installed and have access to npm on your terminal or shell by running npm -v which should display the version of npm installed. Install the netlify-cli by executing npm i -g netlify-cli (You may need root privileges on a Linux system).
Activity 1: Interacting with Browser APIs
In order to get started with building a voice assistant, we have to obviously listen to the speaker using the device microphone. The Web Speech API specification allows us to get started with speech recognition quickly.
The SpeechRecognition interface of the Web Speech API is the main controller interface that one has to use in order to implement speech recognition. On WebKit-based browsers, this interface is prefixed with the webkit vendor prefix.
Once we instantiate a SpeechRecognition object, we can use the onresult event handler to use the spoken phrases. The onspeechend handler can be used to stop listening to the microphone.
// src/activity-1/script.js
// comment out the following three lines if on firefox
const SpeechRecognition = webkitSpeechRecognition;
const SpeechGrammarList = webkitSpeechGrammarList;
const SpeechRecognitionEvent = webkitSpeechRecognitionEvent;
const recognition = new SpeechRecognition();
recognition.lang = 'en-IN';
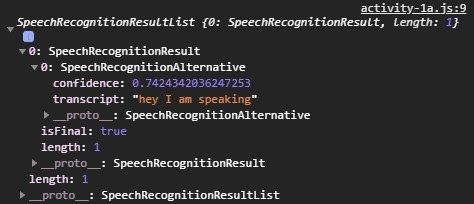
recognition.onresult = (event) => {
// TODO: log the results object in event to the console
};
recognition.onspeechend = () => {
recognition.stop();
};
const listen = () => {
recognition.start();
};
document
.getElementById('listenBtn')
.addEventListener(
'click',
listen
);Write a HTML file that sources this JavaScript file. Trigger the listen() function when a button is pressed. Observe that it logs the results to the browser console.
Use String.prototype.includes() to check if a particular word or phrase is contained in the spoken phrase. This will be useful when we need to handle specific actions that get triggered on certain words. Log a message to the browser console if that word is detected.
// src/activity-1/script.js
// comment out the following three lines if on firefox
const SpeechRecognition = webkitSpeechRecognition;
const SpeechGrammarList = webkitSpeechGrammarList;
const SpeechRecognitionEvent = webkitSpeechRecognitionEvent;

const recognition = new SpeechRecognition();
recognition.lang = 'en-IN';

recognition.onresult = (event) => {
  let result;
  // TODO: assign the first phrase heard to result
  // and make sure that the correct statement is printed
  // Hint: observe the structure of event.results
  console.log('HEARD: ' + result);
  if (result.includes('colour'))
    console.log('ACTION: looking for a colour');
  else if (result.includes('book'))
    console.log('ACTION: looking for a book');
  else
    console.log('ACTION: can not do anything about it');
};

recognition.onspeechend = () => {
  recognition.stop();
};

const listen = () => {
  recognition.start();
};

document
  .getElementById('listenBtn')
  .addEventListener(
    'click',
    listen
  );
We can also use the Web Speech API (window.speechSynthesis) to generate a speech that shall serve as a reply back to the user. We have gone ahead and added a few lines to the code that you saw in the above step to support this feature.
// src/activity-1/script.js
// comment out the following three lines if on firefox
const SpeechRecognition = webkitSpeechRecognition;
const SpeechGrammarList = webkitSpeechGrammarList;
const SpeechRecognitionEvent = webkitSpeechRecognitionEvent;

const recognition = new SpeechRecognition();
recognition.lang = 'en-IN';

const SpeechSynthesis = window.speechSynthesis;

recognition.onresult = (event) => {
  let result = event.results[0][0].transcript;
  console.log('HEARD: ' + result);
  if (result.includes('colour')) {
    console.log('ACTION: looking for a colour');
    SpeechSynthesis.speak(
      new SpeechSynthesisUtterance('looking for a colour')
    );
  }
  else if (result.includes('book')) {
    console.log('ACTION: looking for a book');
    // TODO: reply back to the user using the message logged to console
  }
  else {
    console.log('ACTION: can not do anything about it');
    // TODO: reply back to the user using the message logged to console
  }
};

recognition.onspeechend = () => {
  recognition.stop();
};

const listen = () => {
  recognition.start();
};

document
  .getElementById('listenBtn')
  .addEventListener(
    'click',
    listen
  );
At the end of this activity, you can now detect specific phrases and perform actions based on the spoken phrase and reply back to the user.
Micro-challenge
Write a script to detect whether the following phrase is spoken or not: "I want to learn something new". (Optional: Reply back with "Sure, I am looking for something".)
Activity 2: Build a Serverless Backend and Deploy it
How do you handle business logic in a conventional application? You typically need a backend to execute database queries, fetch data from key-value stores and handle authentication. A backend is usually a server running the server-side code, which consumes compute resources as time progresses.
If it is possible for one to separate the logic into smaller functions, these functions can be executed on a Function-as-a-Service (FaaS) provider like AWS Lambda, Google Cloud Functions etc., which typically cost less and are charged per function invocation unlike servers which run continuously. This is why these functions are also termed serverless functions.
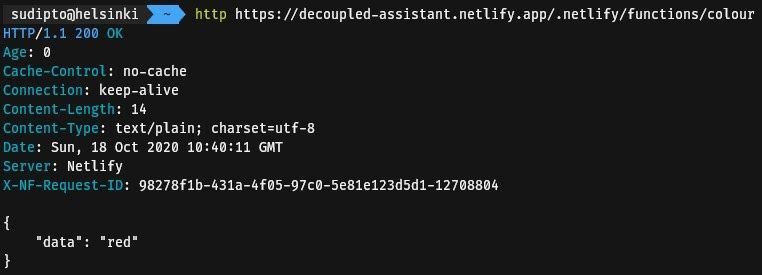
We will use Netlify Functions in this blog which use the AWS Lambda offering internally. Use a HTTP client like cURL or Postman to make a GET request to a pre-existing function at https://decoupled-assistant.netlify.app/.netlify/functions/colour which returns a random colour. You should observe that the output is similar to the one given below.
When building the voice assistant, it may be easier to keep the backend logic separate. As we are using Netlify Functions, you can place them in the functions directory. Take a look at an existing function before implementing your own serverless functions.
// src/activity-2/functions/colour.js
exports.handler = async (event, context) => {
  const colours = [
    'red',
    'green',
    'blue',
    'white',
    'black',
    'magenta',
    'yellow'
  ];

  return {
    statusCode: 200,
    body: JSON.stringify({
      data: colours[Math.floor(Math.random() * colours.length)]
    })
  };
};
In order to let Netlify know that we have stored our serverless function in a specific folder, we must create a configuration file named netlify.toml in the project root that points to the directory where we have stored the functions.
# src/activity-2/netlify.toml
[build]
  functions = "functions"
Deploy this function by executing netlify deploy by following the steps as shown below (Sign in to your Netlify account in the browser window that shall open on executing this command if this is your first time using netlify-cli):
Copy the Website Draft URL, and use a HTTP client and make a GET request to <netlify-draft-url>/.netlify/functions/colours. Observe that the output is similar to the one that we had received at the beginning of this activity.
At the end of this activity, you will be able to deploy your own backend logic to separate, modular serverless functions on Netlify.
Micro-challenge
Study the serverless function provided in this Byte and complete the missing code in src/activity-2/functions/microbytes.js as per the comments given in the file. Deploy this function. This function will be available at <netlify-draft-url>/.netlify/functions/microbytes (Replace <netlify-draft-url> with the Website Draft URL as given by netlify-cli. Note that it may take a couple of minutes for the function to be deployed).
Activity 3: Implement a Front-End for the Assistant
This activity needs your creativity and is left free to your imagination and experience with CSS styling. Basically, you will need a button that will invoke the speech recognition subroutine and a text-label to provide feedback to the user.
// src/activity-3/index.html
<!DOCTYPE html>
<html lang="en">
  <head>
    <meta charset="UTF-8">
    <meta name="viewport" content="width=device-width, initial-scale=1.0">
    <title>Crio.do Voice Assistant</title>
    <link rel="stylesheet" href="https://cdnjs.cloudflare.com/ajax/libs/font-awesome/5.15.1/css/all.min.css">
    <link rel="stylesheet" href="./style.css">
  </head>
  <body>
    <main>
      <div class="speak">
        <button id="speak-btn">
          <i class="fas fa-microphone fa-2x"></i>
        </button>
      </div>
      <div class="text-lbl">
        press tap to speak
      </div>
    </main>
    <script defer src="https://cdnjs.cloudflare.com/ajax/libs/font-awesome/5.15.1/js/all.min.js"></script>
    <script src="./script.js"></script>
  </body>
</html>
/* src/activity-3/style.css */
body, html {
margin: 0;
padding: 0;
}
main {
position: absolute;
top: 0;
left: 0;
display: flex;
align-items: center;
flex-direction: column;
justify-content: center;
width: 100%;
height: 100%;
min-width: 100vw;
min-height: 100vh;
background-color: #444444;
}
main > .speak {
border: 0.8rem #ffffff;
}
main > .speak > #speak-btn {
width: 8em;
height: 8em;
outline: none;
color: #ffffff;
padding: 1em;
transition: 1s;
border-radius: 50%;
font-size: xx-large;
background-color: #444444;
}
main > .text-lbl {
margin-top: 2rem;
font-size: xx-large;
font-family: 'Montserrat';
color: #ffffff;
}
.listening {
transition: 1s;
color: #444444;
background-color: rgb(24, 168, 168) !important;
}
.danger {
transition: 1s;
color: #ffffff;
background-color: red !important;
}
@media (max-width: 720px) {
main > .speak > #speak-btn {
width: 5em;
height: 5em;
margin-top: -2em;
font-size: large;
}
main > .text-lbl {
margin-top: 2rem;
font-size: large;
}
}After you are done with styling the user interface, write a script to detect a couple of phrases and reply back to the user using hard coded literals.
// src/activity-3/script.js
const textLbl = document.querySelector('.text-lbl');
const speakBtn = document.querySelector('#speak-btn');
const SpeechRecognition = webkitSpeechRecognition || SpeechRecognition;
const SpeechGrammarList = webkitSpeechGrammarList || SpeechGrammarList;
const SpeechRecognitionEvent = webkitSpeechRecognitionEvent || SpeechRecognitionEvent;
const recognition = new SpeechRecognition();
recognition.lang = 'en-IN';
const SpeechSynthesis = window.speechSynthesis;
const handleInvalidTrigger = () => {
// TODO: Toggle the 'danger' class on speakBtn
// TODO: Set the textContent property for textLbl to 'invalid phrase'
SpeechSynthesis.speak(
new SpeechSynthesisUtterance('invalid phrase')
);
setTimeout(() => {
speakBtn.disabled = false;
speakBtn.classList.toggle('danger');
textLbl.textContent = `press tap to speak`;
}, 3000);
};
const resetButton = () => {
setTimeout(() => {
speakBtn.disabled = false;
textLbl.textContent = `press tap to speak`;
}, 3000);
};
recognition.onstart = () => {
speakBtn.disabled = true;
textLbl.textContent = `listening`;
speakBtn.classList.toggle('listening');
};
recognition.onresult = (event) => {
let result = event.results[0][0].transcript;
// TODO: change the condition of the if statement
// so that the block is execute only when the result
// includes 'colour' or 'food'
if (true) {
if (result.includes('colour')) {
textLbl.textContent = `i can not get a colour`;
SpeechSynthesis.speak(
new SpeechSynthesisUtterance(`i can not get a colour`)
);
resetButton();
} else {
// TODO: Inform the user that the assistant cannot cook
// a food item. Make sure you set the textContent for the
// textLbl and speak the phrase using SpeechSynthesis
resetButton();
}
} else {
handleInvalidTrigger();
};
};
recognition.onnomatch = handleInvalidTrigger;
recognition.onerror = () => {
speakBtn.classList.toggle('listening');
speakBtn.classList.toggle('danger');
textLbl.textContent = `i could not hear you`;
setTimeout(() => {
speakBtn.disabled = false;
speakBtn.classList.toggle('danger');
textLbl.textContent = `press tap to speak`;
}, 3000);
};
recognition.onspeechend = () => {
speakBtn.classList.toggle('listening');
recognition.stop();
};
speakBtn.addEventListener('click', () => {
recognition.start();
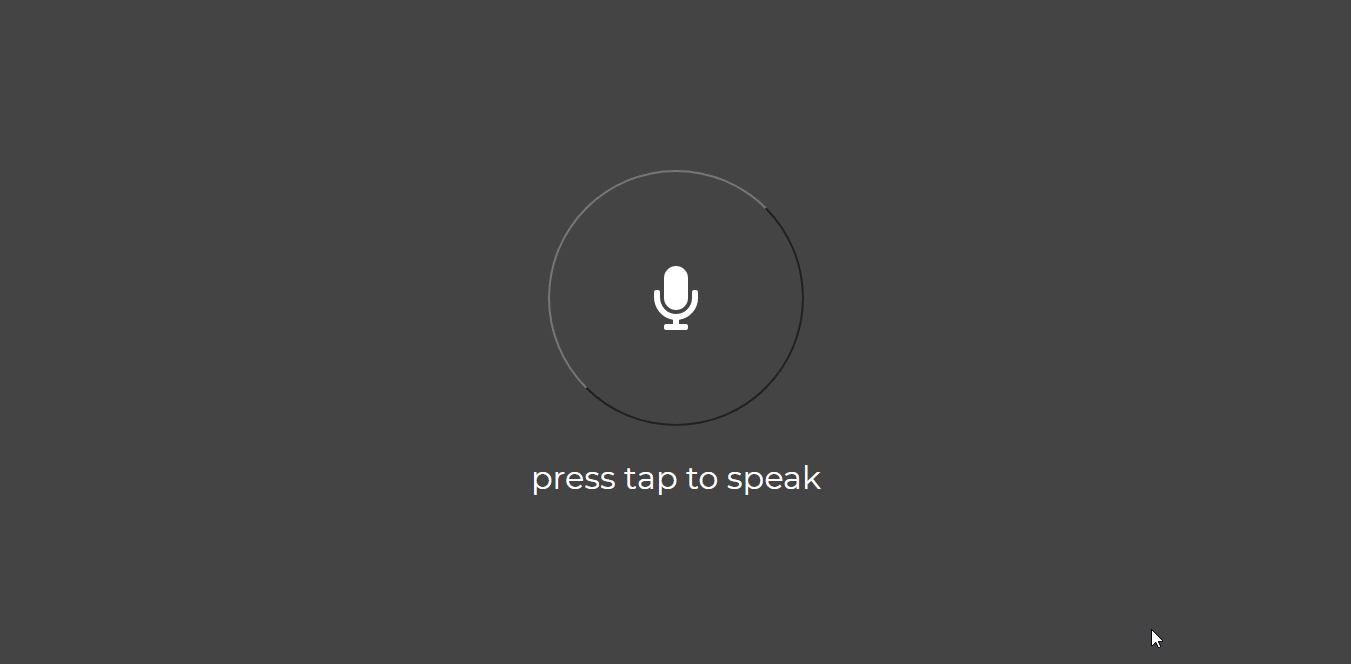
});The front-end that we wish to implement will look like this:
At the end of this activity, you would have built the interface which an user can use to interact with your assistant.
Activity 4: Interface the Assistant with your Backend
In order to interact with the backend, we need to make HTTP requests like we did in Activity 1, but this time we have to do that programmatically. We will use the Fetch API to make a GET request to our functions and use the response on our user interface so that the user is kept engaged.
Netlify Functions can be developed locally by executing netlify dev in the appropriate folder. Copy the URL given by netlify-cli. This is the application URL similar to the deployment URL we had obtained in Activity 2.
Run the development server in the src/activity-4 directory and try to fetch a random colour and log it to the browser console.
// src/activity-4/fetch.js
fetch('/.netlify/functions/colour')
  .then((r) => res.json())
  .then((d) => {
    // TODO: observe that you log a JSON
    // object. update the following statement
    // to log the actual colour
    console.log(d);
  });
At the end of this activity, you are now able to interact with a serverless function or any REST API endpoint and make appropriate decisions.
Micro-challenge
Complete the code for the assistant in src/activity-4/script.js so that it is able to reply back with the name of a random MicroByte (Learning Byte) if a user wants to learn something new. Restart the development server to observe the updated logic.
// src/activity-4/script.js
const textLbl = document.querySelector('.text-lbl');
const speakBtn = document.querySelector('#speak-btn');

const SpeechRecognition = webkitSpeechRecognition || SpeechRecognition;
const SpeechGrammarList = webkitSpeechGrammarList || SpeechGrammarList;
const SpeechRecognitionEvent = webkitSpeechRecognitionEvent || SpeechRecognitionEvent;

const recognition = new SpeechRecognition();
recognition.lang = 'en-IN';

const SpeechSynthesis = window.speechSynthesis;

const handleInvalidTrigger = () => {
  speakBtn.classList.toggle('danger');
  textLbl.textContent = `invalid phrase`;
  SpeechSynthesis.speak(
    new SpeechSynthesisUtterance('invalid phrase')
  );
  setTimeout(() => {
    speakBtn.disabled = false;
    speakBtn.classList.toggle('danger');
    textLbl.textContent = `press tap to speak`;
  }, 3000);
};

const resetButton = () => {
  setTimeout(() => {
    speakBtn.disabled = false;
    textLbl.textContent = `press tap to speak`;
  }, 3000);
};

recognition.onstart = () => {
  speakBtn.disabled = true;
  textLbl.textContent = `listening`;
  speakBtn.classList.toggle('listening');
};

recognition.onresult = (event) => {
  let result = event.results[0][0].transcript;
  if (result.includes('learn') || result.includes('colour')) {
    if (result.includes('colour')) {
      SpeechSynthesis.speak(
        new SpeechSynthesisUtterance(`looking for a colour`)
      );
      fetch(
        '/.netlify/functions/colour'
      )
        .then(r => r.json())
        .then(d => {
          textLbl.textContent = `i think ${d.data} is a good colour`;
          SpeechSynthesis.speak(
            new SpeechSynthesisUtterance(`i think ${d.data} is a good colour`)
          );
          resetButton();
        });
    }
    // TODO: if the user wants to learn,
    // fetch a random microbyte from a
    // serverless function
    // hint: /.netlify/functions/microbyte
    else {
      textLbl.textContent = `i can not find a microbyte`;
      SpeechSynthesis.speak(
        new SpeechSynthesisUtterance(`i can not find a microbyte`)
      );
      resetButton();
    }
  } else {
    handleInvalidTrigger();
  };
};

recognition.onnomatch = handleInvalidTrigger;

recognition.onerror = () => {
  speakBtn.classList.toggle('listening');
  speakBtn.classList.toggle('danger');
  textLbl.textContent = `i could not hear you`;
  setTimeout(() => {
    speakBtn.disabled = false;
    speakBtn.classList.toggle('danger');
    textLbl.textContent = `press tap to speak`;
  }, 3000);
};

recognition.onspeechend = () => {
  speakBtn.classList.toggle('listening');
  recognition.stop();
};

speakBtn.addEventListener('click', () => {
  recognition.start();
});
Activity 5: Deploy the Assistant to Production
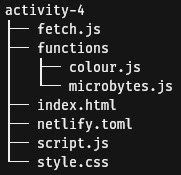
We have now reached the final step in this Learning Byte in which we have to deploy the voice assistant to a production environment. After the last activity, confirm that you have the following directory structure in the src/activity-4 folder.
Copy all the contents to a directory outside of the MicroByte repository in a separate folder, say VoiceAssistant. Create a new repository on GitHub. Do not add any README or LICENSE from the GitHub UI. Initialize a local Git repository in VoiceAssistant, add all the files to stage, commit the changes and push it to origin.

Deploy it on Netlify by executing netlify init in the directory by following the instructions. When you are prompted about a build command, enter # as our front-end does not need to be built using any toolchain. Netlify shall detect that our functions are stored in the corresponding directory and your voice assistant should be live at the site URL.

After you make any changes to your application, commit your changes, and push them to GitHub, your application will be redeployed automatically.
At the end of this activity, you have deployed a web application with a decoupled, serverless architecture to the cloud and set up continuous deployment.
Micro-challenge
Complete by deploying your voice assistant and add a link to your Netlify site in the comments below.
Summary
You just built a voice assistant that was able to return random responses to a specified set of keywords. Amazing right? You can now go ahead, do further research and develop a basic voice assistant that can do whatever you want it to. You can add a new keyword and return the current weather, for instance. The code for the activities mentioned in the article can be found in the companion repository on GitHub.
Kudos to you on completing this Learning Byte! We know it might have taken longer than usual, but we believe you learned something by doing it! Don't forget to let us know about your creation.