Do your first app server backend deployment in AWS!
Objective
Background
Cloud
Buzz word that everyone uses, but is a very simple concept. In very simple terms,
-
Cloud is a bunch of hardware resources like storage or compute that someone maintains for you.
-
Eg: Apple maintains your photos in iCloud instead of your harddisk, AWS provides you with a server (think desktop computer) to host your website instead of doing it from a machine at your house.
AWS
Amazon Web Services (AWS) is one of the most popular cloud service providers out in the market. They provide different kinds of services for companies and individuals.
Some of the popular offerings from AWS are:
-
Virtual machines (EC2)
- VM - in simple terms, computers with some configuration; eg: 2cpu, 16GB RAM, 20 GB hard disk
-
Storage (S3)
-
Load Balancers (ELB)
You’ll be using AWS EC2 virtual machines in this Byte.
Docker
Docker is a containerization technology - you can think of them as tiny VMs. You don’t have to know the details of docker for this Byte. But feel free to dig deeper if you are curious - find our bytes Docker-1(https://learn.crio.do/home/me/ME_DOCKER1) and Docker-2(https://learn.crio.do/home/me/ME_DOCKER2)
Primary goals
-
Launch your first virtual server in AWS
-
Deploy the app backend server
-
Connect mobile app to the app backend server
Note
This Byte has to be done locally on your machine. Crio workspace is not provided for AWS Byte.
Objective
Do your first app server backend deployment in AWS!
Background
Cloud
Buzz word that everyone uses, but is a very simple concept. In very simple terms,
-
Cloud is a bunch of hardware resources like storage or compute that someone maintains for you.
-
Eg: Apple maintains your photos in iCloud instead of your harddisk, AWS provides you with a server (think desktop computer) to host your website instead of doing it from a machine at your house.
AWS
Amazon Web Services (AWS) is one of the most popular cloud service providers out in the market. They provide different kinds of services for companies and individuals.
Some of the popular offerings from AWS are:
-
Virtual machines (EC2)
- VM - in simple terms, computers with some configuration; eg: 2cpu, 16GB RAM, 20 GB hard disk
-
Storage (S3)
-
Load Balancers (ELB)
You’ll be using AWS EC2 virtual machines in this Byte.
Docker
Docker is a containerization technology - you can think of them as tiny VMs. You don’t have to know the details of docker for this Byte. But feel free to dig deeper if you are curious - find our bytes Docker-1(https://learn.crio.do/home/me/ME_DOCKER1) and Docker-2(https://learn.crio.do/home/me/ME_DOCKER2)
Primary goals
-
Launch your first virtual server in AWS
-
Deploy the app backend server
-
Connect mobile app to the app backend server
Note
This Byte has to be done locally on your machine. Crio workspace is not provided for AWS Byte.
Create an AWS account
Create a new account in the AWS console (https://aws.amazon.com/console/) with the steps given there. You need a Debit/Credit card to create the account.
In case you already have an existing AWS account, we strongly suggest you make a new one to avoid you exceeding free tier limits and being charged with a hefty bill.
Note: It’s free of cost, an initial 2 INR deduction will be there for first timers which will be refunded as soon as the account is verified.
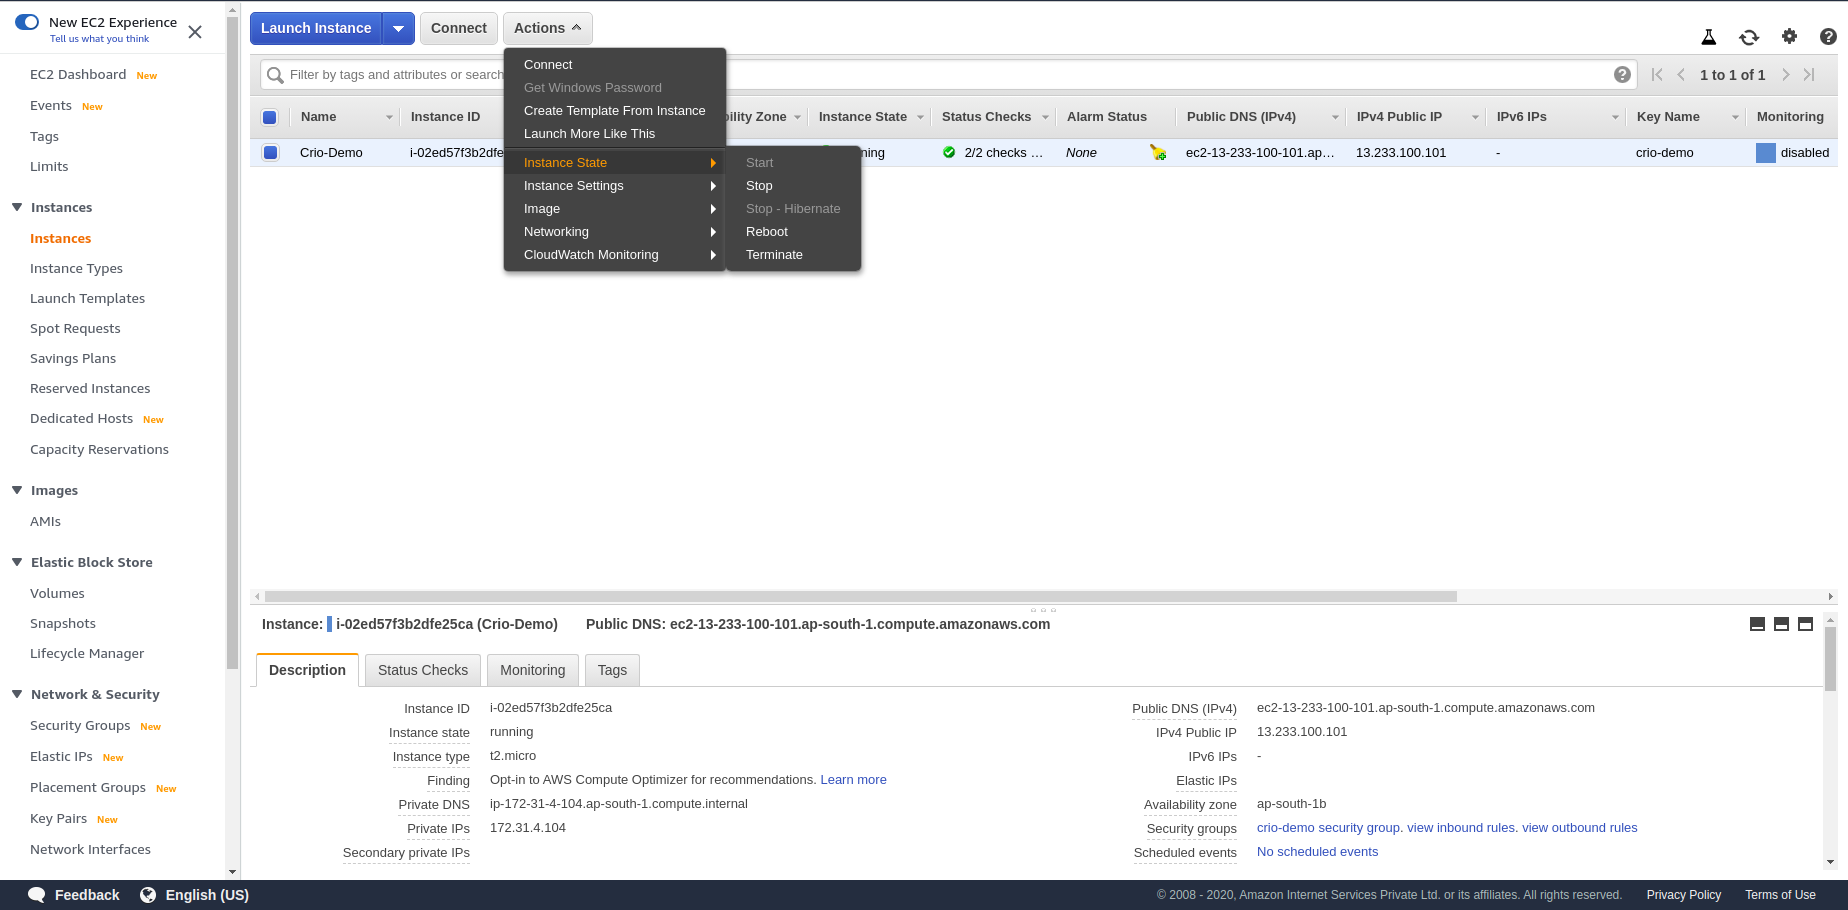
After logging in to the AWS console, you will see a dashboard like this -
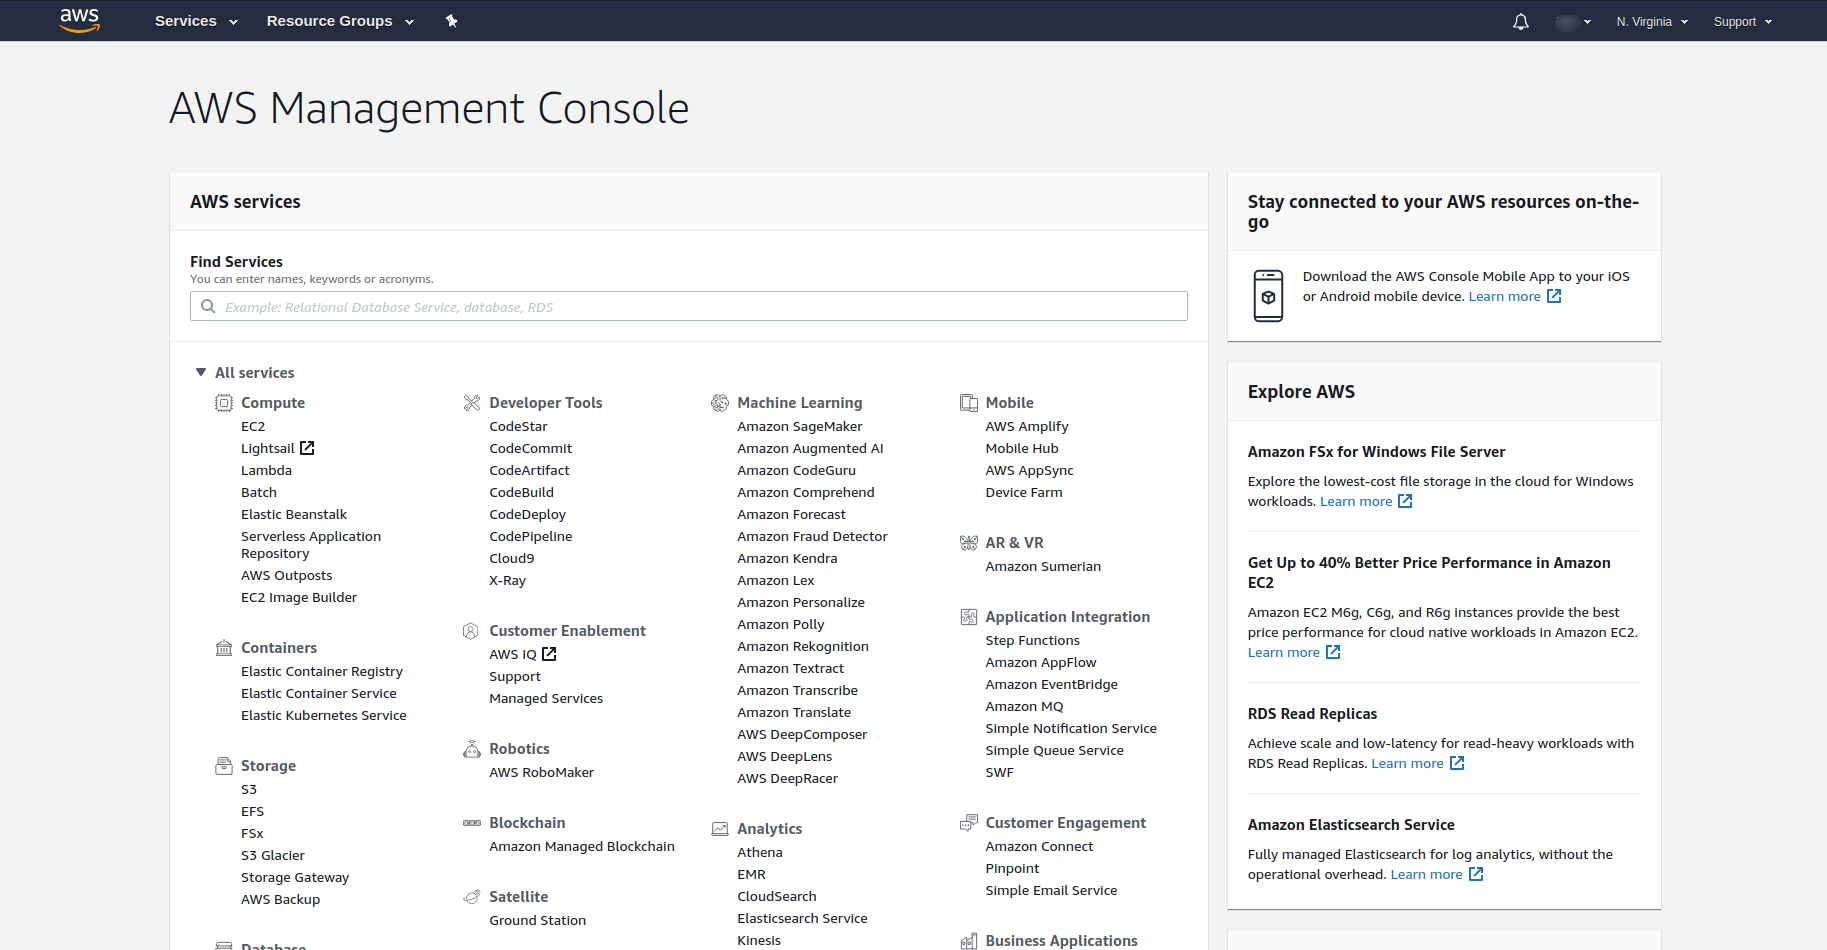
AWS Console post Sign-up
Do not feel overwhelmed - most of it is very use-case specific and not something we have to bother about.
Note
This Byte has to be done locally on your machine. Crio workspace is not provided for AWS Byte.
Create an EC2 instance
Elastic Compute Cloud (EC2) is the IaaS(Infrastructure as a Service) offering from AWS - you can rent out servers with customizable memory, storage and bandwidth. These servers can then be used for purposes hosting your applications, which is exactly what we’re going to do.
Step 1. Click on the search bar. Search for EC2. After clicking you will see a EC2 dashboard. Click on the launch instance button.

Step 2. Select Ubuntu 18 64 bit (x86). - this reflects the OS configuration of the server you’d be renting. Note: that if you select any other distribution, the instructions/user-name to login etc will be different.

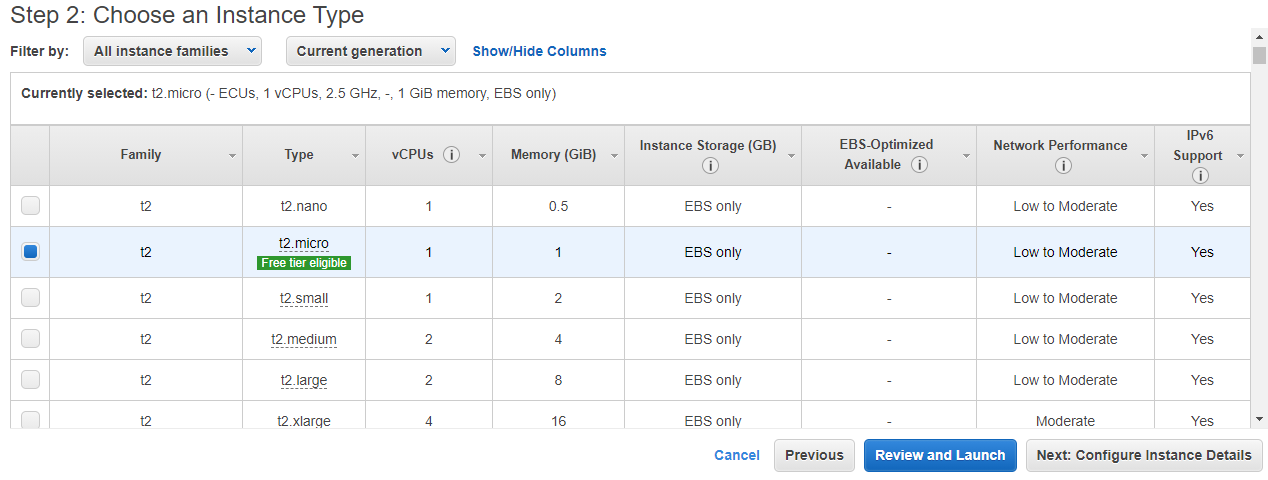
Step 3. Click on t2 micro (Free Tier) with 1 GiB memory. This reflects the storage setting. Make sure you select the free one - you’ll be charged otherwise. Click Next Configure Instance Details.
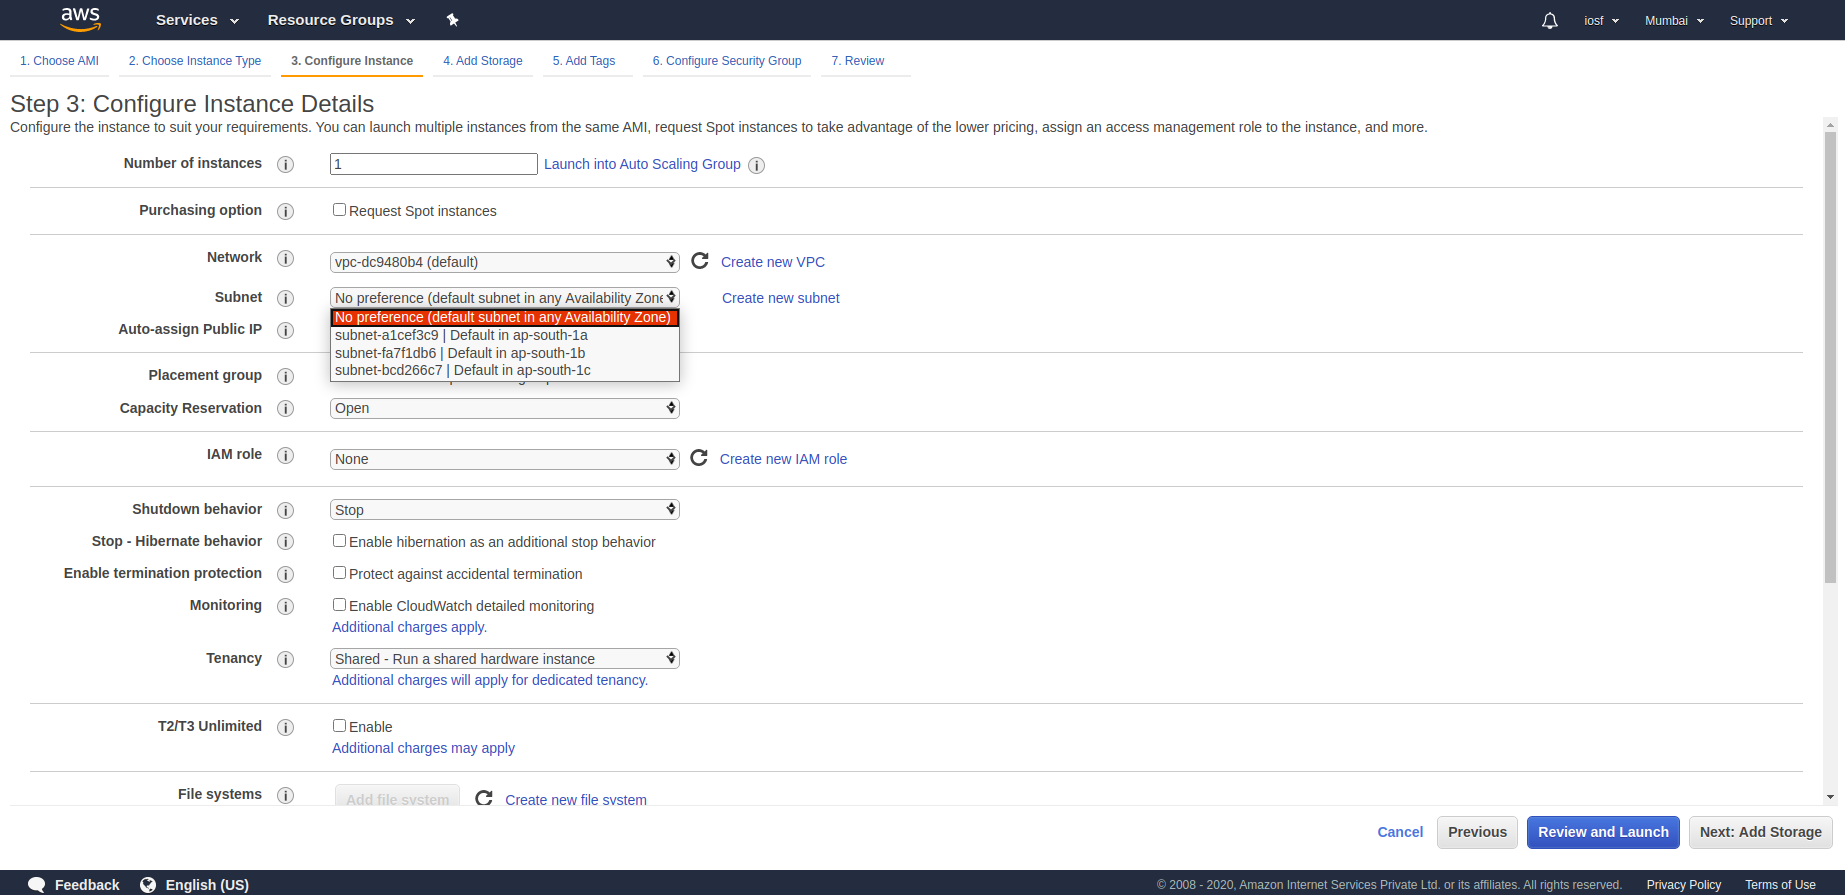
Step 4. Choose the number of instances as 1 and click default subnet in any available zone. Move to the next step, Click on Add storage.
Step 5. Leave this at default. Click on Add tags.

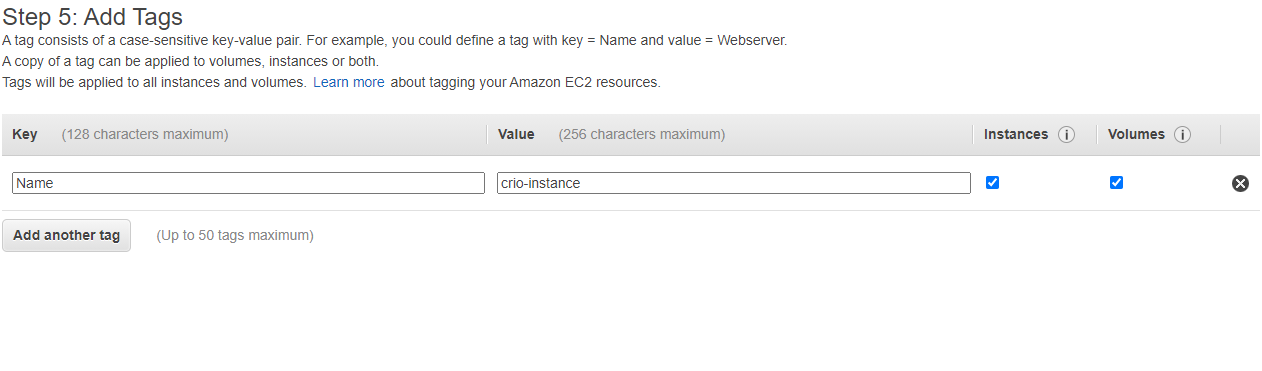
Step 6. Write Name in the Key and write anything in the value and that value will be your Instance name. Click on configure security group.
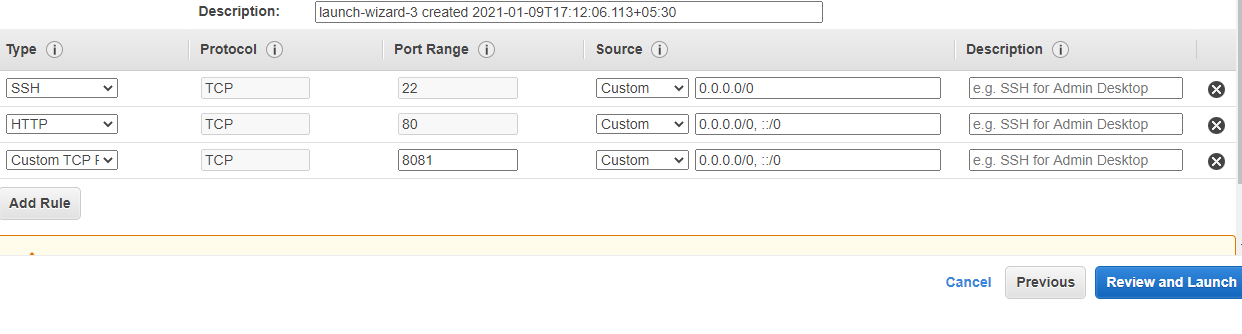
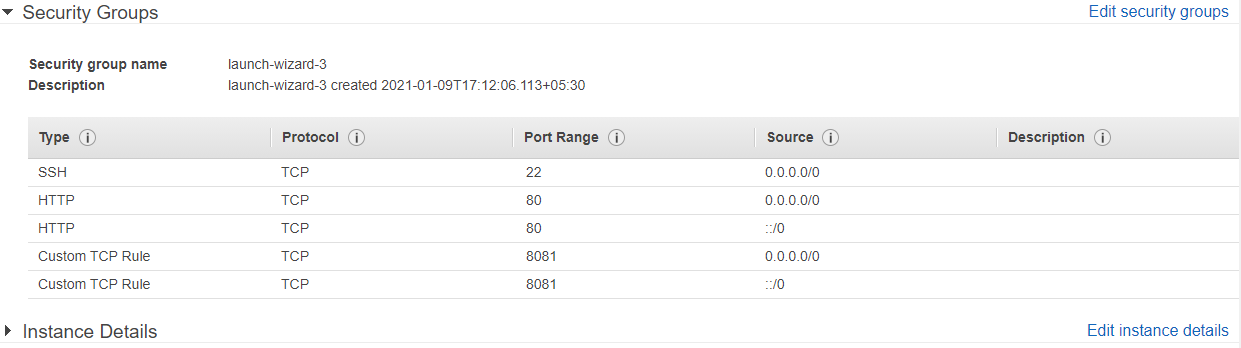
Step 7. There should be three open ports, with the configurations as shown - Confirm that you fill them exactly like they’re given here
Click on review and launch. You should see something like this
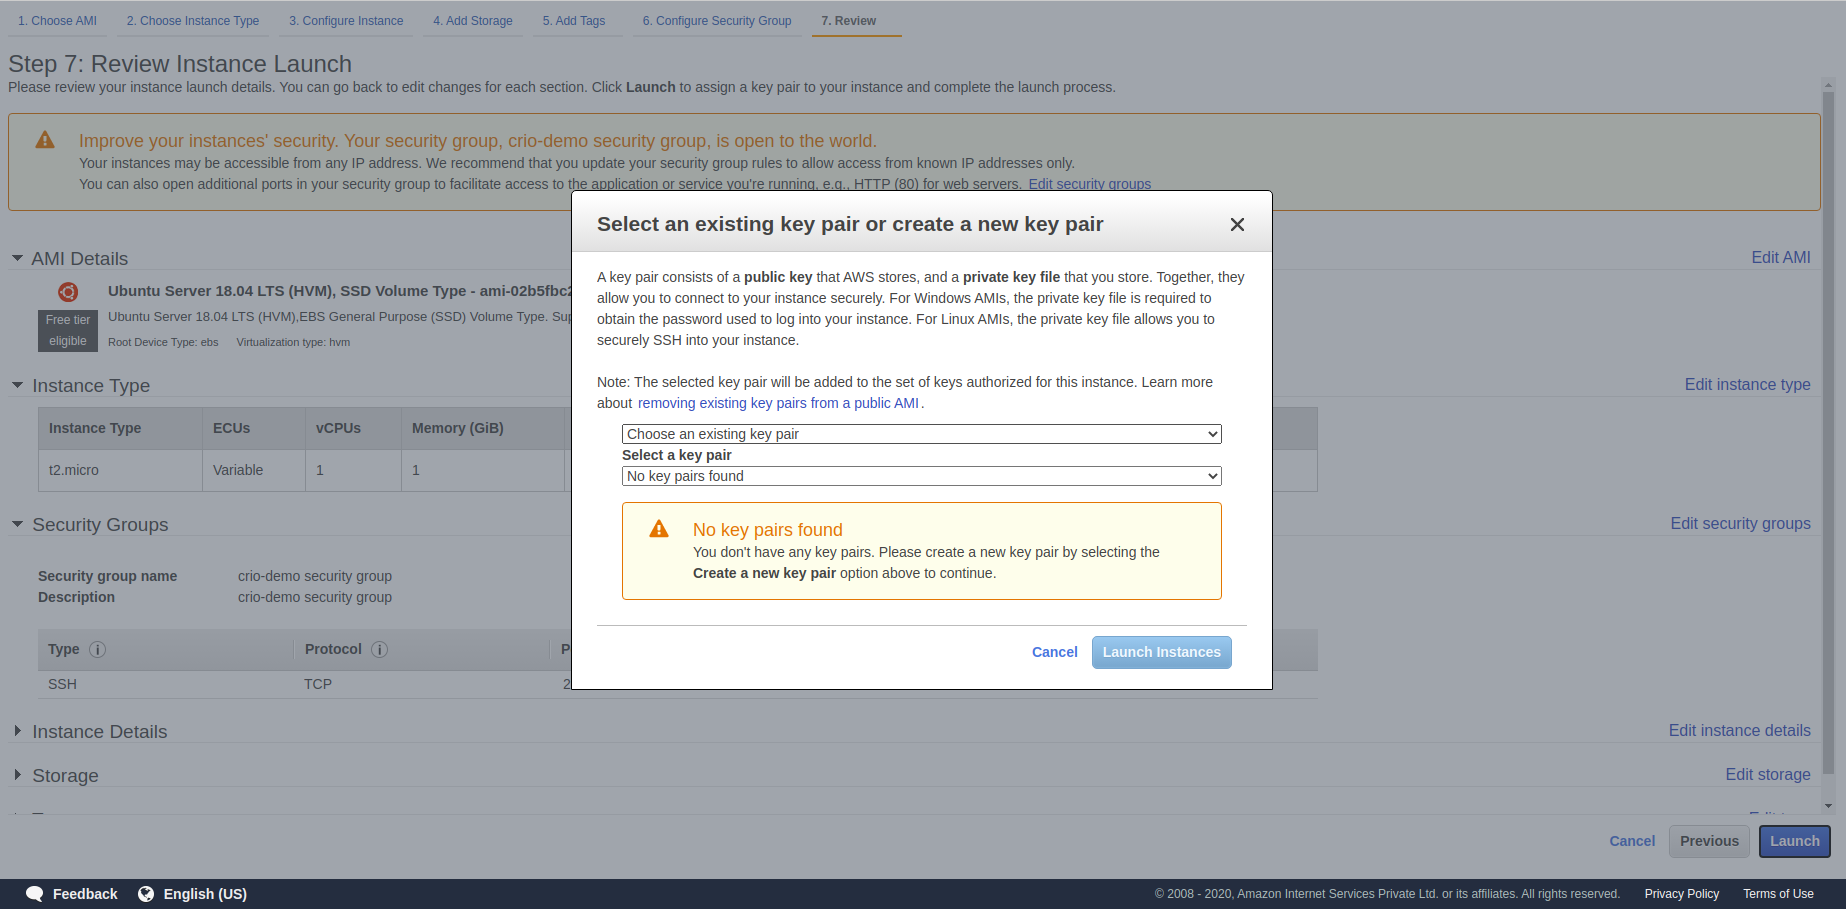
Step 8. Click on Create a new key pair. Give a key-pair name, download it in a place you’d remember. The PEM(Privacy Enhanced Mail) file is your credentials for you to be able to access your instance.
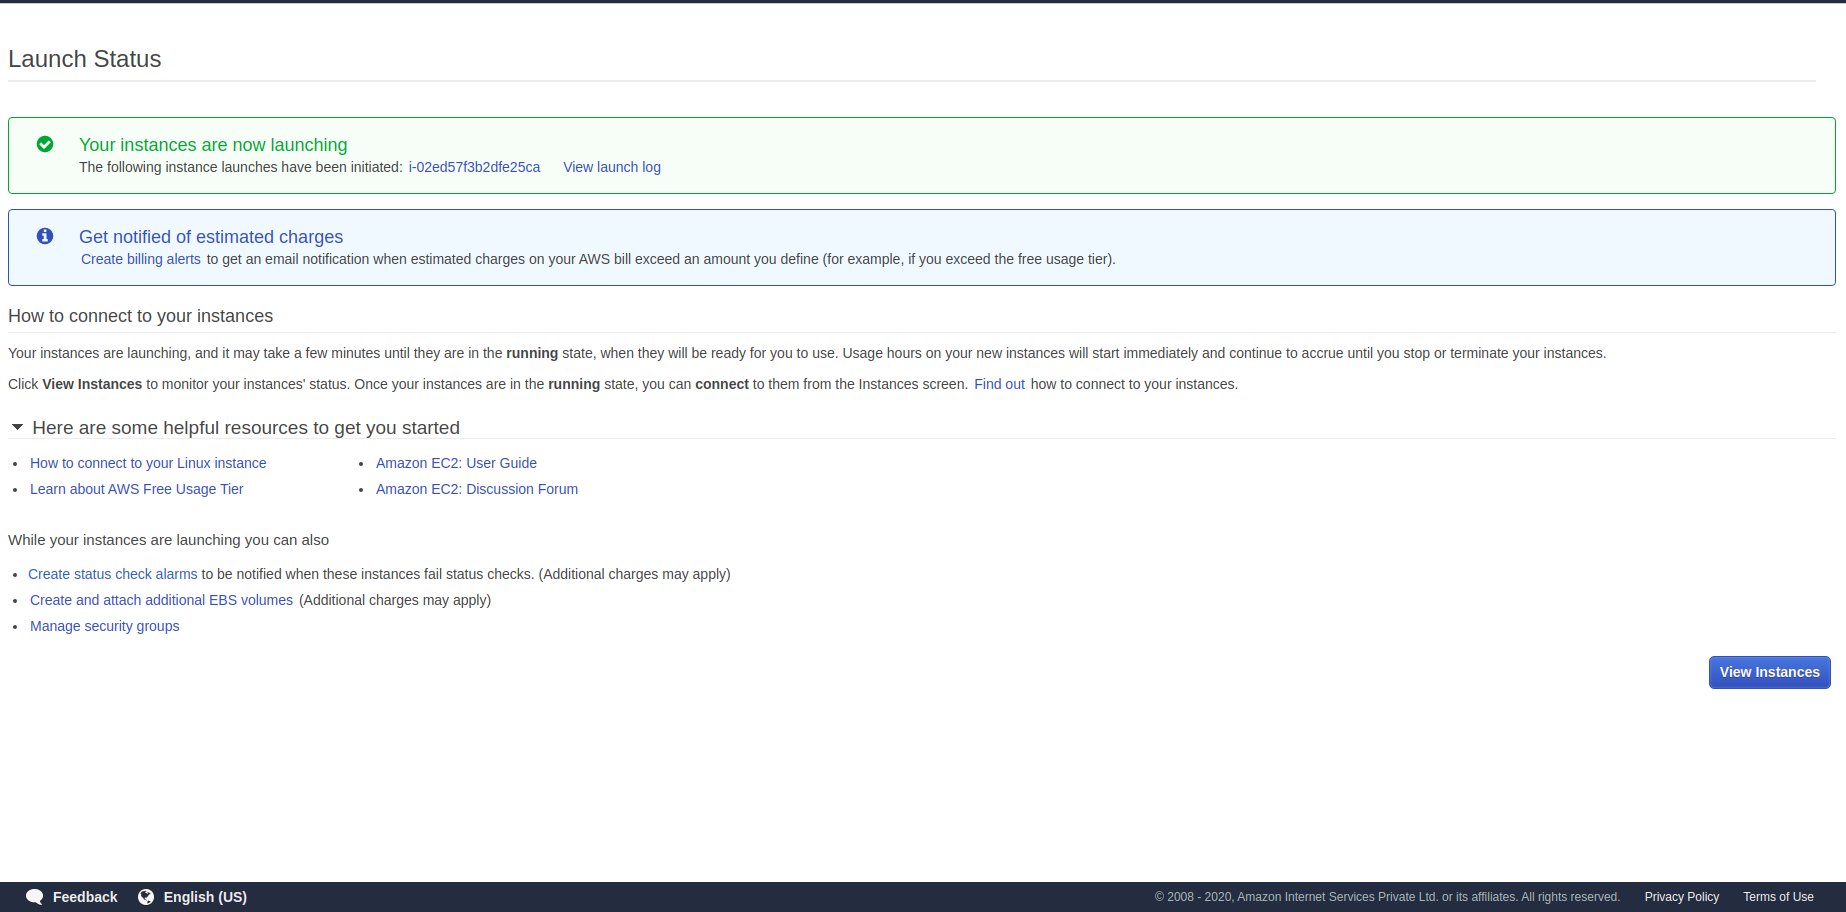
After that click on launch and wait for a few minutes to launch our instance.
Step 9. After launching, you will see a screen like this. Click on View Instances to go to the Instances window.
Step 10. If you want to stop/terminate/reboot your instance, you can do it anytime from the console.
Note
Never forget to stop your instance when you’re going off, to avoid unexpected costs. You can always restart it.
Curious Cats
-
Explore the different categories of EC2 instances, about what they offer - this will help you when you aim to deploy an application commercially.
-
In the Step 3 above, you must have seen ‘EBS only’ in the Instance Storage column. Check out what EBS is.
References
SSH into your instance
(For Windows users only, before we go ahead, we need PuTTY - a terminal program to be able to SSH. Setup PuTTY from here - https://www.putty.org/)
SSH(Secure Socket Shell) is a network protocol that allows you to sign in to your servers from a remote computer. You might have seen SSH referred to on GitHub - "Clone using HTTPS or SSH". Here, we use SSH to securely log in to the server, using the pem file we have.
# Usually downloads go to ~/Downloads/


chmod 400 <path-to-your-pem-file>

ssh -i "crio-demo.pem" ubuntu@<your-ec2-url>


# Example

ssh -i "~/Downloads/crio-demo.pem" ubuntu@ec2-13-233-100-101.ap-south-1.compute.amazonaws.com
Note that you can either write the absolute path to the pem file, or cd to the folder where the pem file lives. You’ll find your EC2 URL under the heading ‘Public IPv4 DNS’
If successful, you’ll now be logged on to your server - one that’s sitting a few thousand miles away - sweet, eh?
Deploying app backend server
You will be deploying the app backend for QEats app - which is a Swiggy/UberEats like food-ordering app. Once you start the backend server, you can connect to it from your app anywhere in the world and have some fun.
- Installing Docker
APT is a packet manager in Linux. The following instructions are similar to installing an EXE file in windows or an app in Android.
Type the following instructions the AWS instance terminal -
sudo apt-get update

sudo apt-get install wget

wget -qO- https://get.docker.com/ | sh

sudo usermod -aG docker $USER

sudo service docker start

newgrp docker
- Install telnet
sudo apt install -y telnet
- Run the docker container for QEats app server.
You are exposing your server on port 8081 - so make sure your firewall rules allow incoming
connections on this port.
sudo docker run -d -m 800m -v /var/log:/var/log:rw -p 8081:8081 criodo/qeats-server
The moment you run the above command, you will start seeing something like:
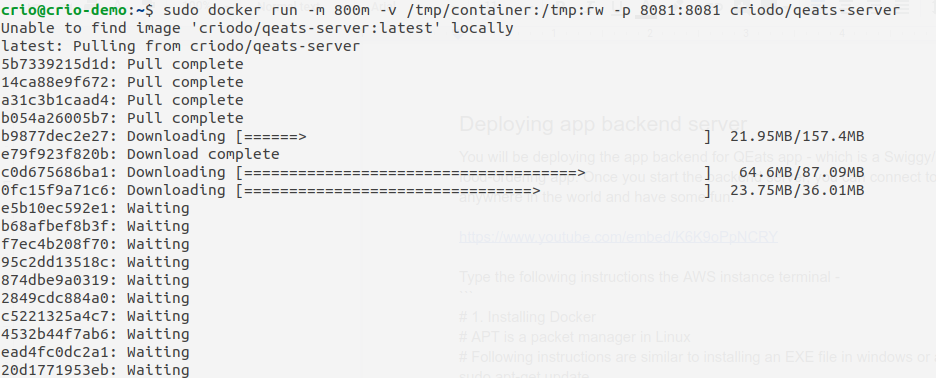
It will take a few minutes as it is downloading all the necessary images from Docker Hub - a public repository of docker images. Think of Docker Hub as an App store for docker images. For the purposes of this Byte, you don’t have to understand all the docker instructions, but feel free to refer to the reference material if you like to learn more :)
Once download finishes, your server will start serving data on port 8081!
- When you go to the next milestone and try connecting your app to this server, or when your friend connects to this server, you can always check the logs on your server with the following commands.
# If you want to see the logs as they come in;

tail -f /var/log/qeats-server.log


# (or) Just print the logs

cat /var/log/qeats-server.log
Checkpoint
Type telnet localhost 8081 from the same AWS instance and you should see the following output if everything worked fine -
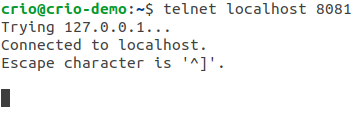
You can press Ctrl + ] and then type quit to return back to terminal.
If there are any issues in starting your server, you will see this:

In that case, you might have to retry the instructions.
To logout of the server, type
logout
References
Curious Cats
-
Telnet sounds something out of a Terminator movie, no? Find out what it is here.
-
What is the difference between stopping and terminating an instance?
-
Checkout what
sudoandwgetmean.
Connect the QEats Android app with your server
Download the QEats Android App (APK) https://bit.ly/qeats-app-crio onto your phone and install it. If you don’t have an Android phone, you can use an online Android emulator as shown in the next section.
The login screen of the QEats app looks like this.
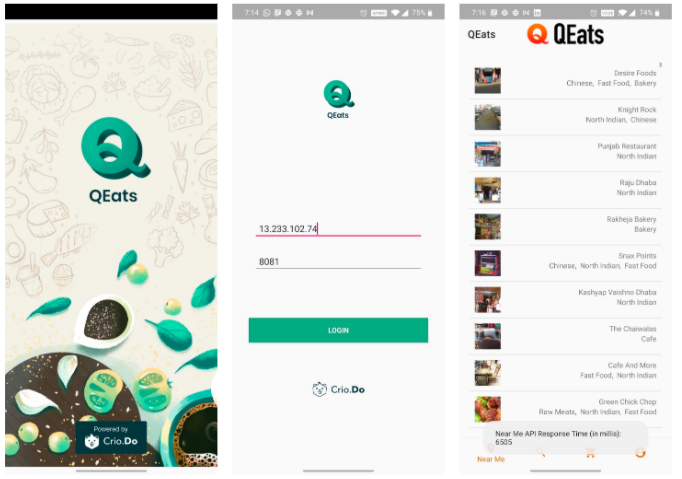
Enter the following details to connect to the QEats backend server:
-
IP Address: AWS instance public ip
-
Port number: 8081
You will start seeing restaurants - you can start playing around with search, placing orders etc from the app.
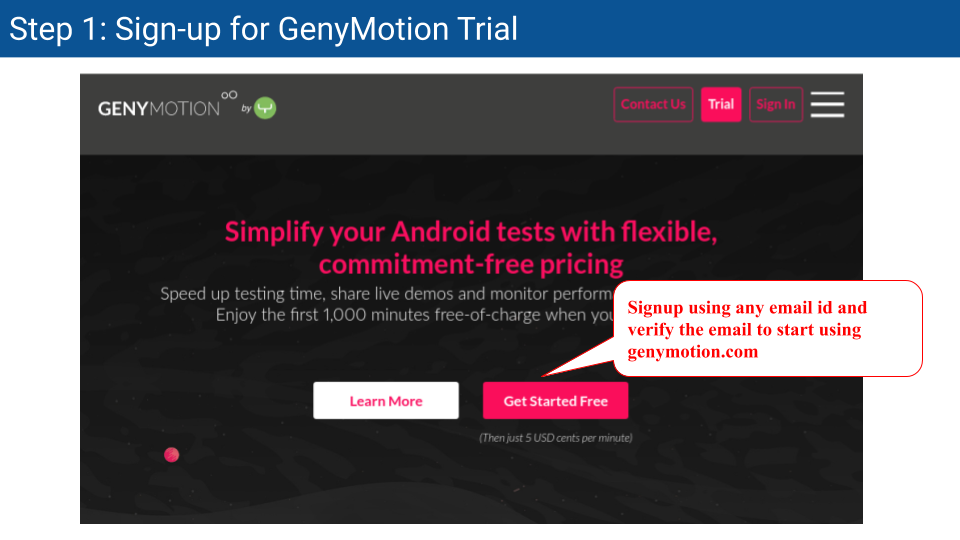
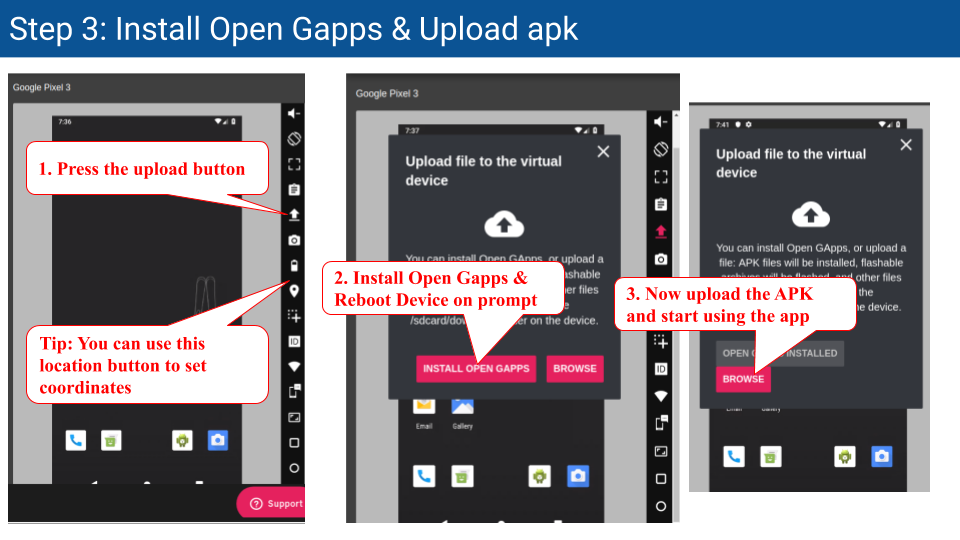
Running QEats app on Emulator

Takeaways
You have successfully deployed your first app server on AWS EC2 instance using Docker.
Congratulations! You can ask your friends to install the QEats app from this link and connect with your server. Boast away!
Note
Make sure to terminate the instance once you play around with it!
Curious Cats
- Mattermost is a Slack / Microsoft Teams like application - do you want to try hosting it yourself? Try it out with your new found power - https://docs.mattermost.com/install/docker-local-machine.html#ubuntu
Once you host it on the server, you can connect to it through browser and Android / iOS apps available in Playstore. Note that you may have to change firewall settings to allow port 8065
Interview Corner
-
What is EC2?
-
What is an AMI(Amazon Machine Image)?
-
What are some different types of instances that AWS offers? What do they differ in?
-
How do you connect to a remote machine?
-
What is SSH?
-
What is Docker?
Next Steps
Was deploying the app server for QEats fun?
How about building the app server all by yourself :)
Try out the Java Backend Developer experience - https://crio.do/backend-developer-experience