Get started using Chrome Developer Tools
Objective
Background/Recap
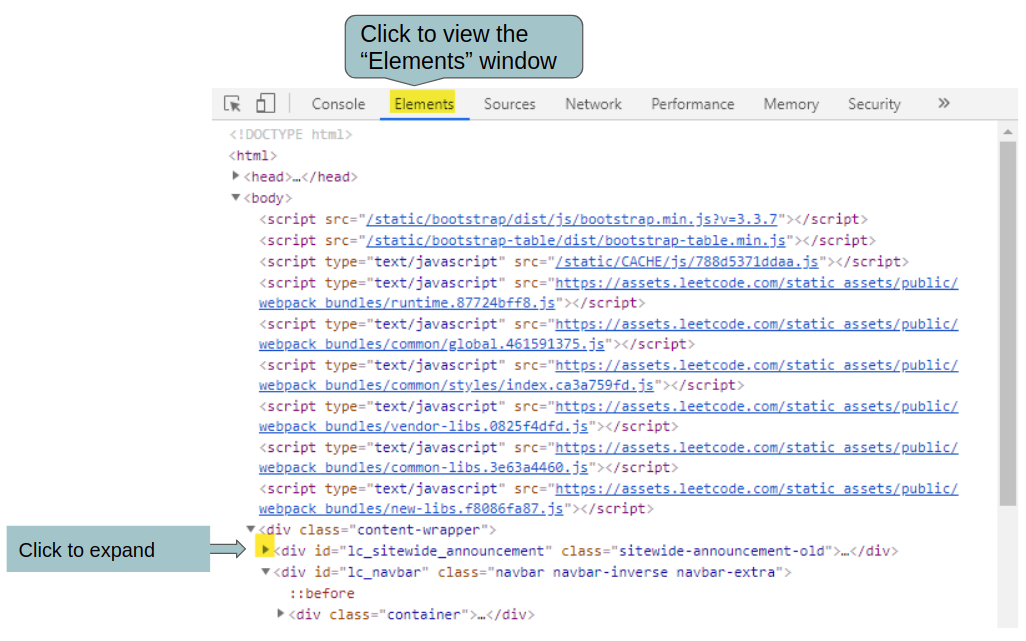
The Chrome browser provides a tool to help developers easily perform tasks like inspecting web page content, analysing HTTP requests made and checking data stored locally by web pages. Using these tools is an important skill for web developers. Refer to the image below which has the Chrome Developer Tools open and shows the elements of the web page.
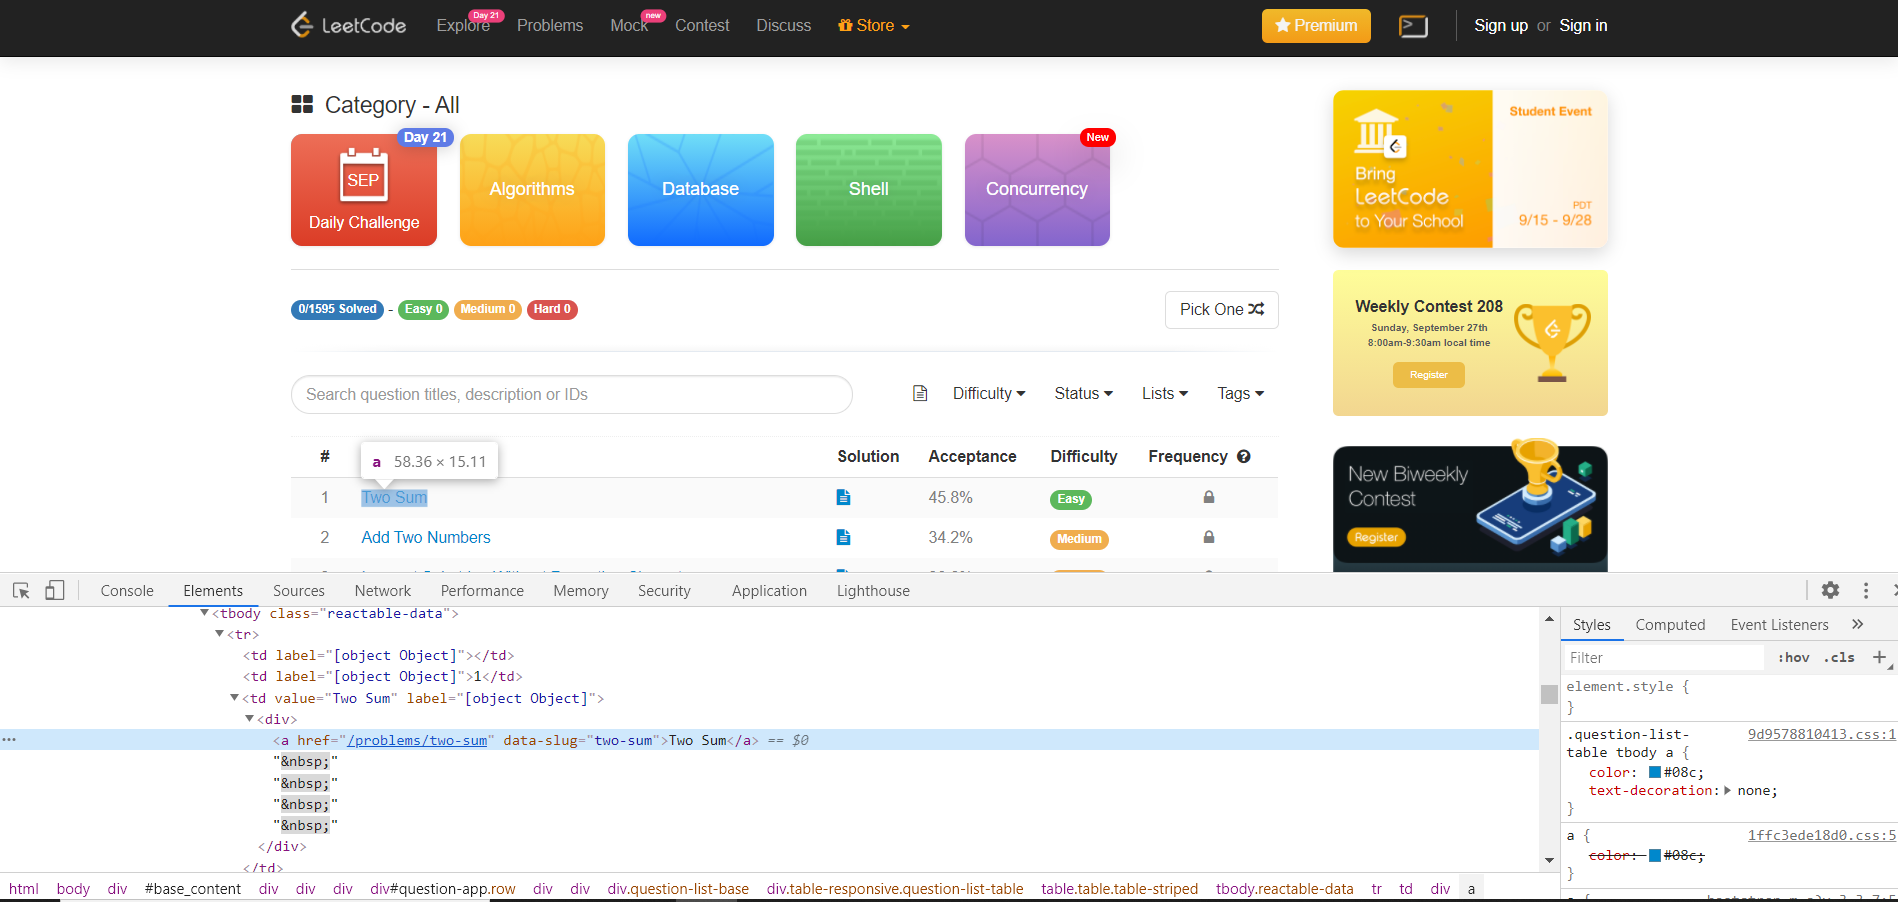
Using Chrome developer tools to inspect website HTML
Primary goals
-
Use Chrome Developer Tools to find the Leetcode site’s API endpoint which fetches all problems
-
Use Chrome Developer Tools to inspect and modify HTML content
Objective
Get started using Chrome Developer Tools
Background/Recap
The Chrome browser provides a tool to help developers easily perform tasks like inspecting web page content, analysing HTTP requests made and checking data stored locally by web pages. Using these tools is an important skill for web developers. Refer to the image below which has the Chrome Developer Tools open and shows the elements of the web page.
Using Chrome developer tools to inspect website HTML
Primary goals
-
Use Chrome Developer Tools to find the Leetcode site’s API endpoint which fetches all problems
-
Use Chrome Developer Tools to inspect and modify HTML content
Open a new terminal in your Crio Workspace
To open a new terminal, click on the menu > View > Terminal. The menu button is on the top-left (three horizontal bars).

Fetch the source files
Copy all the commands in the code-block below and paste them in the Workspace terminal window.
# Go to the bytes directory

mkdir -p ~/workspace/bytes

cd ~/workspace/bytes


# Clone the repository for this Byte.

git clone git@gitlab.crio.do:COHORT_ME_DEVELOPER_TOOLS_ENROLL_1601458110319/criotest003-ME_DEVELOPER_TOOLS.git


# Go into the cloned repo directory.

cd ~/workspace/bytes/criotest003-ME_DEVELOPER_TOOLS/


# Setup the remote repository and pull the code stubs for this Byte.

git remote add ME_DEVELOPER_TOOLS_MODULE_ONE_STUB git@gitlab.crio.do:ME_DEVELOPER_TOOLS_STUBS/ME_DEVELOPER_TOOLS_MODULE_ONE_STUB.git


git pull ME_DEVELOPER_TOOLS_MODULE_ONE_STUB master --allow-unrelated-histories --no-edit
Open the source files in the IDE
-
Now that you have fetched all the required source files, you can open them in the online IDE by following these steps: Click on the
Open Folderbutton. -
Select the following folder
/home/crio-user/workspace/bytes/criotest003-ME_DEVELOPER_TOOLS/and Click onOK.
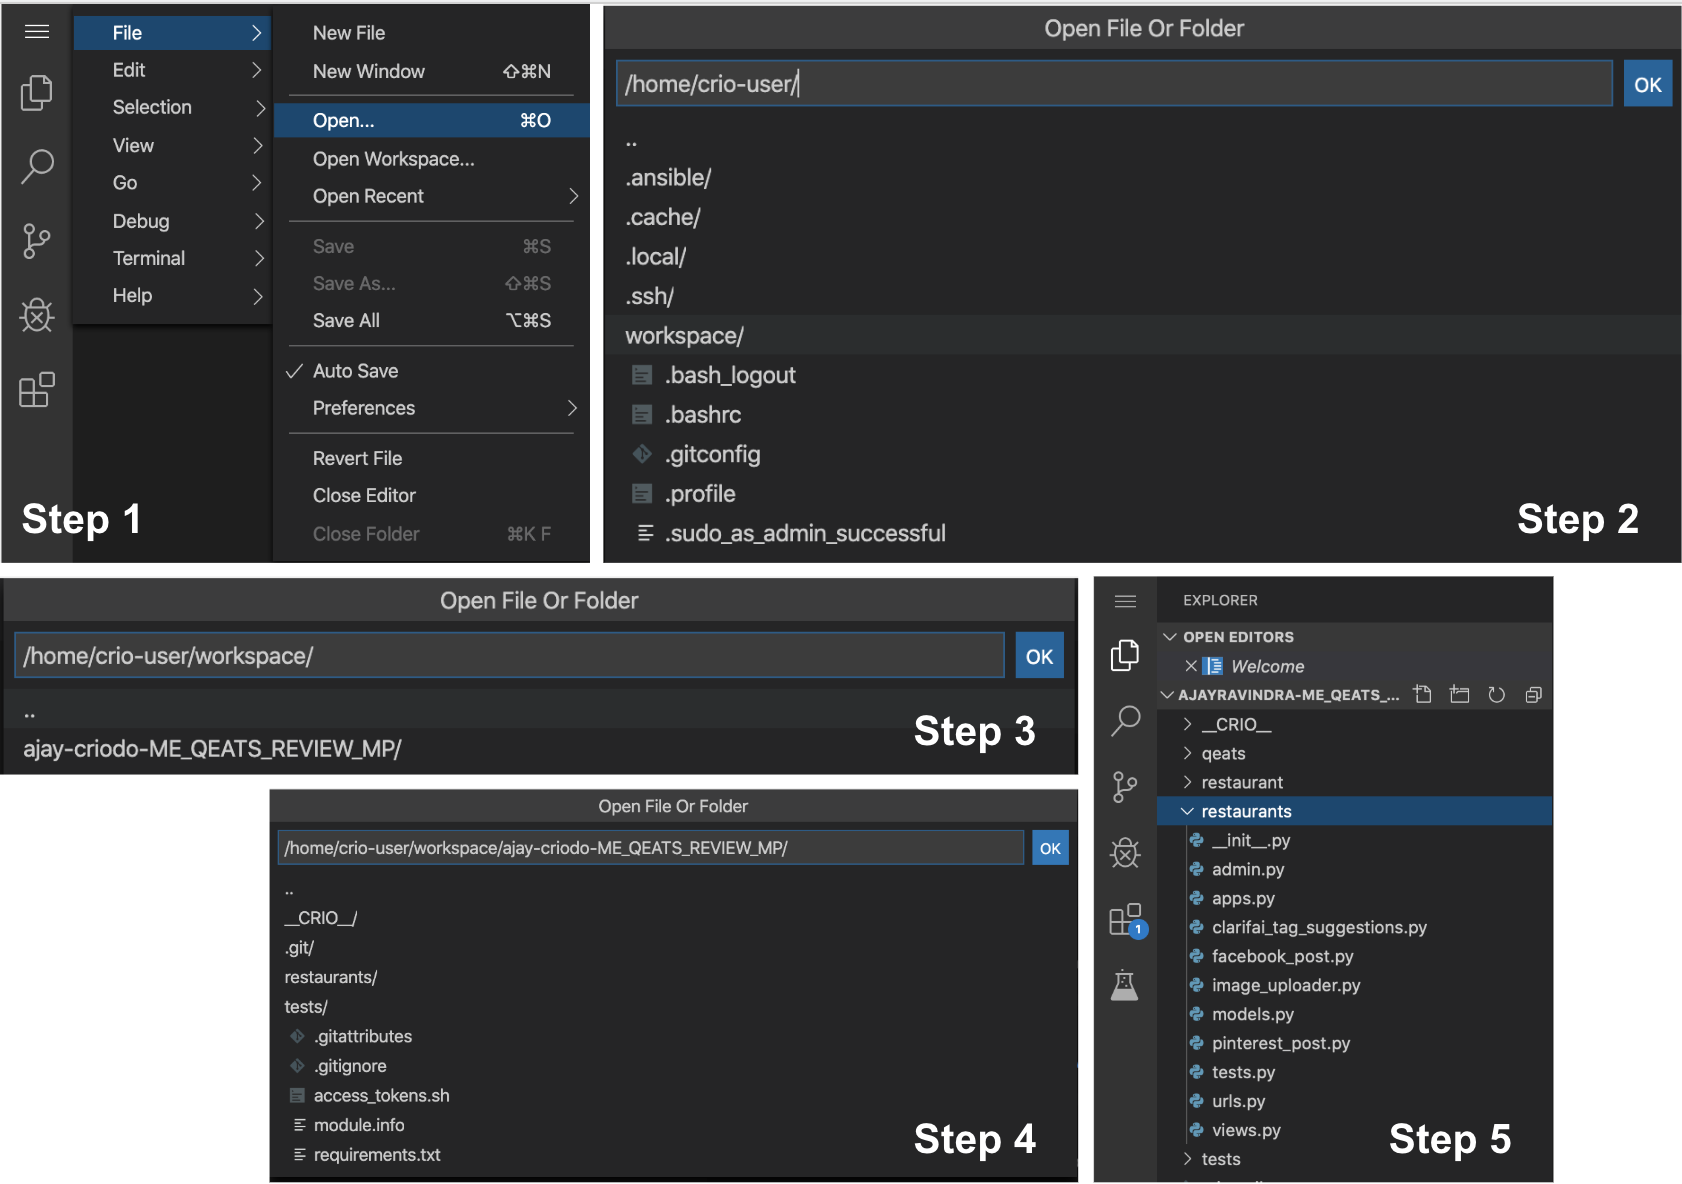
Note
Please use the image above for illustration purposes only. The actual Byte name and the corresponding folder names might be different.
Install dependencies
- Execute
npm installto install the project dependencies. This might take a couple of minutes.
cd ~/workspace/bytes/criotest003-ME_DEVELOPER_TOOLS/

npm install
- Execute
npm run mainRunnerto run the contents of themain()method in leetcode.js. You’ll find a similar output if installation was correct.
crio-user@criotest003:~/workspace/bytes/criotest003-ME_DEVELOPER_TOOLS$ npm run mainRunner


> byte@1.0.0 mainRunner /home/crio-user/workspace/bytes/criotest003-ME_DEVELOPER_TOOLS

> node -e 'require("./leetcode.js").main()'


Running main

crio-user@criotest003:~/workspace/bytes/criotest003-ME_DEVELOPER_TOOLS$
Setup is complete
You can now proceed to the next task.
Note
Going forward, If you notice any slowness, please use the following keyboard combination to refresh your browser
CTRL+SHIFT+R
References
Loading a Web Page
Loading a webpage involves a number of Requests and Responses between the browser and the server. Any external CSS or JavaScript file and images that the webpage requires are fetched using separate HTTP requests.
<!-- File: index.html →


<!DOCTYPE html>

<html lang="en">


<head>

    <link rel="stylesheet" href="styles.css">

    <title>Learning By Doing!</title>

</head>


<body>

	Crio.Do

	<img src="crio_beaver.jpg">

</body>


<script src="script.js"></script>


</html>
An HTTP request for the above index.html page will result in at least 3 other HTTP requests which are for fetching
-
styles.css
-
crio_beaver.jpg
-
script.js
As these requests may in turn result in new requests (eg: calling some API from script.js), the number of additional requests can be 3 or more.
Chrome Developer Tools
An API endpoint is the URL used to request for a particular data or resource. Visit https://leetcode.com/problemset/all/, you’ll find a table listing problems. As there are a large number of problems listed, it’s highly unlikely these are hardcoded to the HTML and rather fetched via an API call. Let’s find out the API endpoint that needs to be used to retrieve all the problems on this page. It can be done by checking the HTTP requests made when we load this webpage.
Chrome Developer Tools (DevTools) can help us see all the HTTP requests and responses made to load the webpage. One of the requests would be an API call to retrieve all the problems.
TODO -
-
Visit www.google.com on your Chrome browser
-
Right-click and select Inspect to open DevTools (or hit
Ctrl + Shift + Iif you prefer shortcuts) -
The Network tab lists the HTTP requests made. Goto the Network tab - Yes, by clicking on it! (See below screenshot)
-
Only the HTTP requests made after opening the Network tab will be shown. Refresh the browser tab and you’ll see the Network tab get populated with the HTTP requests.
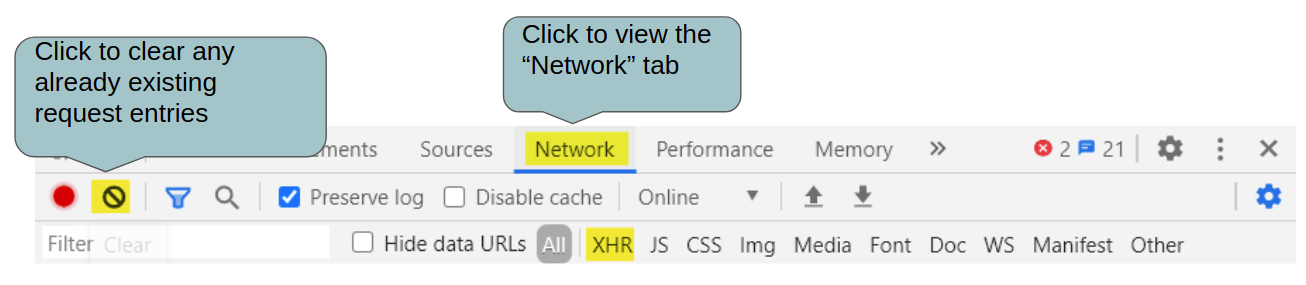
You can clear the existing requests displayed by clicking on the clear button (button on the right of the red circle).
Note: Ensure you don’t have the below fields selected

To fetch data from an API endpoint without refreshing the webpage, XMLHttpRequest (XHR) is used. It enables the webpage to update a part of it without disrupting the overall view for the user.
TODO -
-
Visit https://leetcode.com/problemset/all/ with the DevTools open.
-
Do you see the large number of HTTP requests being made?
-
Filter the XHR requests (Click on "XHR" in one of the bars, as shown below)
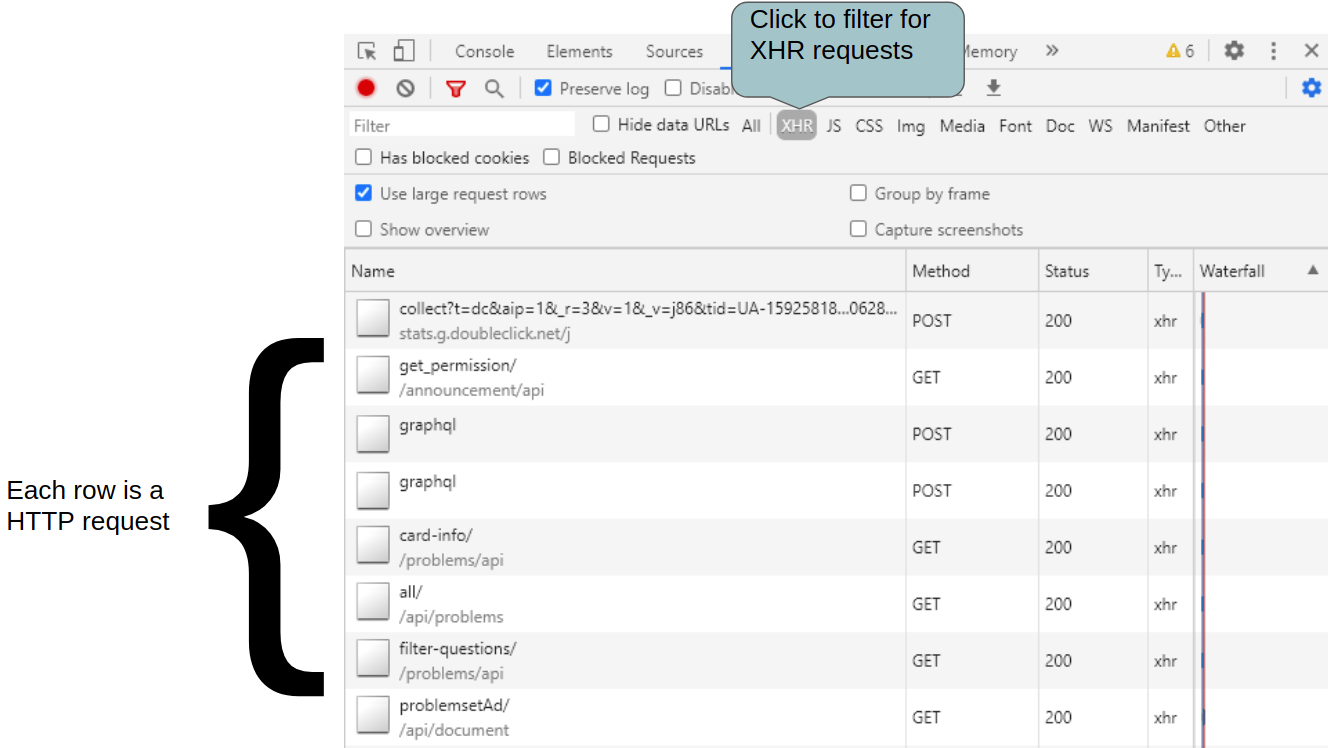
You’ll now be able to see a quick overview of all the XHR requests made when the page was loaded. It can include the HTTP request method (eg: GET, POST), HTTP response status code (eg: 200) and the type of request which will be XHR, since we’ve filtered for it. Do any of the request names look like they were used to fetch all the problems?
TODO -
-
Click on the all/ request on the left, to open up its details on the right. You’ll see the Headers section displayed on the panel that opened. This panel shows both the Request and the Response.
-
Can you figure out the API endpoint used for this request?
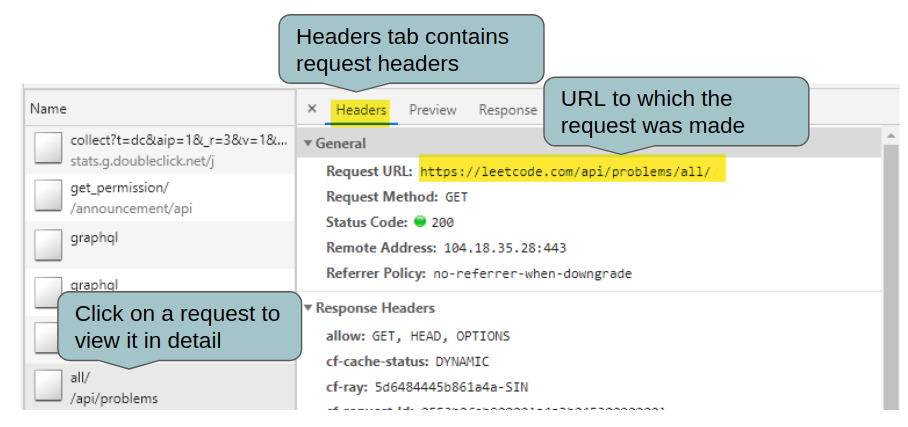
The API endpoint (or the HTTP request URL) is https://leetcode.com/api/problems/all/. You’ll notice that this is different from the overall webpage URL - https://leetcode.com/problemset/all/. Try opening the API endpoint directly in your browser. Do you see a webpage?
The data returned in the response is in JSON format.
JavaScript Object Notation (JSON) is a commonly used format to transfer data between computers. JSON is a human readable format with key-value pairs.
Example:
{

    "symbol": "AAPL",

    "quantity": 100,

    "purchaseDate": "2019-01-02"

}
Here, we have three keys: symbol, quantity, purchaseDate and their corresponding values. The keys have to be a String whereas values come from a much wider pool of objects like String, Integer, Boolean, Array, or even another JSON nesting.
Let’s ensure this is the correct endpoint by checking the response.
TODO -
-
Click Preview on top of the panel to view the API response, you’ll see the JSON response
-
What do you think? Did we select the correct API call? (You can double-click on keys with values like an Array or a JSON nesting to expand it)
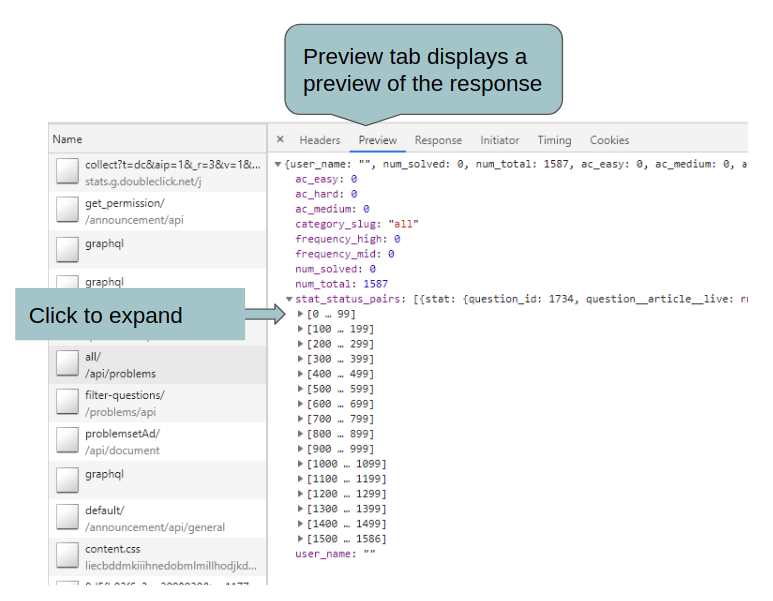
You’ll be able to see there are lines numbered for 0-1586. Each of these could be representing one question on leetcode.
TODO -
-
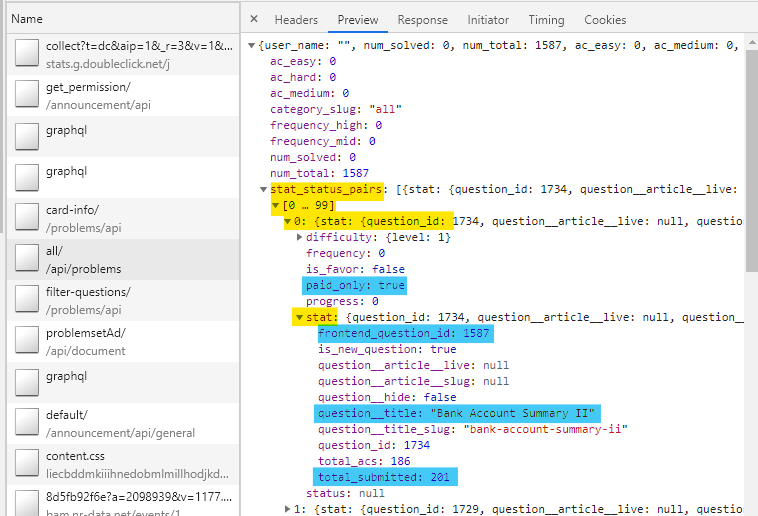
Expand the keys to find the value for the 0th entry
-
Can you find out if the question is available for only paid users?
-
What is the question id for this problem and it’s title? What about the total number of submissions?
-
The
paid_onlykey is a boolean referring to the problem being accessible to a paid user or all users. -
frontend_question_idkey is part of the value for thestatkey. This can also be referred to asstat.frontend_question_id. It’s value gives the question id of the problem. -
stat.question_titlegives the display title for the problem -
stat.total_submittedgives the total number of user submissions for this problem
TODO -
- Visit the API endpoint directly from a new tab to see the response key-value pairs in its actual form. (A Chrome extension like JSONView helps to pretty-print the JSON value)
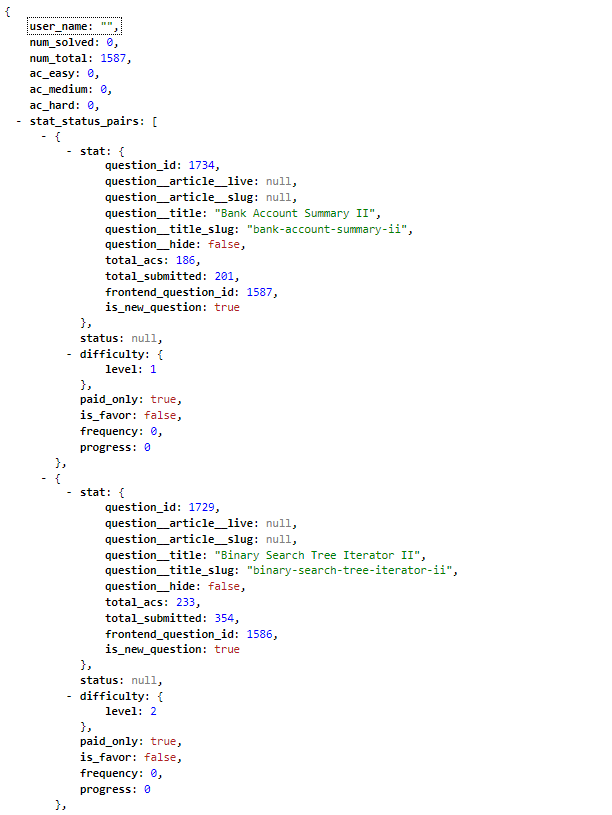
-
Do you have any ideas about how we could programmatically get the question attributes like id, title, total submissions etc., for each of the questions?
-
You’ll see that the
stat_status_pairskey has as its value, a list of JSON objects, one for each question. This list was wrapped in Developer Tools Preview to groups of 100 (0-99, 100-199) for ease of viewing. -
We can programmatically loop through this list to find the values for attributes like
stat.question_title,stat.frontend_question_id.
Retrieve All Problems
We’ll now use the API endpoint found in the previous milestone to
-
Fetch the data,
-
Programmatically find out the top 100 problems based on total submissions, and
-
Write those to a CSV file.
Here’s a quick overview of the project files:
-
tests - contains test files to help you check your implementation
-
data.json - API response stored locally for testing purpose
-
leetcode.js - you’ll be implementing the functionalities in this file.
-
listMocked.csv - final CSV stored for testing purpose
-
package.json - setup file describing the dependencies and supported commands
Let’s first create a method to return the API endpoint, https://leetcode.com/api/problems/all/. Baby steps :)
TODO -
-
Implement the
getApiURL()method in leetcode.js to return the URL (API endpoint) as a string. (This string will then be used to fetch all the problems). -
Execute
npm test apiURL.test.jsin the terminal to verify you got the implementation correct. You should see this test passing if you’ve implemented the method correctly.
crio-user@criotest003:~/workspace/bytes/criotest003-ME_DEVELOPER_TOOLS$ npm test apiURL.test.js


> byte@1.0.0 test /home/crio-user/workspace/bytes/criotest003-ME_DEVELOPER_TOOLS

> jest


 PASS  __tests__/apiURL.test.js

  API URL:

    ✓ It must be correct (6 ms)


Test Suites: 1 passed, 1 total

Tests:       1 passed, 1 total

Snapshots:   0 total

Time:        2.134 s

Ran all test suites.

crio-user@criotest003:~/workspace/bytes/criotest003-ME_DEVELOPER_TOOLS$
We’ll now add functionality to make the actual API call to retrieve the data of all the problems.
TODO -
-
Implement the
getAllProblems()method to make the API call using a GET request and retrieve all the problems data (Promise, axios)-
On success, return the data fetched as a resolved
Promiseobject (to return the data only and not the whole axios response object) -
On error, return a rejected
Promiseobject with the error
-
-
Execute
npm test apiInteraction.test.jsin the terminal to verify that you’ve got the implementation correct. You should see this test passing if you’ve implemented the method correctly. -
Run
npm run mainRunnerto see the raw API response inproblemsAll.jsonfile. Use this as a reference to process the data going forward.
crio-user@criotest003:~/workspace/bytes/criotest003-ME_DEVELOPER_TOOLS$ npm test apiInteraction.test.js


> byte@1.0.0 test /home/crio-user/workspace/bytes/criotest003-ME_DEVELOPER_TOOLS

> jest


 PASS  __tests__/apiInteraction.test.js

  Tests for API interaction

    ✓  (76 ms)


Test Suites: 1 passed, 1 total

Tests:       1 passed, 1 total

Snapshots:   0 total

Time:        2.134 s

Ran all test suites.

crio-user@criotest003:~/workspace/bytes/criotest003-ME_DEVELOPER_TOOLS$
References
Curious Cats
-
Why does the
npm test -- apiUrl.test.jscommand output show "It must be correct" text? -
axios was used to perform the API call inside the
getAllProblems()method. How would you do that using XHR? -
What is the advantage of using "async" in the
getAllProblems()method?
Processing API response
Now, you’ll process the raw API response and store the data of the top 100 submitted problems to a CSV file in this format
We don’t want to keep problems that aren’t accessible to everyone i.e. we only want to store problems that are not specific to paid users.
To get the Top 100 problems:
-
Filter out/remove the problems that are only for paid users (Reference)
-
There’s way more information in the response than what’s required for us, so keep only these fields for each problem -
frontend_question_id,question_titleandtotal_submittedfields. You have to replace the original field names as given-
frontend_question_idtoid -
question_titletoquestion_title -
total_submittedtosubmissions
-
-
Sort by number of submissions and return the Top 100 problems.
TODO -
-
Implement the
getTopHundredProblems()method. It should take the raw API response as input and return the top 100 hundred problems with the required properties,- id, title and submissions. -
Execute
npm test topHundredProblems.test.jsand you’ll see the test pass if the implementation is correct.
crio-user@criotest003:~/workspace/bytes/criotest003-ME_DEVELOPER_TOOLS$ npm test topHundredProblems.test.js


> byte@1.0.0 test /home/crio-user/workspace/bytes/criotest003-ME_DEVELOPER_TOOLS

> jest


 PASS  __tests__/topHundredProblems.test.js

  Tests for getting top 100 problems

    ✓  (31 ms)


Test Suites: 1 passed, 1 total

Tests:       1 passed, 1 total

Snapshots:   0 total

Time:        2.134 s

Ran all test suites.

crio-user@criotest003:~/workspace/bytes/criotest003-ME_DEVELOPER_TOOLS$
Now that we have successfully retrieved the API response and filtered data based on our need, we should store it in a CSV file for future use. This will avoid making an API call every time there’s a need to get the top 100 list.
TODO -
-
Implement the
createCSV()method using the objects-to-csv library (Reference) -
Run the
main()method ofleetcode.jsusingnpm run mainRunner. You’ll see alist.csvfile created if you’ve implementedcreateCSV()correctly -
As always, execute
npm test csvFile.test.jsto run the corresponding test
crio-user@criotest003:~/workspace/bytes/criotest003-ME_DEVELOPER_TOOLS$ npm test csvFile.test.js


> byte@1.0.0 test /home/crio-user/workspace/bytes/criotest003-ME_DEVELOPER_TOOLS

> jest


 PASS  __tests__/csvFile.test.js

  Tests for CSV file

    ✓  (69 ms)


Test Suites: 1 passed, 1 total

Tests:       1 passed, 1 total

Snapshots:   0 total

Time:        2.134 s

Ran all test suites.

crio-user@criotest003:~/workspace/bytes/criotest003-ME_DEVELOPER_TOOLS$
Way to go! You now have a list of the Top 100 free Leetcode problems with the most number of submissions.
Commit and push your code
Use the commands from the code block below to commit your changes and push them to the remote Git repository.
cd ~/workspace/bytes/criotest003-ME_DEVELOPER_TOOLS

git add .

git commit -m "ME_DEVELOPER_TOOLS_MODULE_ONE"

git push -u origin master


# Ensure you have no pending commits

git status
Note
After you have pushed your changes, you can check this link to confirm if the remote Git repo has received your code.
Curious Cats
- Why do we use CSV to store our end result when we could have used JSON itself?
Summary
-
Chrome DevTools is useful to find the API endpoints by inspecting the HTTP requests made by the browser
-
Javascript can be used to fetch data from the APIs and re-model the response according to our need
-
Find the solutions to the Curious Cats questions here
-
Further Learning
Newfound Superpowers
- Knowledge of Chrome Developer Tools
Now you can
-
Use Dev Tools in your work, to analyse HTTP requests/responses
-
Use JavaScript to fetch an API response and process it as needed