Understand usage of Chrome Developer tools for inspecting and altering HTML DOM
Objective
Prerequisite
The HTML-CSS and Developer Tools 1 Bytes are prerequisites and the current Byte assumes knowledge of topics covered there.
Background/Recap
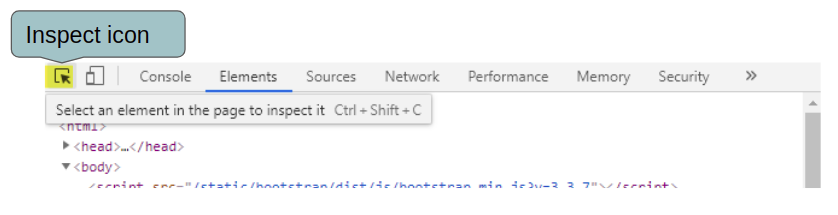
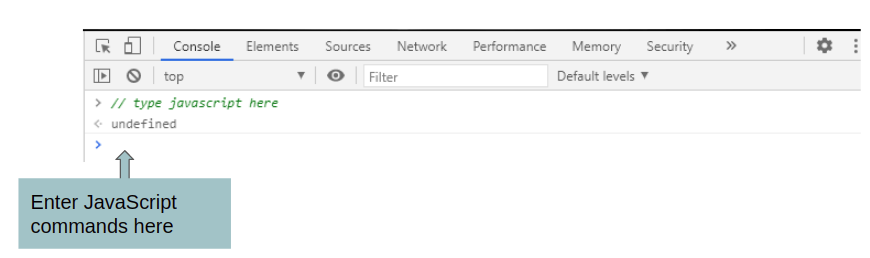
The Chrome browser provides tools to help developers easily perform tasks like inspecting web page content, analysing HTTP requests made and checking data stored locally by web pages. The ability to use these tools is an important skill for web developers. Refer to the image below which has the Chrome Developer Tools open and shows the elements of the web page.
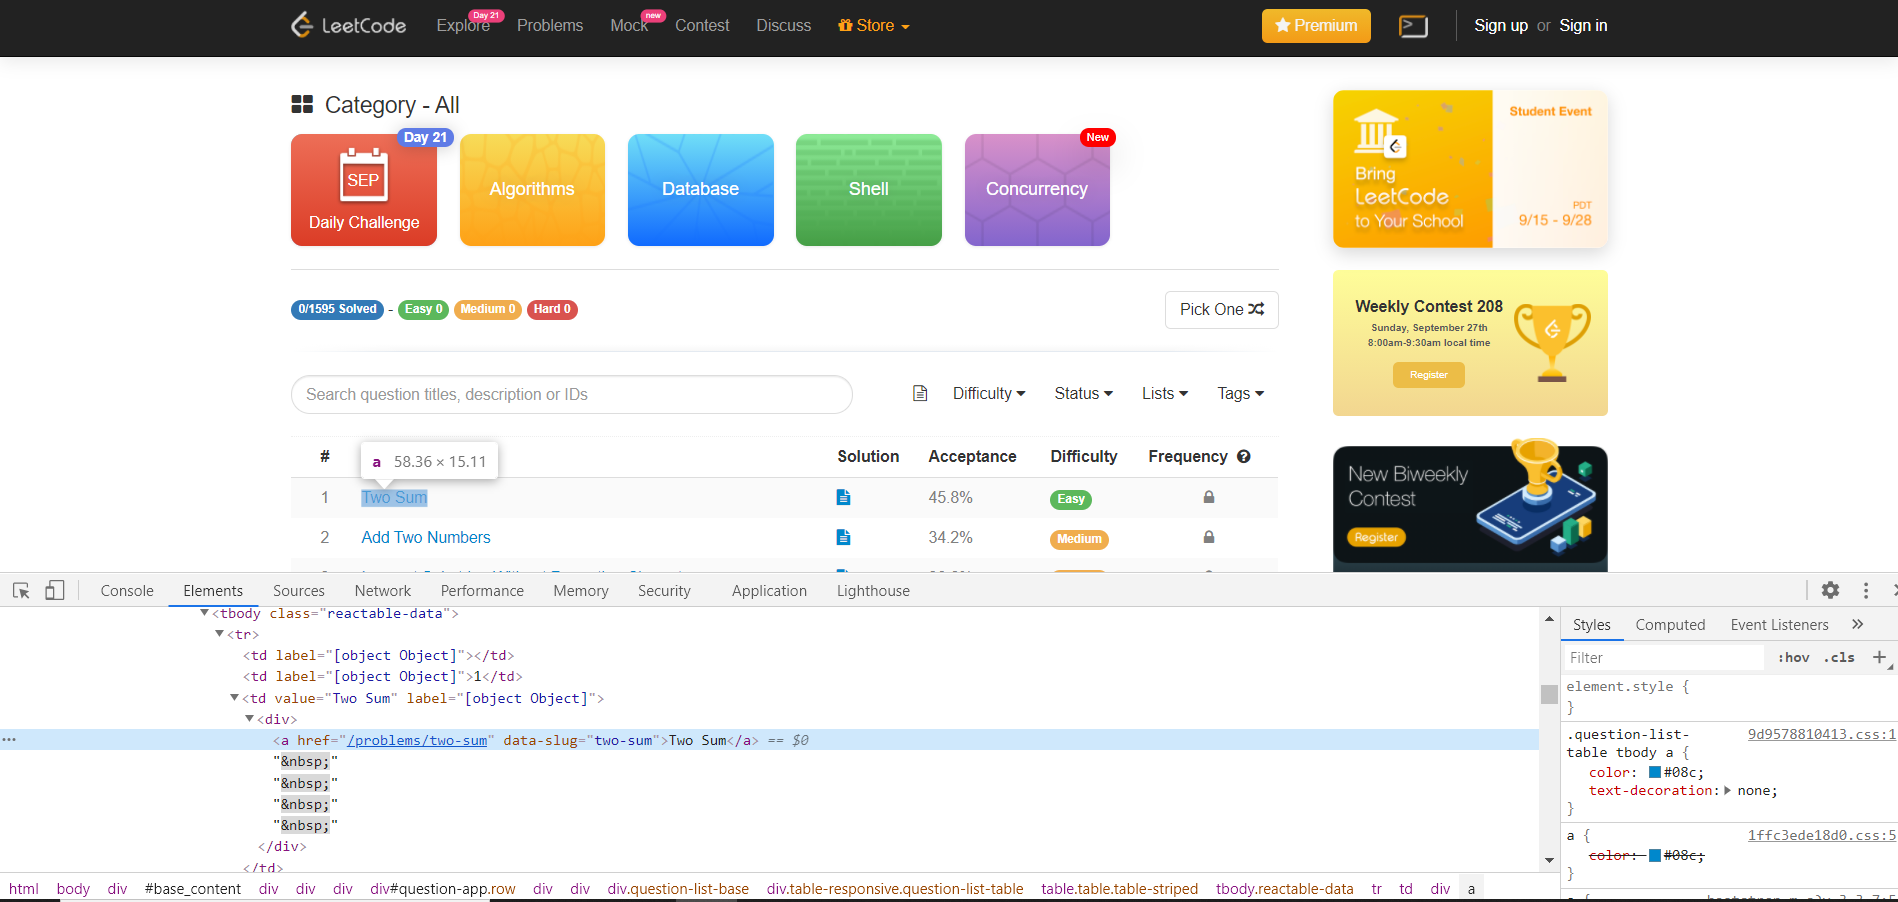
Using Chrome developer tools to inspect website HTML
In this Byte, you’ll add a new "Submissions" column to the Leetcode Problems table using JavaScript everytime the Leetcode page is visited.
Primary goals
-
Use JavaScript to store the top 100 Leetcode problems, sorted by submissions, to a CSV file
-
Use JavaScript to retrofit a new feature in the Leetcode page
-
Use Tampermonkey Chrome extension to inject your code any time the leetcode.com site is visited
Objective
Understand usage of Chrome Developer tools for inspecting and altering HTML DOM
Prerequisite
The HTML-CSS and Developer Tools 1 Bytes are prerequisites and the current Byte assumes knowledge of topics covered there.
Background/Recap
The Chrome browser provides tools to help developers easily perform tasks like inspecting web page content, analysing HTTP requests made and checking data stored locally by web pages. The ability to use these tools is an important skill for web developers. Refer to the image below which has the Chrome Developer Tools open and shows the elements of the web page.
Using Chrome developer tools to inspect website HTML
In this Byte, you’ll add a new "Submissions" column to the Leetcode Problems table using JavaScript everytime the Leetcode page is visited.
Primary goals
-
Use JavaScript to store the top 100 Leetcode problems, sorted by submissions, to a CSV file
-
Use JavaScript to retrofit a new feature in the Leetcode page
-
Use Tampermonkey Chrome extension to inject your code any time the leetcode.com site is visited
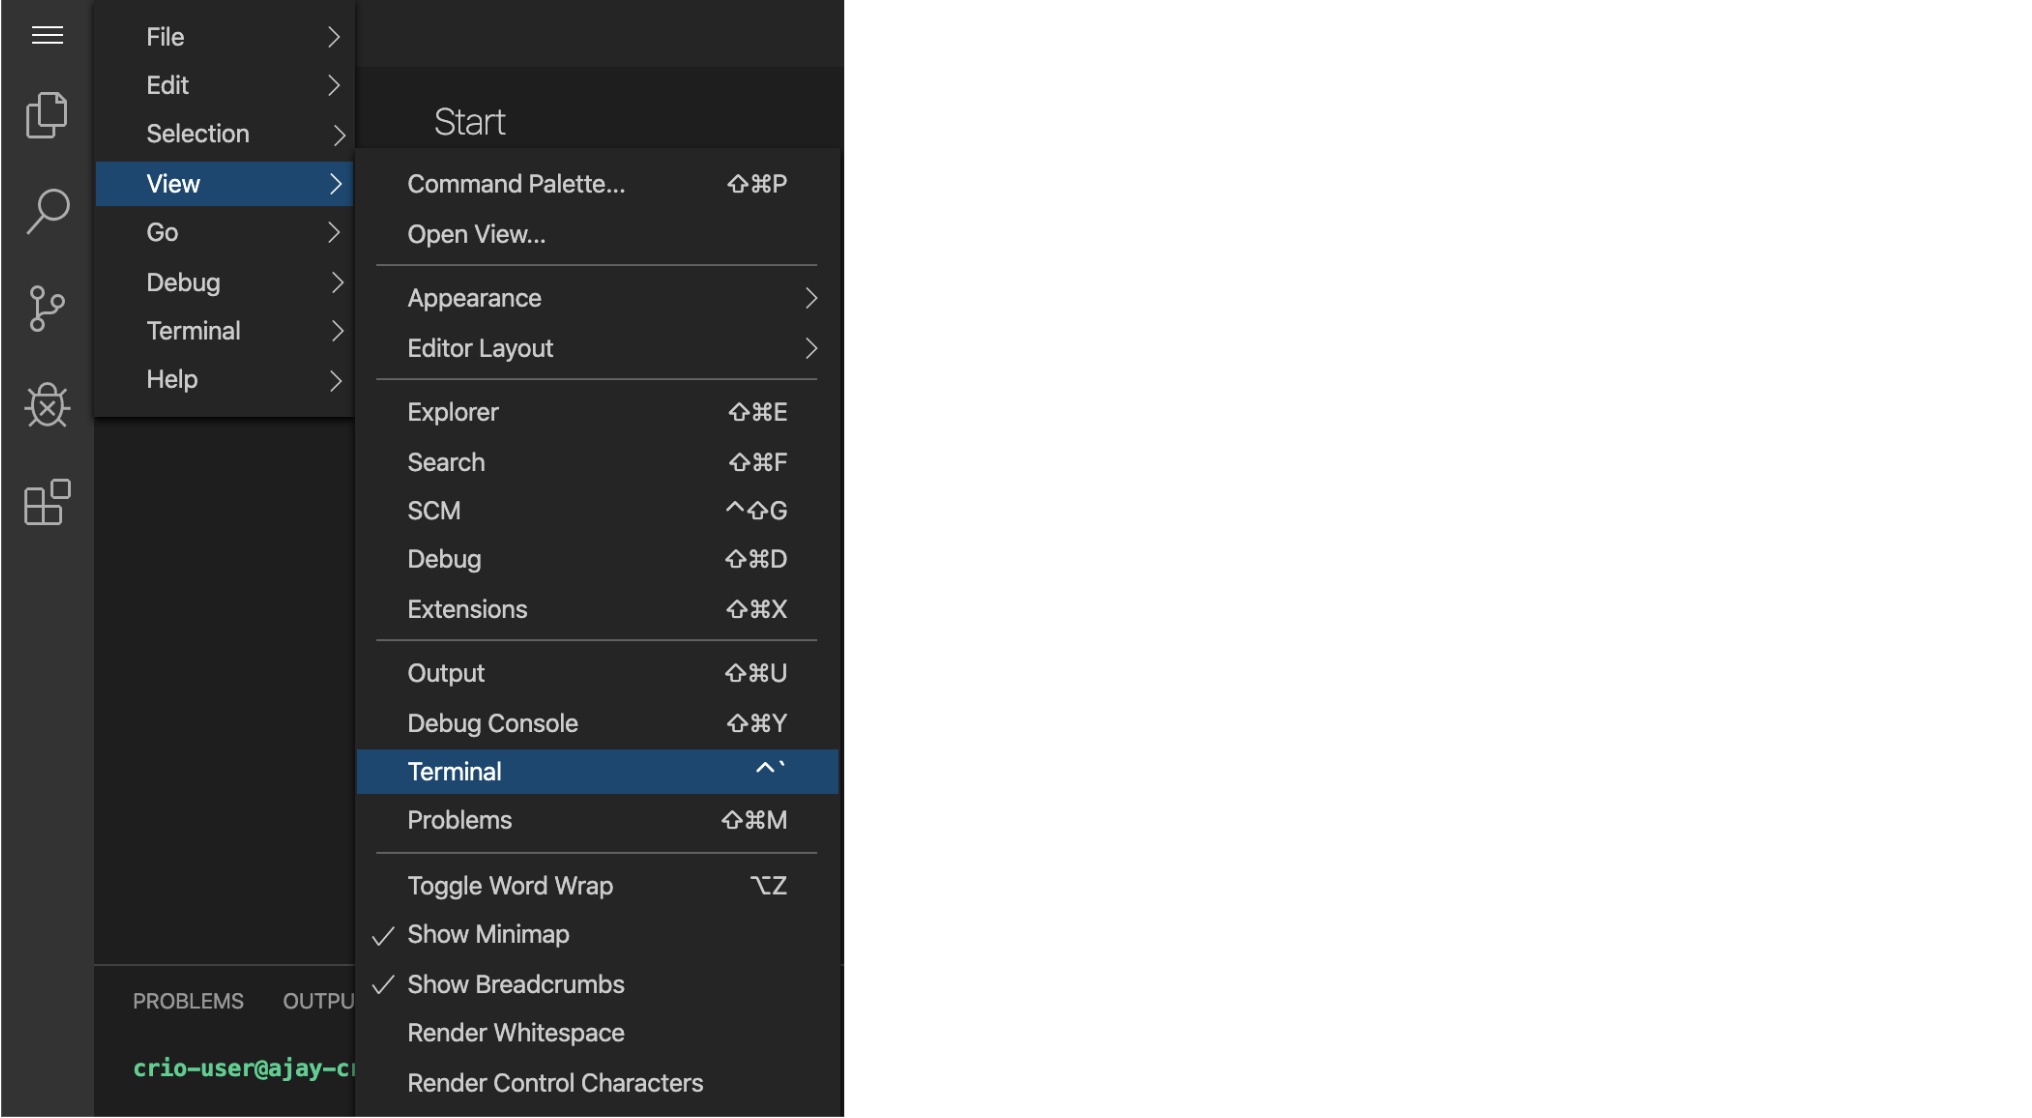
Open a new terminal in your Crio Workspace
To open a new terminal, click on the menu > View > Terminal. The menu button is on the top-left (three horizontal bars).
Fetch the source files
Copy all the commands in the code-block below and paste them in the Workspace terminal window.
# Go to the bytes directory

mkdir -p ~/workspace/bytes

cd ~/workspace/bytes


# Clone the repository for this Byte.

git clone git@gitlab.crio.do:COHORT_ME_DEVELOPER_TOOLS_II_ENROLL_1602229012119/criotest003-ME_DEVELOPER_TOOLS_II.git


# Go into the cloned repo directory.

cd ~/workspace/bytes/criotest003-ME_DEVELOPER_TOOLS_II/


# Setup the remote repository and pull the code stubs for this Byte.

git remote add ME_DEVELOPER_TOOLS_II_MODULE_ONE_STUB git@gitlab.crio.do:ME_DEVELOPER_TOOLS_II_STUBS/ME_DEVELOPER_TOOLS_II_MODULE_ONE_STUB.git


git pull ME_DEVELOPER_TOOLS_II_MODULE_ONE_STUB master --allow-unrelated-histories --no-edit
Open the source files in the IDE
-
Now that you have fetched all the required source files, you can open them in the online IDE by following these steps: Click on the
Open Folderbutton. -
Select the following folder
/home/crio-user/workspace/bytes/criotest003-ME_DEVELOPER_TOOLS_II/and Click onOK.
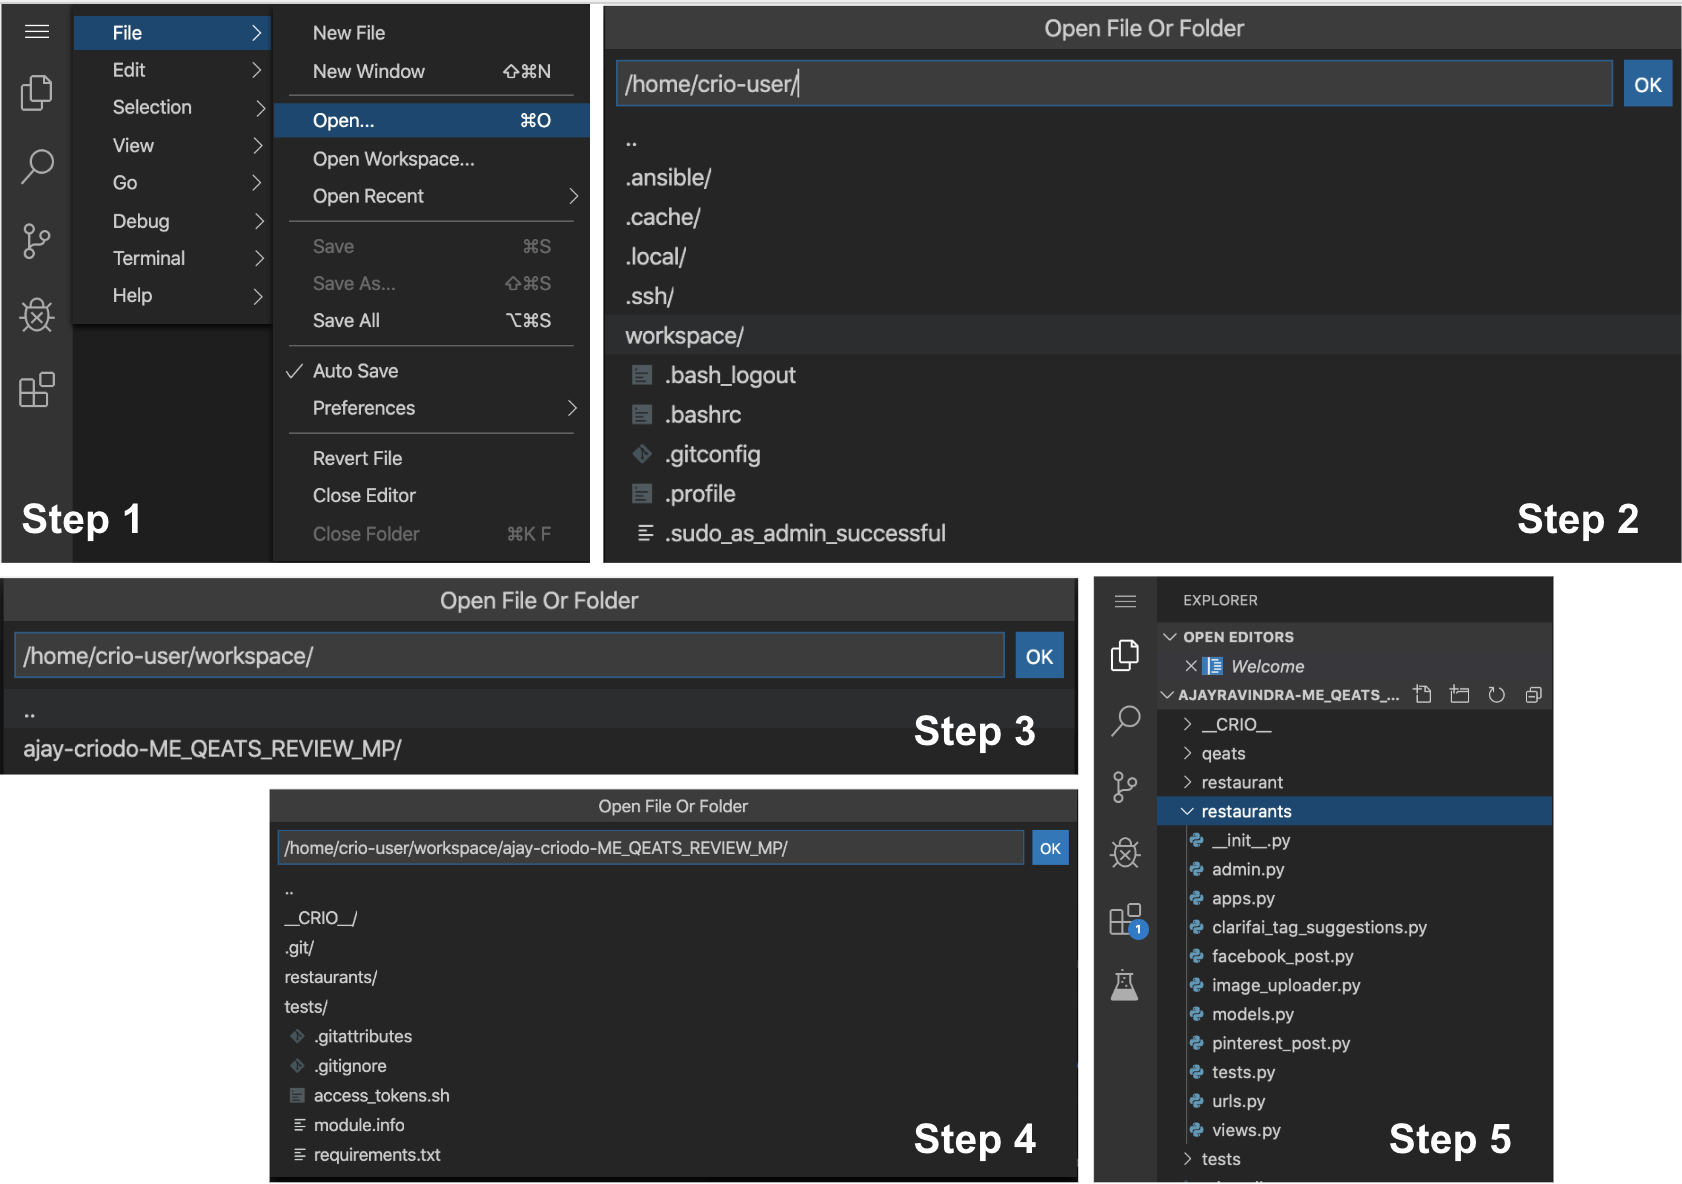
Note
Please use the image above for illustration purposes only. The actual Byte name and the corresponding folder names might be different.
Install dependencies
Execute npm install to install the project dependencies. This might take a couple of minutes.
cd ~/workspace/bytes/criotest003-ME_DEVELOPER_TOOLS_II/

npm install
Setup is complete
You can now proceed to the next task.
Inspecting HTML using Developer Tools
Chrome Developer Tools (or DevTools) allows you to inspect the HTML content of a webpage.
We’ll first understand how to view the whole HTML content.
TODO -
-
Open the Chrome Developer Tools window (Right-click and select "Inspect")
-
Goto the Elements window. Scroll up to find the opening
<html>tag -
Try clicking on the arrow beside the different HTML elements to expand or hide their child elements

Chrome Developer Tools "Elements" window
You’ll find the webpage’s HTML content shown here, hierarchically formatted as HTML elements.
Now, how can we find the HTML element corresponding to a particular button or link in the webpage? Should we expand all the HTML elements in the <body> tag and be optimistic that we’ll find the correct element at some point?
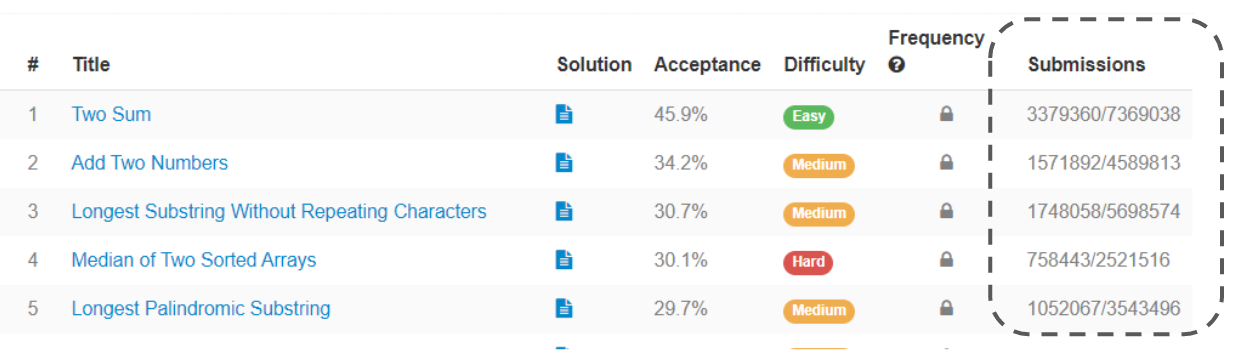
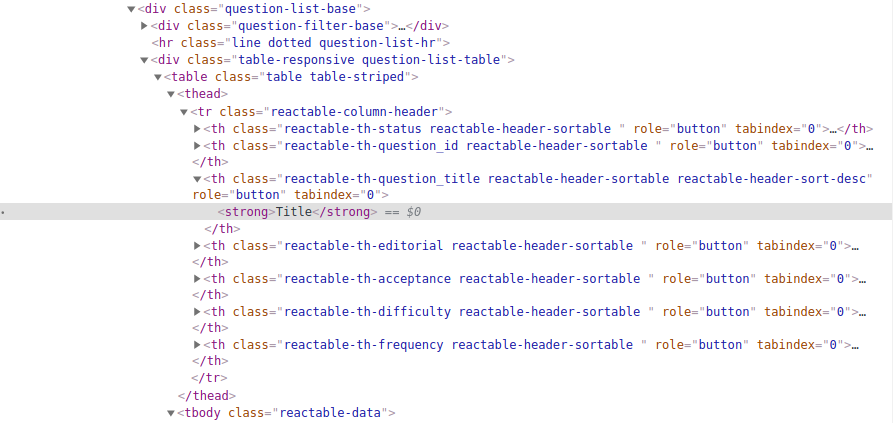
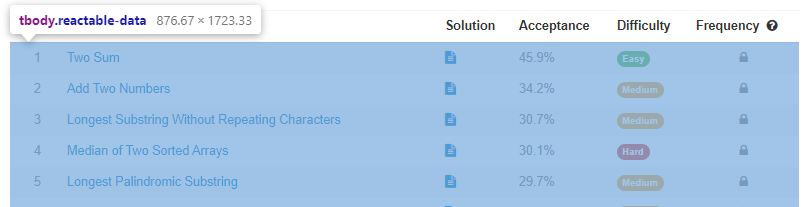
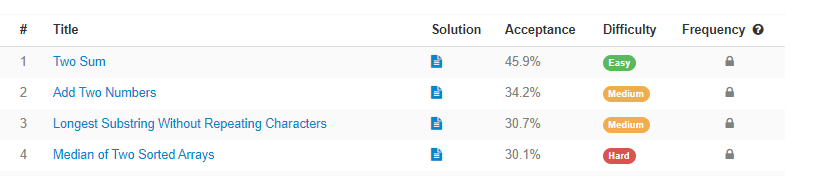
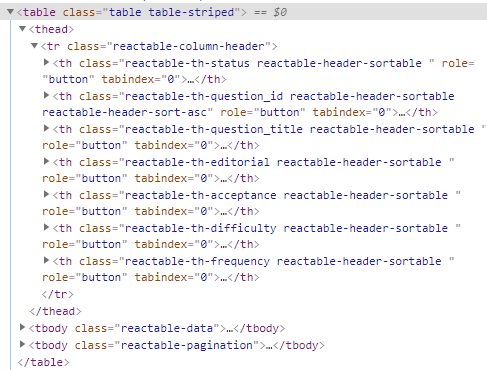
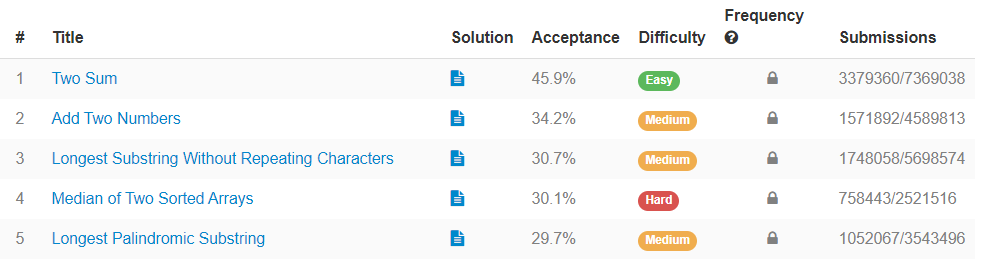
Let’s try to understand the HTML elements which make up the below Problems list table in the webpage.

Problems List Table
TODO -
- Click on the Inspect icon on the top-left of the DevTools window. (The highlighted arrow)
- Hovering over the web page will now display info about the elements. Can you figure out each item listed in the pop up display?
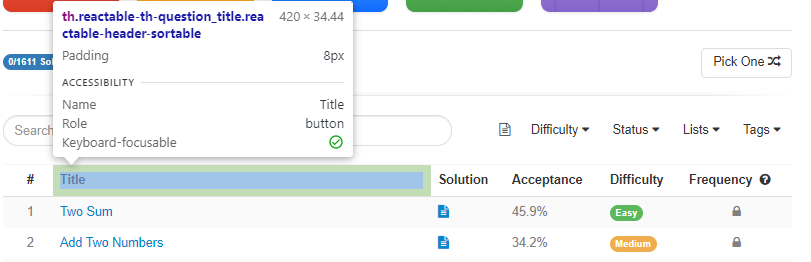
- Clicking on an item in the web page takes you to its HTML element in the Elements window of DevTools. Click on the "Title" column in the header row (first row) of the Problems list table. (Once you click on an item, the inspect feature gets turned off, you’ll have to click on the Inspect icon again to inspect some other element)
-
Do you find that the "Title" text is wrapped in another HTML tag? (Expand the
<th>element using the arrow besides it if it’s not already) -
Hover over the other
<th>tags in the Elements window. What do you find happening on the web page?
<th class="reactable-th-question_title reactable-header-sortable reactable-header-sort-desc" role="button" tabindex="0">

<strong>Title</strong>

</th>
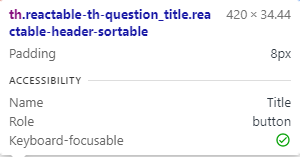
By cross-checking the "Title" header item’s HTML given above with the data displayed upon hovering over an item in the webpage (see below screenshot), you’ll find some of the info shown are
-
Element tag type -
<th>denoted by th -
Element’s
classorid- classes start with "." andidif present will have a prefix, “#”. Eg: “th.reactable-th-question_title.reactable-header-sortable” -
The Name property shows the text inside the HTML element - "Title"
-
The Role property shows the value of the HTML attribute,
role, within the<th>opening tag
By expanding the <th> tags, you’ll see that each of the table header row elements (#, Title, Solution etc) are wrapped in a <strong> tag. What does this do?
Yes, it displays the text in bold.
Hovering over HTML in the Elements window highlights the corresponding item in the webpage, you’ll find that each of the <th> tags corresponds to a header in the Problems list table.

We’ll now dive deeper into the HTML tags that make up an HTML table
TODO -
-
What happens if you hover over the
<table>,<thead>and the<tbody>elements? What are these tags for? -
Expand the
<thead>tag. Which are the tags it has as children and grand-children? What do these tags do? -
Expand the
<tbody>tag. Which are the tags it has as children and grand-children? What do these tags do?
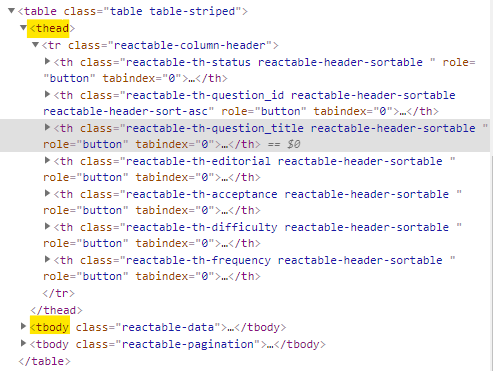
Hovering over the <table> element selects the whole of the Problems list table including the header row, content and pagination row at the bottom. <table> tag is the parent tag that makes up an HTML table.

Hovering over the <thead> element selects the header row of the Problems list table. Header row elements of an HTML table goes inside the <thead> tag, denoting the table’s header.

Hovering over the <tbody> element selects the whole of the content (body) of the Problems list table. Content or body of the HTML table goes inside the <tbody> tag, denoting the table’s body.
The <thead> element has one child element which is a <tr> tag. It represents a table row. Here, we have only one row as the header and hence has a single <tr> tag inside <thead>. <tr> element contains a number of <th> elements each denoting a header column.
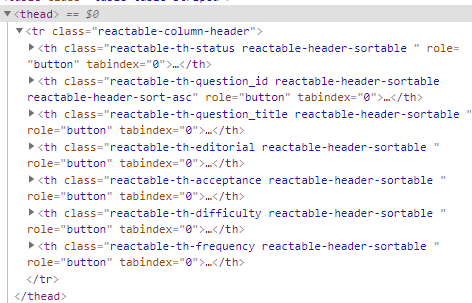
The <tbody> element has a number of <tr> tags each denoting a row in the table. Here in the <tr> tags, columns are denoted using <td> tags denoting table description instead of <th> tag as we saw in <thead>.
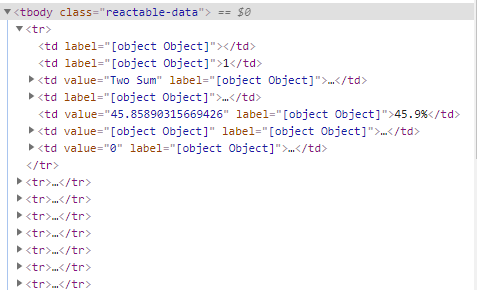
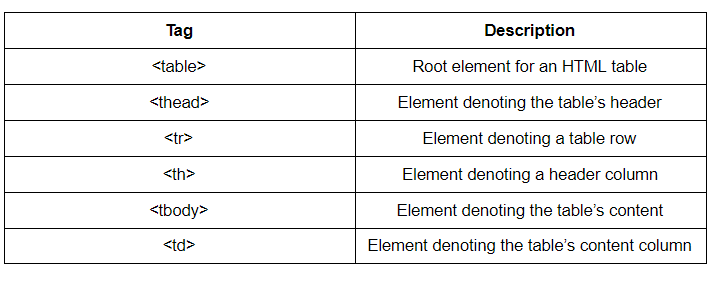
HTML tags making up a table
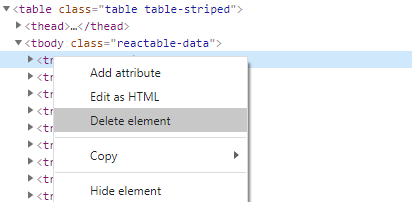
Now that we know what an HTML table is composed of, let’s mess with it a bit :)
The table looks like this for me now
TODO -
- Check the first Problem in the Problems list table. Right-click on the
<tr>tag corresponding to it in the Elements window and click on "Delete element". What happened on the web page?
-
Right-click on the header column with title, Title and click on "Edit as HTML". Change the text inside the
<strong>element to New Title. Did the table title change in the web page? -
Right-click on one of the
<th>tags, select "Copy", and click on “Copy element” -
Paste this copied
<th>tag as the last<th>element in the<tr>tag inside<thead>(To paste, click the point before which you want to paste it and press ‘Ctrl + v’, in our case, right before the</tr>tag) -
Add "Submissions" as text inside the
<strong>element for this newly added<th>tag. What happened?
You’d have found out that clicking on "Delete element" removed the Problem row from the web page, that the title changes on editing the HTML and Copy-pasting the <th> element adds a new header column, “Submissions”

Note
Refresh the page to reset any HTML changes made
Getting to know your project files
Here’s a quick overview of the project files:
-
tests - contains test files to help you check your implementation
-
utils/ - utility files for test files
-
package.json - setup file describing the dependencies and supported commands
-
solution.js - you’ll be implementing the functionality in this file.
-
solutionOptional.js - for bonus task in the takeaways milestone. You can safely ignore this for now :)
Using JavaScript to modify HTML
Now, let’s make use of HTML DOM and JavaScript to make changes to the web page programmatically. Watch the below video to understand HTML DOM.
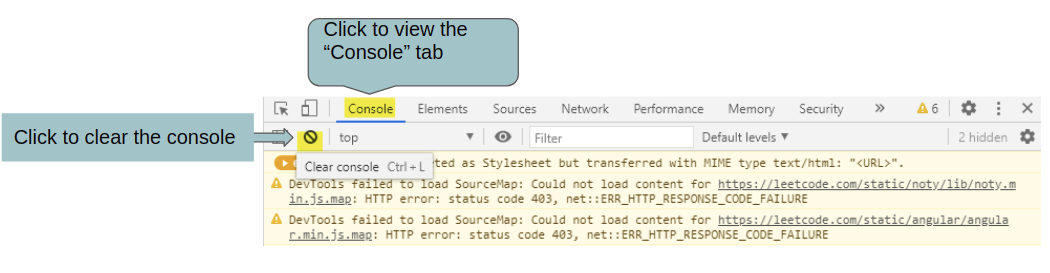
Similar to how we used the Elements window for checking the HTML content, the DevTools Console window can be used to execute JavaScript on the webpage’s HTML DOM.
You added a new "Submissions" column by directly editing the HTML earlier, let’s now use JavaScript to do the same.
TODO -
- Open the DevTools Console window and click on the "Clear console" button to clear any already existing warnings
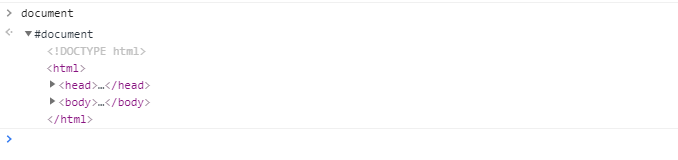
- Type "document" in the console window and hit “Enter” to execute it. Hover over the result, does it highlight any item in the web page? Expand the result and check its contents
-
Use this playground to play around with selecting DOM objects using JavaScript. See the JS section in the playground to view the methods used and how to access the elements in multiple ways. (Reference)
-
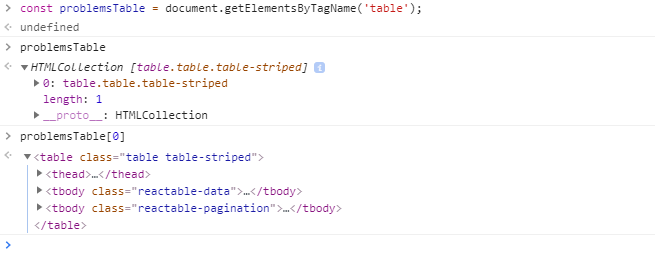
Get the object corresponding to the Problems list table i.e,
<table>element and save it in a JavaScript variable called, "problemsTable". This console will run the JavaScript code using Chrome's JavaScript engine. (Reference) -
Get the object corresponding to the header column of the Problems list table,
<tr>tag. (Reference - 1, 2)
Recall from the DOM video that the document refers to the whole HTML DOM. Executing document in the console returns an object denoting the whole HTML DOM. This is why the whole web page get selected on hovering over the result. You’d have found that the content is the page’s HTML itself.
We can use the getElementsByTagName() function to retrieve DOM objects by their tag type. This returns a collection of objects as there can be multiple elements of the same tag type.
As the current page has only one <table> element (length of the HTML collection returned by getElementsByTagName() is 1), the first and only element in the collection should be our table which is index, 0. You’ll see the table highlighted when hovering over the result.
To select the header row object, we could search for elements of tag type, <tr> and select it by indexing. A more precise way to select an exact element will be to use it’s CSS selector as parameter to the querySelector() function. CSS selectors are used to find HTML elements we want to apply CSS styles to. For example, in the below CSS rule example, div and .tile are CSS selectors where div selects all <div> tags and .tile selects all elements of the class, tile.
div {

	color: white;

}

.tile {

	font-family: Verdana;

}
querySelector() returns the first element matching the query. Right-click on the <tr> denoting the table header in the Elements window, select "Copy" and click on “Copy selector” to copy the element’s CSS selector.

Were you able to understand how the CSS selector worked?
Let’s see this CSS selector in detail
#question-app > div > div:nth-child(2) > div.question-list-base > div.table-responsive.question-list-table > table > thead > tr
This basically says
-
Select the element with id, question-app
-
Now, select the above element’s first child
<div>element -
Now, select the above element’s 2nd child
<div>element -
Now, select the above element’s first child
<div>element with class, question-list-base -
so on and so forth …
Tip
Try using Right-click -> "Copy" -> “Copy JS Path” combination for an element from the Elements window. It is basically a query like the one we executed in the Console window earlier to select the Problems list table header row.
Adding HTML to DOM
Now let’s create a new <th> element corresponding to the new "Submissions" header column and append to the header row.

TODO - Below tasks are to be done in the Console window
-
Use the first
<th>child element in the<tr>element of the header (<thead>) as reference (Use the tip mentioned above). It’s<strong>element will have empty content. -
Find the object corresponding to the
<tr>element inside<thead>(Reference) -
Create a
<th>element (Reference) -
Set HTML properties - className, role and tabIndex as same as your reference element (Reference)
-
Create a
<strong>element with text, **Submissions **(Reference) -
Append this
<strong>element as child of the<th>element you created (Reference) -
Append the newly created
<th>element to the<tr>element (Reference)
If you did the above steps correctly, you’ll find the new "Submissions" header column added as the last header column with empty content on the Problem rows.
TODO -
-
Copy paste the code used to add the "Submissions" header column inside the
addSubmissionColumnHeader()function of solution.js -
In the workspace terminal, execute
npm test -- submissionHeader.test.jsto check your implementation. Test will pass if the implementation is correct.
crio-user@criotest003:~/workspace/bytes/criotest003-ME_DEVELOPER_TOOLS_II$ npm test -- submissionHeader.test.js


> developer_tools_2@1.0.0 test /home/crio-user/workspace/bytes/criotest003-ME_DEVELOPER_TOOLS_II

> jest "submissionHeader.test.js"


 PASS  __tests__/submissionHeader.test.js (7.718 s)

  Test adding submissions header

    ✓ should add header to the table head row (731 ms)

    ✓ should have the desired className (458 ms)

    ✓ should have the desired role (274 ms)

    ✓ should have a <strong> child with correct column name (269 ms)


Test Suites: 1 passed, 1 total

Tests:       4 passed, 4 total

Snapshots:   0 total

Time:        15.374 s

Ran all test suites matching /submissionHeader.test.js/i.

crio-user@criotest003:~/workspace/bytes/criotest003-ME_DEVELOPER_TOOLS_II$
Tip
Chrome uses the V8 JavaScript engine to execute JavaScript in it
References
Inserting data to the Submissions column
Now that we added a new header column, let’s get the data to be added in the content rows for this column.
TODO -
-
Similar to what you did in Developer Tools 1 Byte, fetch the data returned by the API endpoint - https://leetcode.com/api/problems/all/
-
getApiUrl()function of solution.js should return the API endpoint as aString -
Execute
npm test -- apiUrl.test.jsand ensure the test passes -
getAllProblems()function of solution.js should return the API data by making the API call and processing it. (Note: You don’t have to import thefetchmodule explicitly)-
Return an
Arraywith just thestat.frontend_question_id,stat.total_acsandstat.total_submittedproperty data as objects for each of the problems. -
The property names should be updated to
id,total_acsandtotal_submittedrespectively for these three properties. (Note: An array is to be returned and not a Promise)
-
-
Execute
npm test -- apiInteraction.test.jsand ensure the test passes
-
We have the data for all the Problems in Leetcode. Let’s find the list of problems rendered in the web page.

TODO - Use the console window to try out these tasks first
- Find all
<tr>elements corresponding to each of the Problem rows. You can get the CSS selector for one of the required<tr>tags from the Elements window (Right-click > Select Copy > Click Copy selector) to use with thequerySelectorAll()function. (Reference)
-
Return the result as a JavaScript
Array. (Reference) -
Now, copy-paste this code to the
getAllProblemRowElements()function of solution.js -
Execute
npm test -- tableRowElements.test.jsand ensure it passes
Now that we have the Problems for which we need to add data to the "Submissions" column, let’s move on. The “Submissions” column is to contain data as a String in this format, “a/b”. For example, “500/1000”, where 500 is the total accepted submissions for that Problem (total_acs) and 1000 is the total submissions for that problem (total_submitted).
TODO - Use the Console window to try out these tasks first (Paste all the functions that you wrote in solution.js in the console so that you can call them from the console itself)
- Save the output of
getAllProblemRowElements()function of solution.js to a variable,allProblemRowElementsand the output ofgetAllProblems()function to a variable,allProblems
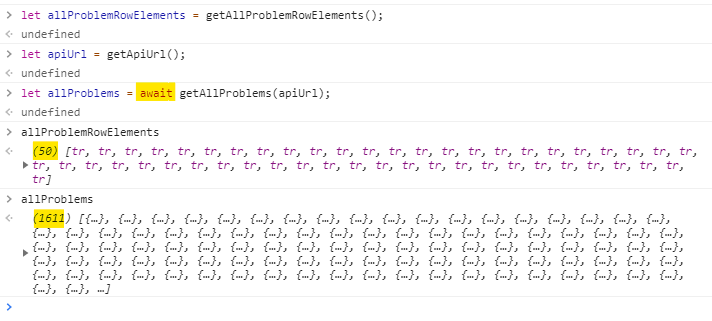
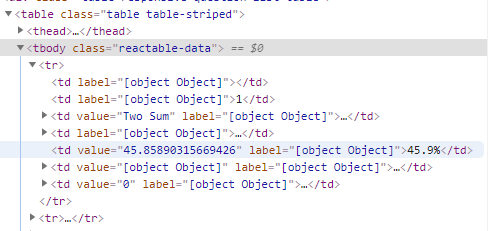
- The value corresponding to the
idfield ofallProblemsarray is the text inside the second<td>tag for each problem inallProblemRowElementsi.e, value of the header column titled, "#".
-
Store the first element of the
allProblemRowElementsarray to a variable,problemRowSingle-
Find the corresponding object in
allProblemsby matching the id value. (Reference - nth-child selector, find, innerHTML, parseInt, trim) -
From the object you found, extract the
total_submittedandtotal_acsvalues and store it as a string,submissionin this format, "500/1000" where 500 is value corresponding tototal_acsand 1000 that oftotal_submitted. (Template Strings, String methods) -
Create a new
<td>element and set its content as the value ofsubmission. (Reference) -
Append this
<td>element as a child of theproblemRowSingleelement. You’ll find the "Submissions" column populated for your first problem
-

-
Implement
addSubmissionsToEachProblem(allProblemRowElements, allProblems)function of solution.js. It should add the Submission data for each of the problems inallProblemRowElementsby getting data from theallProblemsmaster array in a similar way to what you did in the above step. -
Execute
npm test -- problemSubmissionColumn.test.jsand ensure the test passes
Curious Cats
- In the Console window, use
document.querySelector()to store the<th>elements corresponding to the Acceptance and Difficulty headings as two variables. UseappendChild()function to add the element of the Difficulty column as a child of the Acceptance column. What happens when you do that? Does the Acceptance column get an additional text "Difficulty" in its heading or did something else also happen? Is this the case whenappend()is used instead? (Refresh to reset the webpage)
Putting it all together
Now that we have the pieces ready to add a Submission header column and populate it with data, let’s knit those together.
TODO -
-
Use the
getApiUrl(),getAllProblems(),addSubmissionColumnHeader(),getAllProblemRowElements(), andaddSubmissionsToEachProblem()function to implement thecreateSubmissionColumnForLeetCode()function of solution.js.(Think about the flow in which these functions are called and note it down, that is the content ofcreateSubmissionColumnForLeetCode()!) -
Running the
createSubmissionColumnForLeetCode()function in the Console window should create a Submissions column and populate it with data. Try that out! -
Execute
npm test -- leetcodeSubmissions.test.jsand ensure the test passes
Using Tampermonkey to run the script on the website
We have the createSubmissionColumnForLeetCode() function ready which can be executed on the Console window along with its dependent functions to add a Submission column to the Leetcode Problems list table. You’ll need to copy-paste the functions everytime the web page is visited. Only if there was some way to do this automatically :(
Indeed, there is a way! Welcome Tampermonkey!
Tampermonkey is a chrome extension that can be configured to run JavaScript code when a website is visited. Let’s configure it to run our JavaScript code whenever the Leetcode home page is visited.
TODO -
-
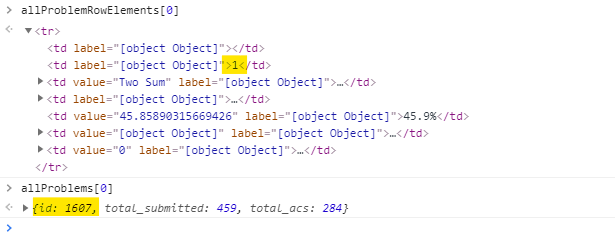
Install the extension - Extension page, Installation reference
-
Visit https://leetcode.com/problemset/all/ and click on the Tampermonkey extension. Select "Create a new script"
- A new tab will be opened with an editor having the below template
// ==UserScript==

// @name         New Userscript

// @namespace    http://tampermonkey.net/

// @version      0.1

// @description  try to take over the world!

// @author       You

// @match        https://leetcode.com/problemset/all/

// @grant        none

// ==/UserScript==


(function() {

    'use strict';


    // Your code here...

})();
-
Give some name to your UserScript by replacing the text, "New Userscript" next to “@name”
-
Copy-paste all of your code -
createSubmissionColumnForLeetCode()and its dependent functions, below where it's marked "// Your code here..." -
Press "Ctrl + s" / “Cmd + s” to save. Click “Installed userscripts” on the top-right menu

- You’ll find your script enabled. Enable if it isn’t by default.

- Visit https://leetcode.com/problemset/all/. Does the Submission column get added automatically? (Hint: It won’t)
The issue here is that the Script gets run before the table gets populated. Why is that?
You’d remember from Developer Tools 1 Byte that the API requests for the problems table data was made asynchronously by Leetcode using XHR requests. This means the table can take some time to get populated compared to the initial HTML loading.
Let’s add a function which runs the createSubmissionColumnForLeetCode() function periodically till the <table> gets loaded.
TODO -
-
Implement
tableCheckfunction in solution.js which checks if the Problems table is present every 100ms. Get the object corresponding to the table using its CSS selector and see if it’s present. (Reference - 1, 2) -
If the table is present, call
createSubmissionColumnForLeetCode()function and stop checking if the function is present.(Reference) -
Append this piece of code to your Tampermonkey script after the content you had added earlier and save it
-
The Submissions column should get populated for all the problems in the page if you visit https://leetcode.com/problemset/all/ now
Excellent work adding a new feature to the Leetcode page!
Commit and push your code
Use the commands from the code block below to commit your changes and push them to the remote Git repository.
cd ~/workspace/bytes/criotest003-ME_DEVELOPER_TOOLS_II

git add .

git commit -m "ME_DEVELOPER_TOOLS_II_MODULE_ONE"

git push -u origin master


# Ensure you have no pending commits

git status
Note
After you have pushed your changes, you can check this link to confirm if the remote Git repo has received your code.
Summary
-
DevTools Elements window can be used to inspect and alter HTML content manually
-
DevTools Console window can be used to inspect and alter HTML content using JavaScript, made possible by the HTML DOM
-
Tampermonkey chrome extension allows us to inject JavaScript to a website on loading
-
Find the
- Pointers to the Curious Cats questions here
-
Further Reading
-
Bonus task - Update your script to re-populate the Submission column when the table is sorted by one of the header columns (by clicking on it)
Newfound Superpowers
- Know-how of using Chrome Developer Tools to inspect and alter HTML content
Now you can
-
Inspect and alter HTML content for any web page
-
Use JavaScript to automate HTML DOM alterations