Get started with Git for version control of your projects
Objective
Background/Recap
Ever been in a situation where
-
You badly needed your old code but it's lost beyond the reach of
Ctrl-Z -
You take backups of your work in progress into different folders like project-x-01082020, project-x-02082020 etc.
-
You need to integrate changes made to a project independently by your team members without losing any code
-
You need to keep track of metadata on a project worked on by multiple developers like - what/who/when/why for any changes made
Version control systems help in these situations. They help us keep track of changes to our files by taking snapshots of them. We can look at earlier snapshots and also restore our code to an earlier snapshot. This lets us work on our projects without worrying about introducing errors to partly/completely working versions and not being able to go back.
Git is one of them, probably the most popular one.
Git projects are called Repositories and contain Git related files apart from the project files we add. These git files contain info about all the changes made - who made the changes, what changes were made, when was it made etc. Similar to having Google Drive for file sharing, we have version control providers like GitLab, GitHub etc. to facilitate the use of Git repositories.
Primary goals
-
Understand how Git works
-
Learn the basic Git commands
Objective
Get started with Git for version control of your projects
Background/Recap
Ever been in a situation where
-
You badly needed your old code but it's lost beyond the reach of
Ctrl-Z -
You take backups of your work in progress into different folders like project-x-01082020, project-x-02082020 etc.
-
You need to integrate changes made to a project independently by your team members without losing any code
-
You need to keep track of metadata on a project worked on by multiple developers like - what/who/when/why for any changes made
Version control systems help in these situations. They help us keep track of changes to our files by taking snapshots of them. We can look at earlier snapshots and also restore our code to an earlier snapshot. This lets us work on our projects without worrying about introducing errors to partly/completely working versions and not being able to go back.
Git is one of them, probably the most popular one.
Git projects are called Repositories and contain Git related files apart from the project files we add. These git files contain info about all the changes made - who made the changes, what changes were made, when was it made etc. Similar to having Google Drive for file sharing, we have version control providers like GitLab, GitHub etc. to facilitate the use of Git repositories.
Primary goals
-
Understand how Git works
-
Learn the basic Git commands
Setup - Crio Workspace
Follow the textual instructions if you have access to the Crio workspace
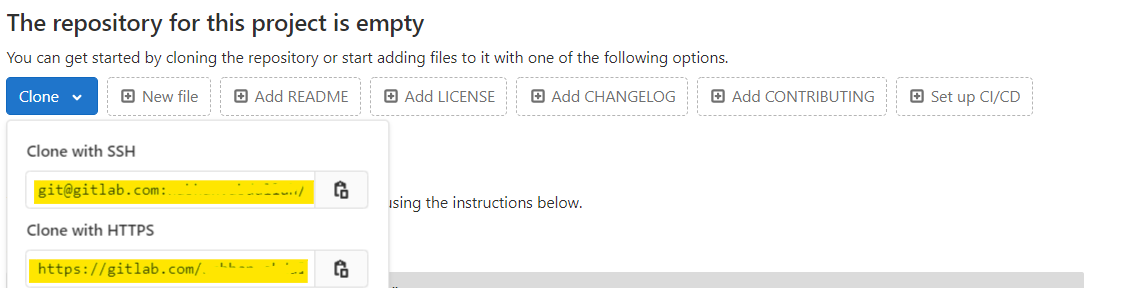
- These are the links to the GitLab repository created for you. We’ll use these in the next milestone
git@gitlab.crio.do:COHORT_ME_GIT_BASICS_ENROLL_1596802014715/criotest003-ME_GIT_BASICS.git

https://gitlab.crio.do/COHORT_ME_GIT_BASICS_ENROLL_1596802014715/criotest003-ME_GIT_BASICS.git
- Goto the above https link to view your Git repository in Gitlab. You’ll need to sign in with Google using the account registered with Crio.
Note
Setup is complete and you can move on to "Milestone 1 - Get that Code".
Setup - Gitpod Workspace
Follow the below video or the set of textual instructions given below if you are working in the Gitpod workspace
- These are the links to the GitLab repository created for you. We’ll use these in the next milestone
git@gitlab.crio.do:COHORT_ME_GIT_BASICS_ENROLL_1596802014715/criotest003-ME_GIT_BASICS.git

https://gitlab.crio.do/COHORT_ME_GIT_BASICS_ENROLL_1596802014715/criotest003-ME_GIT_BASICS.git
-
Goto the Gitpod workspace and open the terminal from within
-
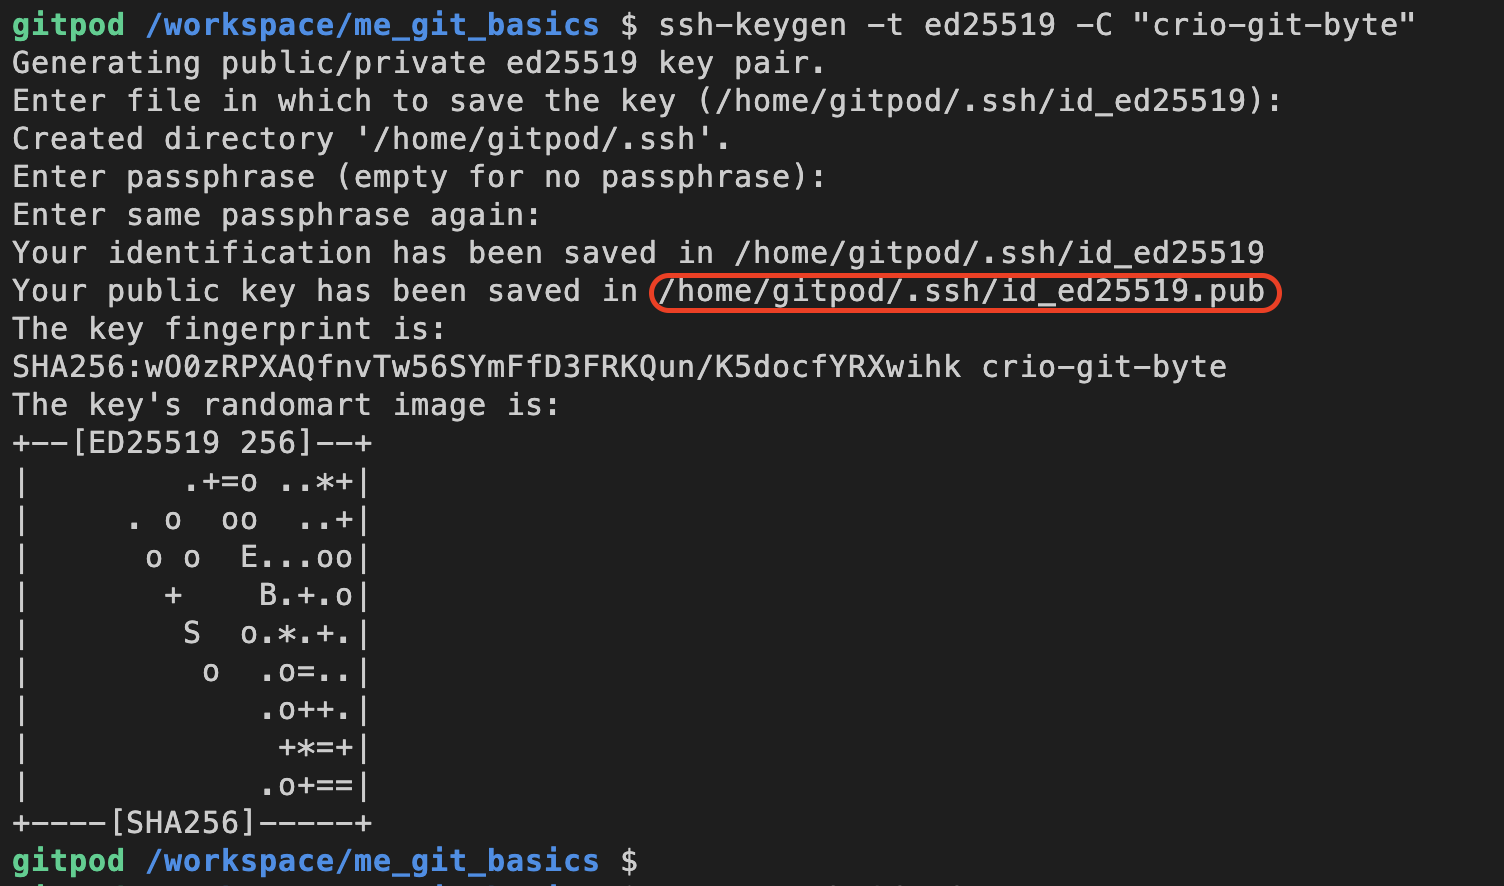
To download/upload contents from/to the above Gitlab repositories you’ll have to prove you’re having access to it. Execute the below command to generate an SSH key.
SSHprotocol allows you to remotely access machines using the SSH key.
ssh-keygen -t ed25519 -C "crio-git-byte"
- You’ll be asked to enter the file to save the generated key and passphrase to secure it. Hit enter for both of these, you don’t have to type anything.
-
Did you notice you were given two links to your Gitlab repository earlier? The one which starts with
git@gitlab.crio.dois to be used to authenticate using SSH. Thehttpslink authenticates using yourgitlab.crio.dousername and password -
Execute
cat ~/.ssh/id_ed25519.puband copy the public key printed. You’ll add this to https://gitlab.crio.do/ in the next step

- Goto https://gitlab.crio.do/ and copy-paste this key by following the instructions in the below video. (Note: You have to visit https://gitlab.crio.do/ and not gitlab.com)
- Ensure the SSH key creation on Gitpod and adding it to gitlab.crio.do was successfully done by executing the below command. You’ll see a message like "Welcome to Gitlab, @<your-gitlab.crio.do-username>"
gitpod /workspace/me_git_basics $ ssh -T git@gitlab.crio.do

Welcome to GitLab, @nabhan-criodo!

gitpod /workspace/me_git_basics $
- Execute the below commands to setup the directory structure
mkdir -p ~/workspace/bytes

cd ~/workspace/bytes
Note
Setup is complete and you can move on to the next milestone.
Setup - Others
Follow these steps if you want to work through this Byte on your local machine
-
An empty Git repository is required, follow the steps here to create a blank project on GitLab. (You won’t have permission to create one on gitlab.crio.do) Nb: Don’t select the Initialize repository with a README option
-
Download and install Git client from here
-
Setup your Git client as explained in this article
-
Create & add an SSH key to GitLab
-
Get the GitLab repository links which we’ll use in the next milestone
- Execute the below commands to setup the directory structure for uniformity
mkdir -p ~/workspace/bytes

cd ~/workspace/bytes
Note
Setup is complete and you can move on to the next milestone.
Getting a copy of the code to your system
You can follow through the below instructions, and can refer to this video walkthrough if you’re stuck at any point -
For Crio Workspace users -
For Gitpod users -
All Git related commands start with the git keyword. One of the frequent commands you’ll use will be git status which gets you the current status of the Git repository. Try executing it.
Git would’ve told you something like this
fatal: Not a git repository (or any of the parent directories): .git
Not the best of welcome message you might’ve anticipated from Git, still it’s something for us to get started with.
The output from a Git command, if successful, tells us that it succeeded with some additional information, else it prints out details which can tell us why exactly the command failed. These details are very useful to address the error and run the command again.
The above message means that you are not in a directory which is part of a git repository.
You’d have your Git repository links from the setup task. Go to the HTTPS link (starting with https://gitlab) of the repository in your browser. GitLab would tell you it’s empty. Let’s download the "empty" repository to ~/workspace/bytes/ directory in our local system. Use the below command with the SSH link (starting with git@gitlab) to your repo to do this.
mkdir -p ~/workspace/bytes

cd ~/workspace/bytes

# Ensure you clone using the ssh link and not the https link

git clone <add-ssh-link-here>
The terminal will say Cloning into <folder-name>
The folder name will be of the format <username>-me_git_basics
Once done, you’d be able to see a new folder. Does it’s name have any correlation to the repository name? Is the new folder empty as GitLab told us or was it all a lie? (Hint: Hidden files)
Now that we have the same Git repository on our local system as on GitLab, the former will be referred to as the local repo and the GitLab one, remote repo.
Remotes in Git are usually places like GitLab & GitHub where we can share our code with others. Once you cd to the local repo folder, execute git remote -v to see something like this
$ cd ~/workspace/bytes/criotest003--me_git_basics

$ git remote -v

origin  git@gitlab.crio.do:COHORT_ME_GIT_BASICS_ENROLL_1596802014715/criotest003-ME_GIT_BASICS.git (fetch)

origin  git@gitlab.crio.do:COHORT_ME_GIT_BASICS_ENROLL_1596802014715/criotest003-ME_GIT_BASICS.git (push)
This just means that whenever Git says origin, it’s referring to the repository denoted by
git@gitlab.crio.do:COHORT_ME_GIT_BASICS_ENROLL_1596802014715/criotest003-ME_GIT_BASICS.git
Try git status again from inside the repo folder. Assuming you weren’t eager enough to have made any changes to the files or folders after cloning the repo yet, you'll get this output
On branch master

Initial commit

nothing to commit (create/copy files and use "git add" to track)
-
Line 1: Mentions that we're currently in a branch named master.What is a Git branch? Why do we need them?
-
Line 2: Mentions that we are yet to make our initial commit
-
Line 3: Mentions that you haven’t made any changes that need to be committed
Wait, wait! What does a commit mean?
We’ll see in the next milestone :)
For now, you have cloned a remote GitHub repository and you can access it on your machine just like a folder.
You might also observe that there is a .git folder inside the repo. See if you can find out what this contains.
Curious Cats
-
When would you need multiple remotes?
-
Is there any difference between using the
httpslink and theSSHlink to clone a repository? -
What if you need to use a different name for the download folder rather than the name of the repository with
git clone? -
Where does
git remotecommand get the mapping of remote name & the corresponding links?
Answers to these Curious Cats questions will be available in the Takeaways milestone at the end.
Saving changes locally
Let’s get started with adding new files. I’ll create a file, first.txt and add some text to it. Feel free to create your own file(s). A file goes through different states in a Git repo - any changes we make are said to be in the working directory. Ok, try executing git status again - No, you won't get the earlier message or rather you shouldn't - Things don't happen the same way twice in life :)
On branch master

Initial commit

Untracked files:

  (use "git add <file>..." to include in what will be committed)

        first.txt

nothing added to commit but untracked files present (use "git add" to track)
We have some familiar lines in there and some newcomers as well!
It’s trying to tell us that first.txt is an Untracked file. What does it mean for a file to be tracked in Git?
Line 4 is Git being a good Samaritan. It's kind enough to tell us that the git add command can be used to add files to the next commit. A commit is like a checkpoint in Git where we save the current state of our files.
Use the git add command to mark your files for the next commit. This pushes the changes from the working directory to the staging area. Use man git add to see the manual page. How does git status look now?
We’ve added new files, do they reflect on GitLab? Login and check.
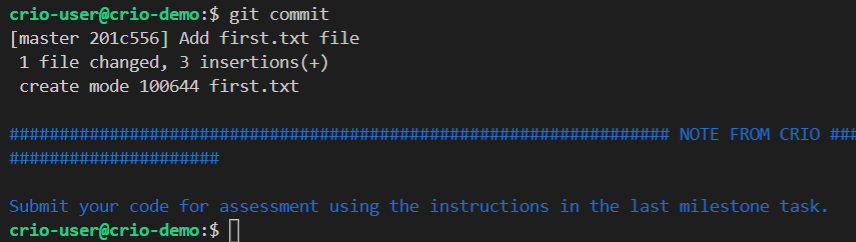
We’re one step away from making our very first commit. We do that using git commit. The thing is, commits are like checkpoints for us to navigate back and forth (if required). It's better to add a message to our commit. Don't worry, our good friend Git will remind you (or should I say, force) to add a message to your commit.
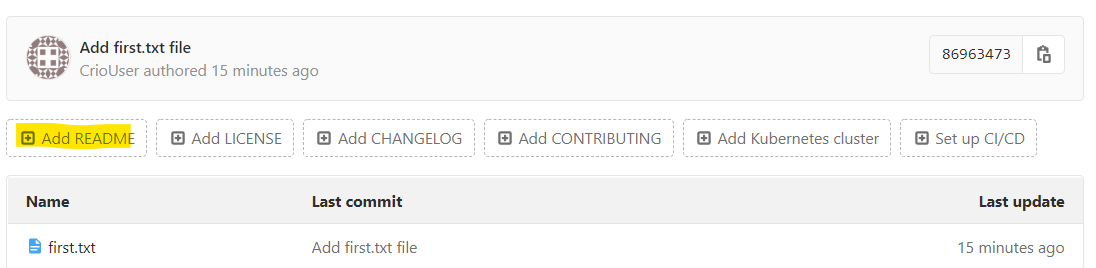
If you have a default text editor configured, it will open up, enter some info about what your commit has/is and close it. In case you were wondering, I added "Add first.txt file".
Now that we’ve committed our changes, it should reflect on GitLab, right? Go and check.
We can use git log to view all our commits. Each commit can be uniquely recognized by an ID. In this case, the commit ID starts with 869634. How do you think the ID is calculated, is it just a random number?

Make changes to one of the files you just committed. Follow the same procedure to create a second commit with changes. See the output of git status after each command. Does it differ from what you saw earlier?
Let the world know!
We committed our ground-breaking updates, but they still haven’t shown up in the GitLab UI. Let’s see how to do this.
Pushing is the art of sending updates from your local repo to the remote repo, which in our case is the GitLab repo we initially cloned from. One or more commits form a push. Use git push -u origin master for that. We specify the remote name & its branch we’re pushing our code to.
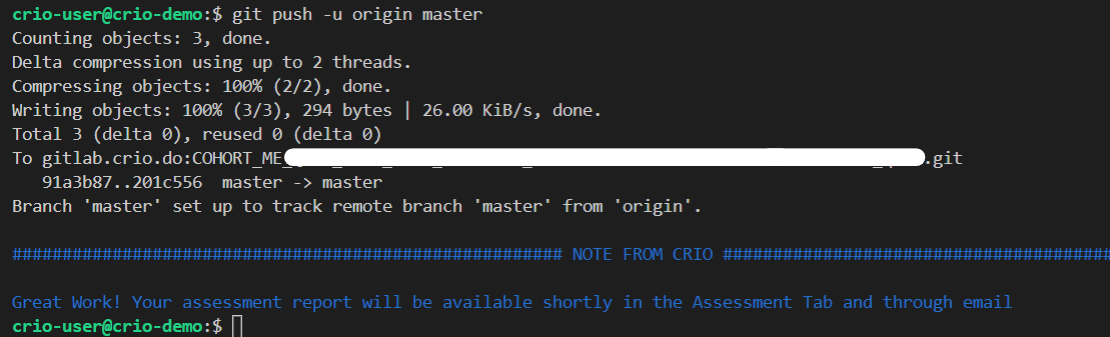
Finally! You’ll be able to see the changes we’ve made locally in the GitLab repo. Get familiar with the details shown there, like
-
When was a file last updated in the remote repo?
-
Who made the commits and when?
-
See changes to files in each commit
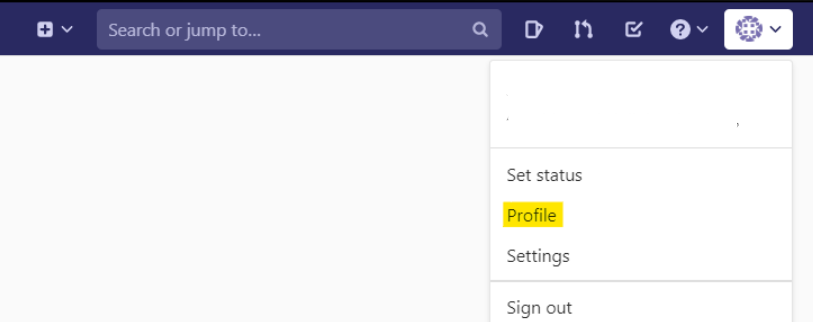
Congratulations! You’ve successfully pushed your changes to Gitlab and have made your mark on the Contribution graph.
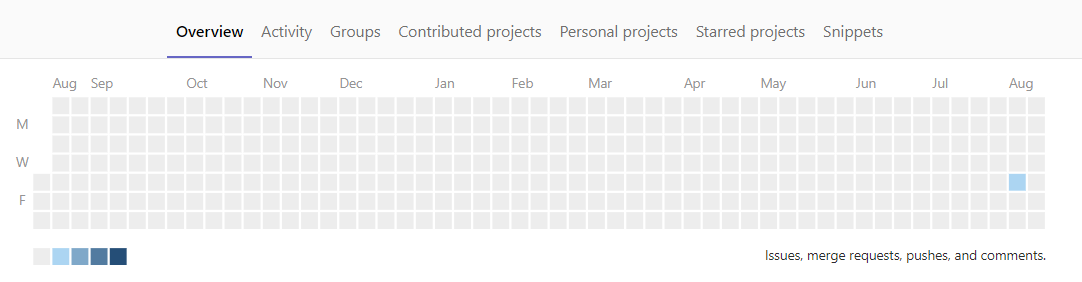
Go to your Gitlab profile to see it
The contribution graph is a quick indicator to recruiters that you’ve been working on projects & following industry best practices like using version control (Git) for it.
Curious Cats
-
How would you mark all changes for committing using
git addinstead of listing out each of the file names? -
How can we move changes to a modified file from the staging area back to the working directory? What if we need to get the file back to the previous committed state?
-
What if we don’t want the text editor to show up its glorious face when
git commitis run? Is there a workaround to provide the commit message with the command itself? -
Now that we have only a handful of files, it’s easy to remember what changes were newly made. How’d you check the changes made to the local repo since the previous commit?
-
Rename a file and make a commit. Now, make some edits to the file and commit again.
git log --follow <filename>lists all commits that changed this file. You’ll be able to find commits related to the original file name are also listed out. How does Git detect renames?
Answers to these Curious Cats questions will be available in the Takeaways milestone at the end.
Getting updates from the remote
Most of the time, you’ll be working on projects as part of a team. Each of you will be pushing new updates to the remote repository. How can you get the latest version of the code, with changes made by others, from the remote repo to your local repo?
Let’s experience one such scenario. Readme files are usually helpful to provide instructions to users about the repository - what it is, how to set up the project, etc. Let’s create one for our git repo!
Use the GitLab UI to create a new Readme file.
Add the below text to the Readme file
Learning Git Basics [Added via GitLab]
You’ll be able to see the file added in GitLab. Did a new commit get auto-created?
Now we need to get these changes reflected in our local repo as well. How do we do that?
Let’s take a step back and think about how we did the opposite i.e., get changes from local repo to the remote. That was git push, right? So, this should be ___?
Once you’ve pulled the changes from the remote repo to your local repo, verify the changes by checking the Readme file. Can you see the new commits (Hint: Use git log)?
Can you quickly answer the first question below and comeback :)
You first! No, you first!
I have a couple of tasks for you
-
Create/edit another file in the local repo and commit changes
-
GitLab lets you edit files from the UI itself. Add "Learnt about git clone/status/log/add/commit commands" to the README file via GitLab and save the changes.
What happens if you try to push your local changes now?
Hmm, Git doesn’t seem to be happy with that :(
To git@gitlab.com:nabhan.abdullah/git-basics-byte.git

 ! [rejected]        master -> master (fetch first)

error: failed to push some refs to 'git@gitlab.crio.do:COHORT_ME_GIT_BASICS_ENROLL_1596802014715/criotest003-ME_GIT_BASICS.git'

hint: Updates were rejected because the remote contains work that you do

hint: not have locally. This is usually caused by another repository pushing

hint: to the same ref. You may want to first integrate the remote changes

hint: (e.g., 'git pull ...') before pushing again.

hint: See the 'Note about fast-forwards' in 'git push --help' for details.
Why could that be?
Git has presented us with intel on why the error occurred as always. It’s trying to tell us something about the updates being rejected due to the remote having work that we don’t have locally. Ah, there you go! We had made some changes to the README earlier via GitLab UI, right?
We’ll need to use the git pull command first to integrate the remote changes locally & then push. Do both of these.
But, why did we have to do a git pull followed by a git push? Why wouldn’t it work the other way around?
Think about a scenario where multiple team members could be changing the same file as well. We’ll get to this in the next milestone.
Curious Cats
-
Both
git clone ...&git pull ...were used to download files from remote to local, how are they different? -
There’s another command,
git fetch .... How’s it different from agit pull ...?
Answers to these Curious Cats questions will be available in the Takeaways milestone at the end.
Time to make a choice!
Ready for more tasks that are common during a software cycle?
-
Update the Readme title to Learning lots of Git Basics [Added via GitLab] via GitLab UI
-
Update the Readme title to Learning more Git Basics [Added via local repo] from the local repo and commit the changes
Push the changes. You know what happens next, right? Yep, Git will ask you to pull first. Is the situation under control once you Pull?
You’d be shown a message like this (if you are on Crio workspace, you’ll be asked to enter y or n based on if you know how to resolve a merge conflict. Enter y, we’ll go through how to resolve the merge-conflict below. Entering n will remove any changes caused by the pull command. Do a pull again if you accidentally hit n)
Auto-merging README.md

CONFLICT (content): Merge conflict in README.md

Automatic merge failed; fix conflicts and then commit the result.
It’s hinting towards some conflict in the README.md file. But, why didn’t this happen the last time we did the same process?
On pulling, Git checks the changes coming from the remote, sees that the same file has changed locally as well & automatically tries to include both sets of changes. In this case, we’ve made changes to the same line of the README file both locally & remotely. Git wouldn’t know which one to prioritise and needs our help to resolve this merge conflict.
Open the README file in your editor

Current Change is what you had locally & Incoming Change is that from the remote.
Make up your mind and choose one. You can also choose both sets of changes and edit them further if that is required. After you’ve made the changes according to your choice, do a git add README.md and git commit to complete the merge.
References
Note
If you are using Gtipod, it will be a good idea to remove the SSH key you added to https://gitlab.crio.do/ after you complete the Byte tasks for security reasons.
Curious Cats
- What kinds of merges can Git do automatically?
Answers to these Curious Cats questions will be available in the Takeaways milestone at the end.
Summary
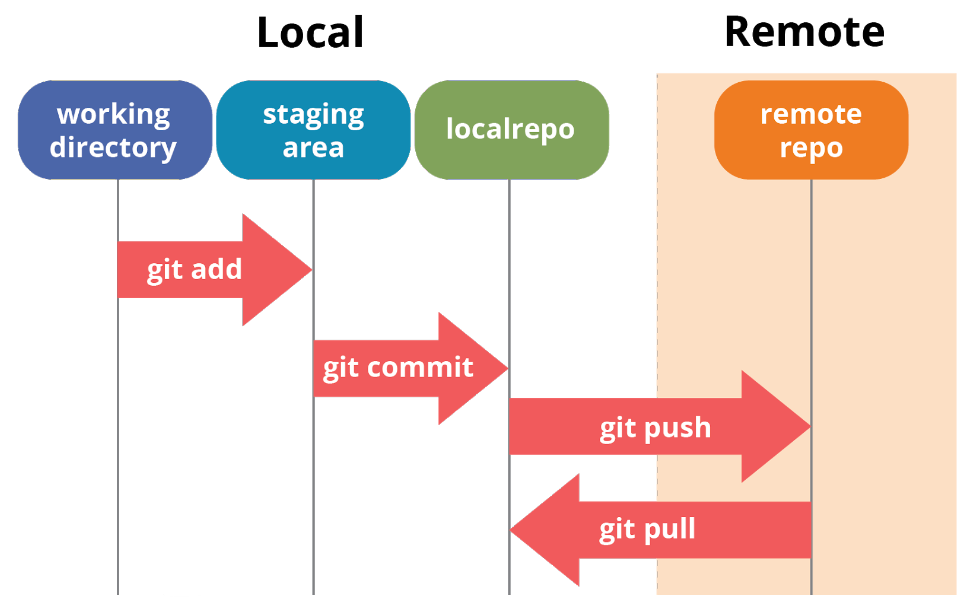
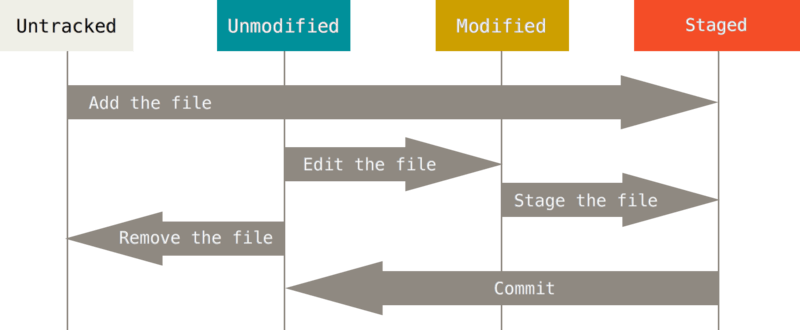
Basic workflow in Git
-
You modify files in your working directory
-
You stage the files, adding snapshots of them to your staging area (
git add file) -
You do a commit, which takes the files as they are in the staging area and stores that snapshot permanently to your local Git repository (
git commit file) -
You push the changes from the local repository to the remote repository (
git push) -
You pull the changes from the remote repository to the local repository (
git pull)
- State of the file according to the actions
Further reading
Git offers several more features which help in maintaining code and collaborating with team members during software development. For example - config, branch, stash, squash etc. You can explore these as needed.
Excited? Dig deeper to Git internals for answering the below questions
Newfound Superpowers
- Ability to use Git for your projects and never lose older versions.
Now you can
-
Download code from hosting services like GitLab/GitHub & start working on them locally
-
Make changes locally and push them back to the GitLab/GitHub
-
Use Git to create checkpoints (sets of changes tracked together) in your project
-
Share code and resolve merge conflicts while working in a team
-
Overall, use commands to perform basic Git operations for version control and collaboration