Get started using Node.js to create backend applications
Objective
Background/Recap
"Node.js is an open-source, cross-platform, back-end, JavaScript runtime environment that executes JavaScript code outside a web browser." - Wikipedia
-
Open source - because it’s source code is available for use and modification legally
-
Cross platform - works across different platforms like Linux, OSX and Windows
-
Backend - receives requests from clients and contains the logic to respond to it
-
JS runtime environment - where JavaScript code gets parsed and executed
As Node.js is based on JavaScript, it’s easier to learn to get started with for developers who know JavaScript. This also means that both the frontend and backend can now be written with just JavaScript knowledge.
Primary goals
-
Understand how Node.js applications are built
-
Implement a TODO application using Node.js
-
Implement REST APIs using Express.js
Objective
Get started using Node.js to create backend applications
Background/Recap
"Node.js is an open-source, cross-platform, back-end, JavaScript runtime environment that executes JavaScript code outside a web browser." - Wikipedia
-
Open source - because it’s source code is available for use and modification legally
-
Cross platform - works across different platforms like Linux, OSX and Windows
-
Backend - receives requests from clients and contains the logic to respond to it
-
JS runtime environment - where JavaScript code gets parsed and executed
As Node.js is based on JavaScript, it’s easier to learn to get started with for developers who know JavaScript. This also means that both the frontend and backend can now be written with just JavaScript knowledge.
Primary goals
-
Understand how Node.js applications are built
-
Implement a TODO application using Node.js
-
Implement REST APIs using Express.js
Open a new terminal in your Crio Workspace
To open a new terminal, click on the menu > View > Terminal. The menu button is on the top-left (three horizontal bars).

Fetch the source files
- Create
~/workspace/bytes/directory andcdto it
mkdir -p ~/workspace/bytes/

cd ~/workspace/bytes/
- Download the source code to the
~/workspace/bytes/directory using one of the following commands:
git clone https://gitlab.crio.do/crio_bytes/me_nodejs_basics.git

git clone git@gitlab.crio.do:crio_bytes/me_nodejs_basics.git
Open the source files in the IDE
-
Now that you have fetched all the required source files, you can open them in the online IDE by following these steps: Click on the
Open Folderbutton. -
Select the following folder
/home/crio-user/workspace/bytes/me_nodejs_basics/and Click onOK.
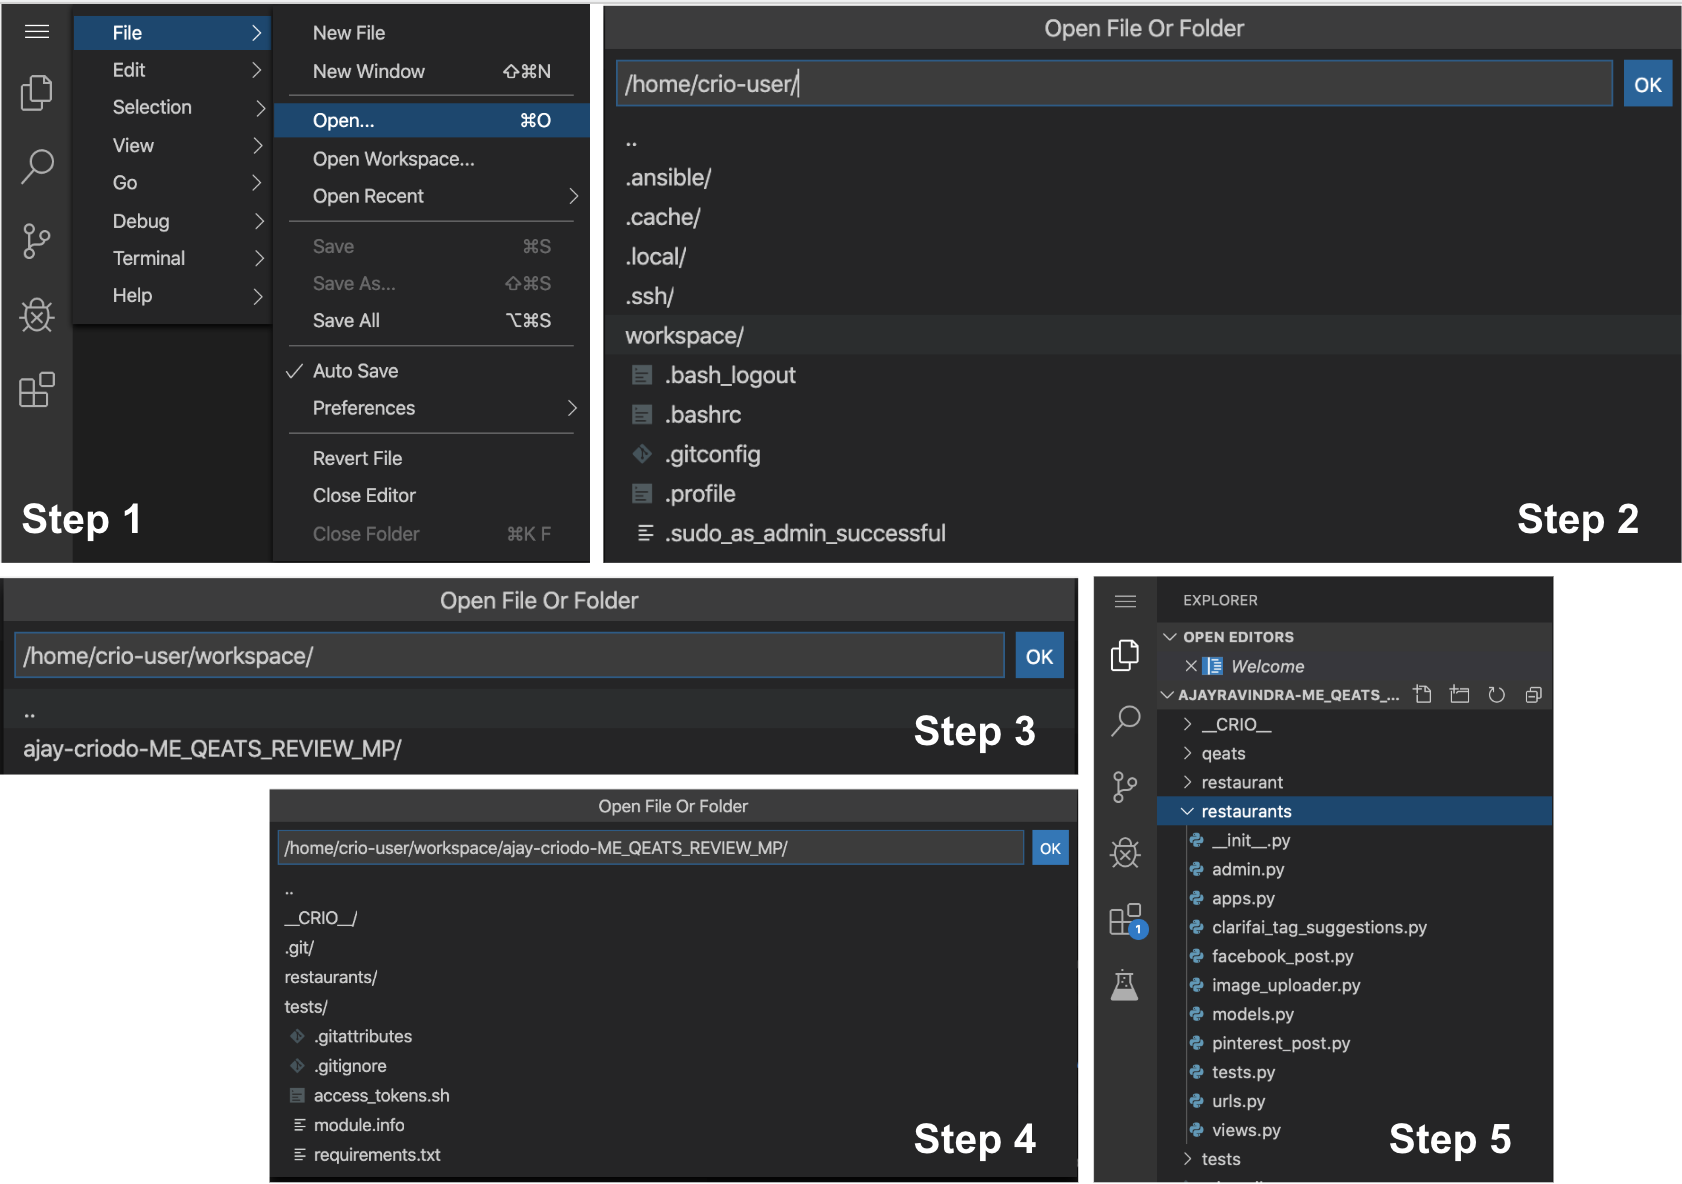
Note
Please use the image above for illustration purposes only. The actual Byte name and the corresponding folder names will be different.
Install dependencies
Execute the below command to install your project dependencies
npm install
Creating a Node.js server
Let’s look at how to create a simple server using Node.js
TODO
-
Open
app.jsfile present in the root directory. -
Copy the below lines of code to the
app.jsfile
// File: app.js

const http = require('http');

const port = 8081;


http.createServer((request, response) => {

    // Set response status code and response headers

    response.writeHead(200, { 'Content-Type': 'text/html' });


    // Set response body i.e, data to be sent

    response.write('<h1>TODO</h1>');


    // Tell the server the response is complete and to close the connection

    response.end();


}).listen(port, () => {

    // Log text to the terminal once the server starts

    console.log(`Nodejs server started on port ${port}`)

});
- Execute
node app.jsin the terminal. You’ll see the below output
crio-user@nabhan-criodo:~/workspace/bytes/me_nodejs_basics$ node app.js

Nodejs server started on port 8081
- Use the
curlcommand to send a GET request tolocalhostat port 8081. What does it print out?
curl -X GET http://localhost:8081
-
Visiting a URL from the browser sends a GET request
- If you are on Crio workspace, find your workspace IP from the workspace tab and visit
<workspace-ip>:8081to view the server response
- If you are on Crio workspace, find your workspace IP from the workspace tab and visit

* If you are working locally, visit `localhost:8081` to view the server response

* If you are using GitPod can use the default options available in the terminal open Ports tab.

-
What is the difference in the response received using the
curlcommand and the browser? -
Can you change the code in
app.jsto print outCreated by <your-name-here>after the TODO heading?
Note
You’ll have to restart the node server to reflect any change made after starting the server. To restart,
-
Enter
Ctrl + cfrom the terminal where the server is running -
Execute
node app.jsagain
Tip
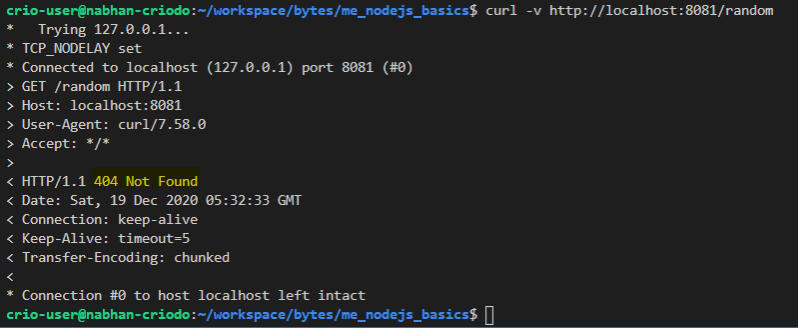
You can use the curl command’s -v flag to view the request and response headers as well
References
What happened?
-
httpis an inbuilt Node module, you can userequire()to import it -
The
httpmodule exposes a functioncreateServer()which can be used to create an HTTP server -
You have to pass a callback function as a parameter to the
createServer()function. This function gets executed every time the server receives a request -
The parameters to the callback function are the HTTP request and response objects
-
We used these
responseobject methods-
writeHead()- the first parameter is the response status code and the second any response headers -
write()- to add response body to be sent back to the client -
end()- tells the server that the response is complete
-
-
curlcommand prints out the response as such eg:curl -v http://localhost:8081
<h1>TODO<h1>
- The browser renders the HTML tag and displays an h1 heading with text, TODO

- You can add more
response.write()calls beforeresponse.end()is called to send more data or add in the sameresponse.write()call itself. The two methods given below produce the same response body.
// Method 1

response.write('<h1>TODO</h1>');


response.write('<p>Created by: Crio.Do</p>');
// Method 2

response.write('<h1>TODO</h1><p>Created by: Crio.Do</p>');
-
The
listen()method sets the port in which the server listens to the requests -
You can also add a callback function to
listen()which will get executed once, when the server starts
Curious Cats
-
What happens if you call the
response.write()method afterresponse.end()is called? (Hint: Check response body) -
What happens if you call the
response.write()method before theresponse.writeHead()method? (Hint: Check the response headers returned)? -
What happens if you miss calling the
response.end()method?
Digging deep into requests
HTTP protocol supports multiple methods to perform different actions. Let’s look at some of these:
-
GET- used to retrieve some resource (eg: list of TODO items) from the server -
POST- used to send some data to the server (eg: add new TODO item) -
DELETE- used to delete a resource stored in the server (eg: delete a completed TODO item)
TODO
-
With your current server setup, to which of the above HTTP request methods does the server respond?
-
Try sending the request to different paths to the server eg:
/,/random,/todo/1. Is there any difference in the responses? -
Find out how to retrieve the request method and path (Ref)
-
Update the server callback function to return the data only if
-
The request path is
/todos -
The request is of type
GET
-
-
When the request isn’t of type
GET, return a501 Not Implementedresponse status code -
When the request path isn’t
/todos, return a404 Not Foundresponse status code -
Verify your implementation using the
curlcommand
# GET request to path "/" - returns 404

curl -v -X GET http://localhost:8081/


# POST request to path "/todos" - returns 501

curl -v -X POST http://localhost:8081/


# GET request to path "/random" - returns 404

curl -v -X GET http://localhost:8081/random


# GET request to path "/todos" - returns 200

curl -v -X GET http://localhost:8081/todos
Tip
If restarting the Node server for every change seems tedious, use the npm start command to start the application defined by the app.js file in monitoring mode. The application will automatically restart on any changes.
References
What happened?
-
The server response is the same for any of the HTTP request methods as well as any path
-
You can fetch the details on the request method and path by using the
requestobject’smethodandurlproperties
const { method, url } = request;
-
Use an
ifclause to check if the path provided byurlvariable is/todos-
If so, check if
methodisGET-
If so, return the header and HTML response
-
Else, return just a 501 status code
-
-
Else, return
404status code
-
if (url == "/todos") {

    if (method == "GET") {

        response.writeHead(200, { 'Content-Type': 'text/html' });

        response.write('<h1>TODO</h1>');

        response.write('<p>Created by: Crio.Do</p>');

    } else {

        response.writeHead(501);

    }

} else {

    response.writeHead(404);

}

response.end();
You’ll get a similar response if you try to GET from http://localhost:8081/random. The response status code is 404 here.
Implement a Todo list app
Now that you have learned how to check for different routes and HTTP request types, go ahead and implement a backend Todo list application.
TODO
- Create an array
todoListand add a couple of TODO items to it, eg:
let todoList = ["Complete Node Byte", "Play Cricket"];
-
Update your callback function so that using the
curlcommand to send-
a
GETrequest to the/todospath responds with the content of thetodoListarray -
Implement a POST API for the path
/todos-
Request body will be JSON with a
nameproperty -
Value of the
nameproperty gets added totodoList -
Return a
201 Createdstatus code -
No response body is required
-
Example JSON data:
{ "name": “Plan for next week” }
-
-
Implement a DELETE API for the path
/todos-
Request body will be JSON with a
nameproperty -
Value of the
nameproperty gets deleted fromtodoList, if present -
Return a
204 No Contentstatus code if a Todo item is deleted -
No response body is required
-
-
-
Verify your implementation using
curlcommands
# GET request to path "/todos" returns contents of “todoList”

curl -X GET http://localhost:8081/todos


# POST request to path "/todos" adds a new TODO item

curl -X POST -d '{"name":"Plan for next week"}' http://localhost:8081/todos -H 'content-type:application/json'


# DELETE request to path "/todos" deletes a TODO item

curl -X DELETE -d '{"name":"Play Cricket"}' http://localhost:8081/todos -H 'content-type:application/json'
Tip
A 200 OK response status code is send by default if it’s not set explicitly
References
What happened?
To complete the tasks, you’d have
- Updated the
ifclause of theGETmethod condition to respond with the contents of thetodoListarray
if (method === "GET") {

    response.write(todoList.toString())

}
-
Added an
else ifclause to check for "POST" requests-
The
requestobject is a stream and it’sdataandendevents can be used to fetch the data -
The
request.on()method can be used to look for the stream events -
The data is read in chunks and is a buffer
-
Once the whole data is read (known by the
endevent), you can parse the JSON data as a JavaScript object using theJSON.parse()function -
Push value of the
nameproperty of the request JSON data totodoList
-
else if (method === "POST") {

    let body = '';

    request.on('error', (err) => {

        console.error(err);

    }).on('data', (chunk) => {

        body += chunk;

    }).on('end', () => {

        body = JSON.parse(body);

        todoList.push(body.name)

    });

}
- Similarly, you can implement the action for a
DELETErequest
else if (method === "DELETE") {

    let body = '';

    request.on('error', (err) => {

        console.error(err);

    }).on('data', (chunk) => {

        body += chunk;

    }).on('end', () => {

        body = JSON.parse(body);

        let deleteTodo = body.name;

        for (let i = 0; i < todoList.length; i++) {

            if (todoList[i] === deleteTodo) {

                todoList.splice(i, 1);

            }

        }

    });

}
Here’s the complete content of the app.js file for your reference.
Curious Cats
- Some of your users are getting overwhelmed with the sheer number of TODOs they have in their TODO list. Update the
GETrequest to support URL parameters by which users can specify the number of TODO items in their list to view. Eg:/todos?n=5should return the first 5 items in the TODO list (Ref)
Importing Express.js
Express.js is a Node.js framework and makes it easier to build APIs.
You’ll implement the same GET, POST and DELETE APIs you created in the previous milestone using Express. You can then compare both the implementations to view how Express.js makes it easier.
First, let’s get Express to work on your system.
TODO
-
Create a new file called
app-http.jsand move you current code fromapp.jsto the new file -
Import the
expresslibrary using therequirekeyword -
Start the app if it isn’t running. You’ll find that the app crashes due to an error
internal/modules/cjs/loader.js:896

  throw err;

  ^


Error: Cannot find module 'express'
- But you imported the
httplibrary exactly the same way earlier, right? Why didn’t it throw an error then?
What happened?
Once you add the import statement as given below to import Express to your project, the Node server will try to find the module. As express is not an built-in Node module whereas http was, you have to install express explicitly.
const express = require('express')
Adding npm dependencies
As a Google search puts it down,
"npm [or Node Package Manager] is a package manager for the JavaScript programming language"
For you, this just means that npm is like GitHub for JavaScript packages from where you can download it.
The package.json file is a special configuration file node uses to store metadata on it’s projects. You can add any number of project dependencies there and anyone who needs to setup your project can just execute npm install to get the project working on their system.
Let’s use npm to get express
TODO
-
Find the Express package in the npm registry (Yeah, Google Search!)
-
Add
expressdependency to yourpackage.jsonfile -
Any patch or minor release of the version you see in the express page in npm registry should be acceptable
-
Install the dependencies and ensure the application starts without any errors
References
What happened?
You’ll find the Express package in the npm registry here. A snapshot of the page is given below (Note: The version number can be different for you)
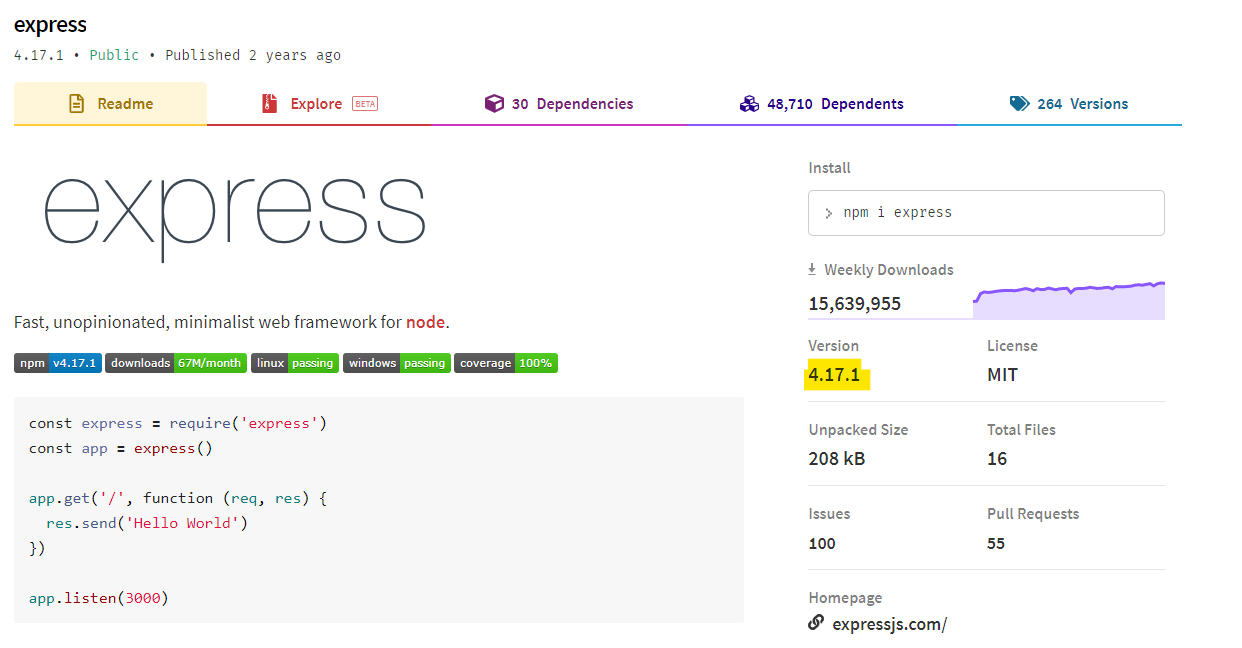
Dependencies in the package.json file goes inside the dependencies field. Instead of configuring our project to be dependent on some exact version of a library, we can use semantic versioning to be flexible.
The npm packages follows the convention where versions are named x.y.z
-
x is the major version i.e, involving new functionalities that are backward incompatible
-
y is the minor version i.e, involving new functionalities that are backward compatible
-
z is the patch version i.e, involving bug fixes that are backward compatible
The ^ option allows to use any minor or patch version of the specified version
"express": "^4.17.1"
Install the express library by executing npm install. This will pickup the dependencies specified in the package.json file. Starting the application again won’t show the error now.
Curious Cats
-
What is happening when you execute
npm start? -
Check which libraries are there in your
package.jsonfile as dependencies. Now, try executingnpm install corsto install a new library. Does this action modify yourpackage.jsonlibrary?
Getting started with Express.js
Routing is how the server responds differently to the client. The response to a GET request to the / path may not be the same as that of a POST request to the same path.
TODO
-
Implement the
GETAPI to the/todospath using Express -
The response should be the contents of the
todoListarray -
Check the response using
curlcommand
curl -X GET http://localhost:8081/todos
What happened?
- Express is initialized using the
express()method
const app = express()
-
For each HTTP request method, Express has a separate method to set the callback function for that request. For
GET, you useapp.get() -
The
responseobject’ssend()method is used to send the response body
app.get("/todos", (request,response) => {

    response.send(todoList);

});
- To bind the server to a port, you use the
listen()method on the Express application,app
const port = 8081;

app.listen(port, function(){

    console.log(`Nodejs server started on port ${port}`)

});
Adding rest of the APIs
Now that you got a glimpse of how to create an API using Express, go ahead and implement the rest of the APIs
TODO
-
Use the built-in
express.json()function to parse the request body as JSON -
Implement a POST API for the path
/todos-
Request body will be JSON with a
nameproperty -
Value of the
nameproperty gets added totodoList -
Return a
201 Createdstatus code -
No response body is required
-
-
Implement a DELETE API for the path
/todos-
Request body will be JSON with a
nameproperty -
Value of the
nameproperty gets deleted fromtodoList, if present -
Return a
204 No Contentstatus code if a Todo item is deleted -
No response body is required
-
-
Any other request method to
/todosshould return a501 Not Implementedstatus code -
Requests to any path other than
/todosshould return a404 Not Foundstatus code
# GET request to path "/todos" returns contents of “todoList”

curl -v -X GET http://localhost:8081/todos


# POST request to path "/todos" adds a new TODO item

curl -X POST -d '{"name":"Plan for next week"}' http://localhost:8081/todos -H 'content-type:application/json'


# DELETE request to path "/todos" deletes a TODO item

curl -v -X DELETE -d '{"name":"Play Cricket"}' http://localhost:3000/todos -H 'content-type:application/json'
References
What happened?
Add express.json() to parse the request body as JSON.
app.use(express.json())
This is how you implement a POST request
app.post("/todos", (request, response) => {

    let newTodo = request.body.name;

    todoList.push(newTodo);

    response.status(201).end();

});
-
app.post()method is used to listen for a POST request -
You can directly access the properties of the JSON request body using
request.body.<property-name>.-
You can use
request.body.namehere -
This is easier in contrast to how you did it with the
httpmodule where you first read data into a stream, parsed it as JSON and then retrieved the property value
-
-
response.status()can be used to explicitly set a response status code in Express-
By default, Express sets a
-
200 status code if a route matches
-
404 status code if no route matches
-
-
To set a different status code let’s say 400, use `response.status(400)
-
-
Even if you don’t have to return any data,
-
you’ll have to call
response.send()method to let Node know the response is completed. -
response.end()is another alternative here.
-
Similarly, you can implement the DELETE request and return a 204 status code
app.delete("/todos", (request, response) => {

    let deleteTodo = request.body.name;

    console.log(deleteTodo);

    for (let i = 0; i < todoList.length; i++) {

        if (todoList[i] === deleteTodo) {

            todoList.splice(i, 1);

            response.status(204).send();

        }

    }

});
Let’s also look at how to satisfy rest of the requirements
- To send a 501 status code for requests to
/todosother thanGET,POSTandDELETE, you can use theapp.all()method below the current set of routes
app.all("/todos", (request, response) => {

    response.status(501).send()

})
-
To send a 404 status code to any other requests
-
Express returns a 404 status code with HTML content by default for any unimplemented route
-
You can also use the
app.all()method at the end to add a custom 404 handler
-
app.all("*", (request, response) => {

    response.status(404);

    response.send("<Custom 404 message>");

})
Find the complete Express implementation here
Curious Cats
- In the new release of your TODO application, the API endpoint was changed from "/todos" to “/user/todos”. You don’t want to give your support team a nightmare by breaking all your existing clients’ code. A 302 status code along with the new endpoint can be returned to communicate in HTTP language, “Hey, I changed my location to this endpoint,
/user/todos. You can catch me up there. Love,/todos”. How do you implement it? (Ref 1, 2, 3)
Summary
-
Node.js is a backend JavaScript runtime environment to to execute JS code without a browser
-
You can use it to build to web server that listens for client requests and responds to it
-
Node’s built-in
httpmodule’screateServer()method can be used to create an HTTP server-
The
createServer()method accepts a callback function with two parameters,requestandresponse-
requestdenotes the incoming request object -
responsedenotes the response object which will be send back to the client
-
-
The callback function gets executed every time a new request is received
-
The
requestobject has properties like-
method- type of HTTP request method -
url- path of the resource requested for -
headers- request headers -
You can use these values to conditionally respond to the requests based on the request properties like HTTP method, path or headers
-
-
The
responseobject methods can be used to set the response-
To set a response status code and headers, use the
writeHead()method exposed by theresponseobject. Eg:response.writeHead(200, { 'Content-Type': 'text/html' }); -
write()method accepts the text to be sent as response body -
end()method tells the server the request has been completed
-
-
To bind the HTTP server created using
createServer()to a specific port, use thelisten()method- It also accepts a callback function which gets executed only once when the server is started
-
To read data sent as request body, use the
requestobject’sdataandendevents-
dataevent is triggered if there’s data remaining in the stream to be read -
endevent is triggered if the request data stream is empty
-
-
-
NPM is a repository for JavaScript packages.
-
You can use
npm installto download your project dependencies from the NPM registry -
The
package.jsonfile can be used to specify your project dependencies using itsdependenciesfield
-
-
Express.js is a Node framework for creating web applications and APIs
-
You create an Express application handler by
const express = require(‘express’); const app = express() -
It provides methods for each of the HTTP request method types like
-
app.get()for GET request -
app.post()for POST request -
app.all()is a special method that listens to all HTTP request types to a particular path
-
-
To specify the callback for a particular route, let’s say
GETrequest to/user, you doapp.get("/user", callbackFunction) -
Using Express’s inbuilt
jsonmiddleware, we can directly parse the JSON request body as a JavaScript object.-
To do that, add
app.use(express.json())before any routes -
You can use for example,
request.body.jsonProperty1to fetch a property in your request body, "jsonProperty1"
-
-
The response object’s methods to use are
-
status()- to set the response status code -
send()- send response body data -
end()- trigger end of response
-
-
-
Find the
-
Further Reading
Newfound Superpowers
-
Knowledge of the Node.js backend framework
-
Know-how of the Express.js library
Now you can
-
Create simple applications using the Node.js framework
-
Use Node.js to create a web server that listens to multiple routes
-
Utilize the Express.js library in your Node applications