Get started Unit Testing using JUnit
Objective
Background/Recap
According to a Cambridge University study, around 50% of a developer’s time is spent debugging. One thing that can help reduce this effort is Unit Testing.
Unit testing involves testing smaller software components to see if they are working according to the specification. This is done before being integrated with other components of the software. The cost to fix a bug increases substantially with every phase (as shown in the diagram below) and hence it’s critical to find bugs as early as possible in the software life cycle. As unit testing is performed in the development stage, by the developers, the cost required to fix defects is minimal. The defects caught unit testing are easier to locate and relatively easier to fix.
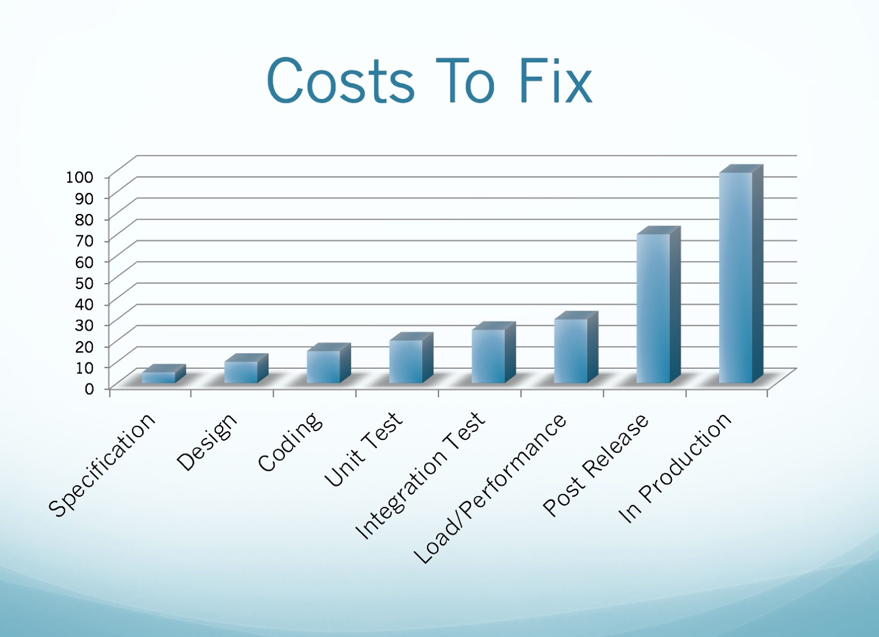
Cost to fix bugs during different phases of a SDLC (Source: leadingagile.com)
Primary goals
-
Understand the need for unit testing
-
Understand basic unit testing with JUnit
-
Understand different JUnit methods
-
Understand JUnit annotations
-
Understand unit testing best practices
Objective
Get started Unit Testing using JUnit
Background/Recap
According to a Cambridge University study, around 50% of a developer’s time is spent debugging. One thing that can help reduce this effort is Unit Testing.
Unit testing involves testing smaller software components to see if they are working according to the specification. This is done before being integrated with other components of the software. The cost to fix a bug increases substantially with every phase (as shown in the diagram below) and hence it’s critical to find bugs as early as possible in the software life cycle. As unit testing is performed in the development stage, by the developers, the cost required to fix defects is minimal. The defects caught unit testing are easier to locate and relatively easier to fix.
Cost to fix bugs during different phases of a SDLC (Source: leadingagile.com)
Primary goals
-
Understand the need for unit testing
-
Understand basic unit testing with JUnit
-
Understand different JUnit methods
-
Understand JUnit annotations
-
Understand unit testing best practices
Download source code
- Create
~/workspace/bytes/directory andcdto it
mkdir -p ~/workspace/bytes/

cd ~/workspace/bytes/
- Download the source code to the
~/workspace/bytes/directory from here using one of the following commands:
git clone https://gitlab.crio.do/crio_bytes/me_junit.git

git clone git@gitlab.crio.do:crio_bytes/me_junit.git
Run the application
-
Right click inside the App.java file and select Run, or
-
Click on Run on top of the
mainmethod in VS Code, or

- Start the application using Gradle. You’ll need to execute
chmod +x ./gradlewthe first time to give executable permissions.
./gradlew clean run
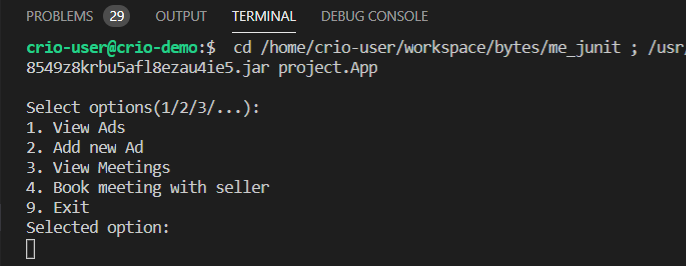
You’ll see a similar output on the command line upon running the application. If the Selected option: text is shown, your application successfully started and now is waiting for input (1/2/3/4/9). Type 9 and hit Enter to exit the application.
Run the tests
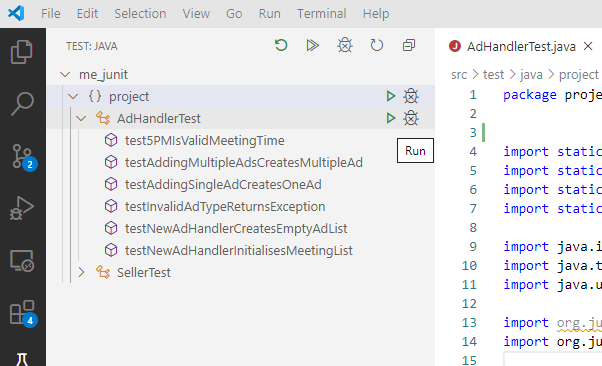
- Click on Run on top of the test class (eg: AdHandlerTest.java) to run all tests in the class
- Click on Run on top of a test method (eg:
testNewAdHandlerCreatesEmptyAdList()) to run that unit test only

- Run the test class or a test from VS code Tests window
- Execute
./gradlew test --infoin the terminal from the project root directory to run all the tests under the src/test directory
Using the ./gradlew command will print the test output on the terminal. For the tests run using the other methods, a Java Test Report window will open. This shows you which tests failed/passed. Click on the failed test name to show the error stack trace.
Note
JUnit 5 is used for the purpose of this Byte
Getting to know the Application
The provided code is that of an OLX like application to view/post advertisements and allow buyers to schedule meetings with the seller. Let’s understand the project files better. Note that all attributes have getter and setter methods.
-
App.java - The starting point. It fetches input from users for now till our frontend team comes up with a GUI
-
main()- run to start the application -
showInitialMenu()- displays menu options and reads input from user -
addNewAd()- usesAdHandlerclass to add a new Ad -
bookMeeting()- usesAdHandlerclass to book a new meeting
-
-
AdHandler.java - handler class which deals with adding new Ads and saving meetings
-
Has 4 attributes - list of all Ads, list of all scheduled meetings, a map of sellers (seller ID to seller object), list of supported Ad types
-
addNewAd()- used to add a new Ad -
addNewMeeting()- used to add a new meeting -
isValidMeetingTime()- check if the meeting time provided by user falls in the specified meeting hours -
readAdTypes()- reads Ad types list from file
-
-
Seller.java - class used to handle info related to an Ad seller
-
Has 2 attributes - a unique ID and seller name
-
readSellerList()- reads seller list from file
-
-
AdData.java - class used to handle information related to an Ad
- Has 5 attributes - a unique ID, seller, type, description and post date
-
Meeting.java - class used to handle info related to a scheduled meeting with the seller
- Has 4 attributes - a unique meeting ID, Ad ID, meeting time and customer name
-
AdHandlerTest.java - contains tests for methods in AdHandler.java
-
SellerTest.java - contains tests for methods in Seller.java
Benefits of Unit Testing
-
Allows to make changes to code easily as the tests will spot any bugs that new changes might introduce
-
Improves code quality as tests are written to check edge cases and writing tests also forces you to think about better implementation
-
Since unit testing is performed in the development stage itself, bugs can be found and resolved very early
-
Reduces development cost due to finding bugs before they reach production
-
Reduces time required to ship new code because previously written tests can be re-used
We'll look at some of these advantages practically in the next couple of sections.
Unit Tests simplify Debugging
Let’s look at how unit tests save debugging time.
Run the application and manually check if
-
Ads list is empty when the application starts (Enter 1 to View all Ads)
-
Ads list contains one entry when one new Ad is added (Enter 2 to Add new Ad)
-
Ads list gets populated correctly on adding multiple Ads (Try adding three Ads in total)
You’ll find that more than one Ad isn’t getting saved. Check the addNewAd() method in the AdHandler.java file. You’ll find the Ad list is getting replaced by a new list every time a new Ad is added. Replace the below lines of code with this.allAdsList.add(adData);
List<AdData> list = new ArrayList<>();

list.add(adData);

this.allAdsList = list;
Run the application again and confirm that multiple Ads get saved successfully.
What did we just do here?
In order to test the implementation, we needed to run the application and manually enter all the details to check the functionality. Doing this manually every time is not possible.
Alternately, let’s see the flow if we had unit tests in place. Change the `addNewAd()` method to how it was earlier. Run tests in the `AdHandlerTest` class either by clicking on "Run" on top of the class or executing below Gradle command.
./gradlew test --info
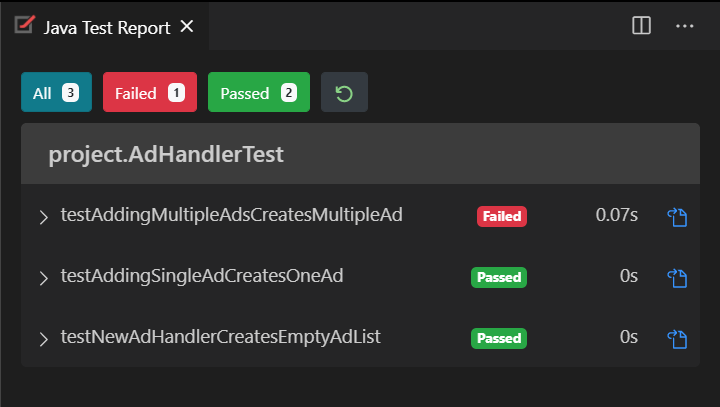
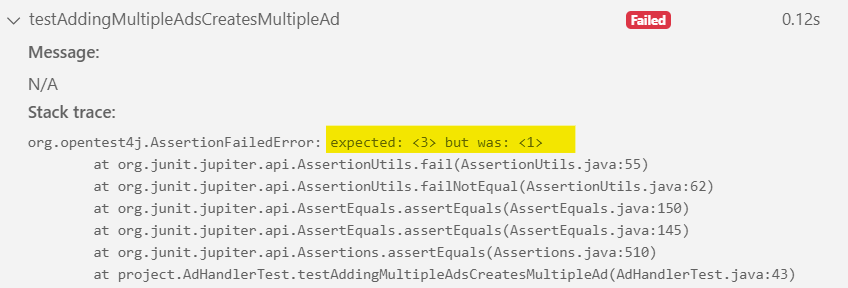
The three tests testNewAdHandlerCreatesEmptyAdList(), testAddingSingleAdCreatesOneAd(), testAddingMultipleAdsCreatesMultipleAd() checks for the exact three cases you manually checked earlier. Run the test class to run all the tests.
You’ll get a Test Report window showing one test failed. If you use the Gradle command, a similar stack trace will be present in the terminal output.
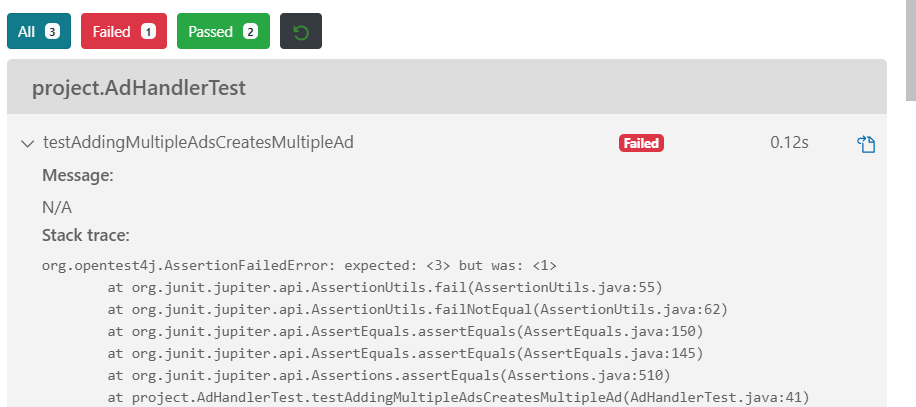
The testAddingMultipleAdsCreatesMultipleAd test has failed. The test expected an output of 3 (3 Ads) but found only 1. Now, make the required fix in the addNewAd() method again and run the tests.
You will find that debugging was much faster and less tedious with unit tests in place.
Tip
Use Ctrl+P to search files in VS code
Unit Tests support enhancements without Regression Errors
Errors to previously functioning code due to new changes are called Regression errors.
Let’s add a new functionality to upload images related to an Ad. We’ll use an interface to support more file types like PDF, Doc etc. in the future. Create files Scanner.java and ImageScanner.java with the following code.
// File: Scanner.java

package project;

public interface Scanner {

    public String uploadData();

}
// File: ImageScanner.java

package project;

public class ImageScanner implements Scanner {

    public String uploadData() {

        return "Uploaded Ad image";

    }

}
Make these changes to the AdHandler.java file
- Add these imports to the top of the file (after the
package project;line)
import project.Scanner;

import project.ImageScanner;
- Add a new method,
addImageToAd()which uses theImageScannerclass
public static String addImageToAd(String imageURI) {

        Scanner imageScanner = new ImageScanner();


        return imageScanner.uploadData();

}
Uncomment the testAddImageToAd() method in AdHandlerTest.java which tests the new addImageToAd() method. Run the tests now. Select Proceed if you get the below pop-up.

The Test Report will look like this. (If you used ./gradlew test to run the tests, the tests won’t be run due to the error)
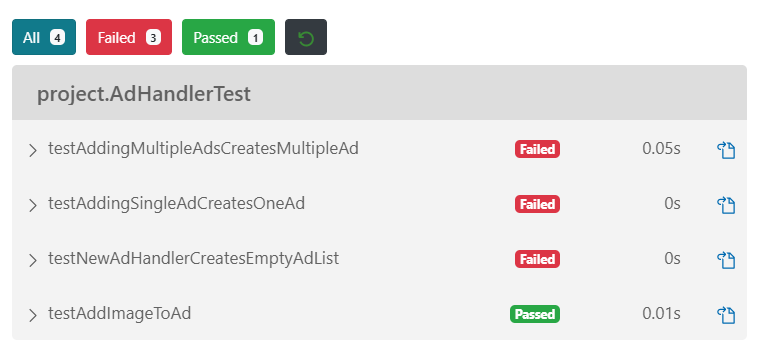
All the tests that had passed earlier are now failing. As you’d have found out by now, there’s a conflict between the in-built Scanner class used for reading data and the new Scanner interface added. Without unit tests in place, we may skip the testing for older methods and test only the newly added methods. Scenarios like these are pretty common when multiple developers work together on a project as not everyone knows about all the classes.
With unit tests, we can implement new functionality or refactor code without worrying about breaking existing functionality unintentionally. This is because the existing functionality will get tested and any regression errors will be caught. We can fix the errors before delivering the refactored code.
Note
Delete the Scanner.java, ImageScanner.java files. Also, remove the newly added imports in AdHandler.java, delete/comment out the AdHandler::addImageToAd() and AdHandlerTest::testAddImageToAd() methods. We won’t need this for the following tasks.
What Developers say about Unit Tests
Unit testing is a crucial part of the software development lifecycle. Though it might feel like an additional burden at first, you’ll soon find it to be a life-saver.

Getting started with Unit Testing using JUnit
The isValidMeetingTime() method in the AdHandler.java file checks if the time passed in as an argument falls in these valid intervals → 10AM - 12PM, 2PM-3PM and 6PM-8PM. Let’s check the unit test for this method. In AdHandlerTest.java, uncomment the test5PMIsValidMeetingTime() method. You’ll see the test has
-
JUnit
@Testannotation, which is used to mark thetest5PMIsValidMeetingTime()method as a test -
Setup required to call the
isValidMeetingTime()method - create anAdHandler()instance and to check if time is valid -
A call to the method to test (
isValidMeetingTime()) and a way to save the output -
The
assertEqualsmethod to check whether the output matches the required value - herefalse
@Test

public void test5PMIsValidMeetingTime() {

    // * - For meetings hours: 10AM - 12PM, 2PM-3PM, 6PM-8PM

    // Given

    adHandler = new AdHandler();

    LocalTime datetime = LocalTime.of(17, 0);


    // When

    boolean actual = adHandler.isValidMeetingTime(datetime);


    // Then

    assertEquals(false, actual);

}
Click on the Run option on top of test5PMIsValidMeetingTime() to run this test only. The Test Report window won’t open if the test passed. If the test failed, the Report window will open up. (If you executed ./gradlew test to run the tests, you’ll find a line TEST RESULT: SUCCESS in the test log on the terminal)
TODO - Similarly, create a couple of new tests to validate other meeting times, at least one should be a valid meeting time (eg: 7:59PM). Run and ensure all tests pass.
Tip
To uncomment multiple lines of code, select code to uncomment and enter "Ctrl + /"
Catching bugs with Unit Tests
The current isValidMeetingTime() method implementation has repetitive code in the if-else conditions. Refactoring the code will improve the readability and code quality.
TODO -
-
Comment out the existing
isValidMeetingTime()method -
Uncomment the
isValidMeetingTimeRefactored()andisBetween()methods -
Rename
isValidMeetingTimeRefactored()method toisValidMeetingTime()
The code looks much cleaner after refactoring. Run the tests to ensure the existing code didn’t break.
You’ll see the test5PMIsValidMeetingTime() test failing.
TODO - Debug the issue to pass the tests (Refer to the hints if you get stuck)
TODO - Run the testSellersList() test in SellerTest.java and fix the bug in readSellerList() method
Curious Cats
- Change the return type of one of test methods to
Stringor the access modifier toprivate. Does this make any difference? (Try running the tests without using gradle command)
Assert statement in JUnit
The assertEquals() method is used in the tests to check the output of the method under test.

The above line of code checks if the value 3 matches the value returned by adHandler.getAllAdsList().size() and fails the test if it doesn’t match.
It is a convention to provide the first argument as the expected value and the second the actual value returned by the method. The error message also makes more sense if this convention is followed.
JUnit provides assert statements other than the assertEquals() used in the tests till now.
TODO -
-
Use
assertTrue()in thetest5PMIsValidMeetingTime()method instead ofassertEquals()to check if output istrue. Similarly useassertTrue()/assertFalse()in any other test methods you’ve added to test theisValidMeetingTime()method -
Uncomment the
testNewAdHandlerInitialisesMeetingList()test in AdHandlerTest.java. UseassertNotNull()method to check that the Meetings list is not null -
Uncomment the
testInvalidAdTypeReturnsException()test in AdHandlerTest.java. UseassertThrows()to verify thatAdHandler::addNewAd()throws aRuntimeExceptionwhen called with an invalid Ad type. UseassertNotEquals()to check the error message length is not zero. (Comment out the type validation code inaddNewAd()to see the test failing ifRuntimeExceptionisn’t thrown)
Curious Cats
-
Find out how
assertEqualsandassertSamediffer. In addition, find a scenario whereassertSamecan be used. -
How would you assert if some method completes execution within some predefined time?
Getting to know JUnit Annotations
Take a look at the tests in the AdHandlerTest.java file. Do you find anything common between the tests?
Apart from the JUnit constructs like the @Test annotation, all the test methods contain this line at the beginning
adHandler = new AdHandler();
Each of the tests create a new AdHandler instance. Comment out the above line in these tests - testNewAdHandlerCreatesEmptyAdList(), testAddingSingleAdCreatesOneAd(), testAddingMultipleAdsCreatesMultipleAd() and update the first line of code in the class to
private static AdHandler adHandler = new AdHandler();
Run the tests and you’ll see some of them failing. This is because the Ads added in one test get carried over to the others. So, a common AdHandler initialisation wouldn’t work in this case.
JUnit provides the
-
@BeforeEachannotation to mark methods to be run before each test method is run. -
@AfterEachannotation to mark methods to be run after each test method is run. -
@BeforeAllannotation to mark methods to be run once before starting to run the first test of the test class. -
@AfterAllannotation to mark methods to be run once after completing running the last test of the test class.
TODO -
-
Change the first line of code in the class back to
private static AdHandler adHandler(). Write a new method setup() in AdHandlerTest.java-
annotate it with
@BeforeEachannotation -
include the line
adHandler = new AdHandler();inside the method -
verify if tests are passing now.
-
-
Similarly in SellerTest.java, ensure the
Scannerresource gets closed after all the tests are completed using the@AfterAllannotation.
Note
In JUnit 4, these annotations are named differently. For example,@AfterAll will be @AfterClass in JUnit 4
Curious Cats
-
When we have a large number of tests, sometimes, we need to skip some unit tests that take a longer time. How would you do this using JUnit annotations?
-
You wrote multiple variants of the
test5PMIsValidMeetingTime()test earlier. If you check, the difference among these tests is just a single value, the input time. How would you use JUnit annotations to reuse the same test with different parameter values?
Best practices for Unit Testing
Don’t use System dependent code in the methods
If the method to be tested contains system-dependent parameters like the current system time,
-
Tests can randomly pass or fail - If you check how the
addNewAd()method creates a newAdDataobject, it uses theLocalDateTime.now()method within it to fetch the current system date and time. Assume there’s some unresolved bug in theAdDataconstructor. An exception is thrown due to this bug when the provided time is between 12 AM - 11:59 AM. Due to this, the tests will pass if run between 12 PM-11:59 PM but fails if the time the developer ran the test falls between 12 AM-11:59 AM. -
Not all scenarios can be tested - To check the
addNewAd()method with some date and time of 3 AM, either the developer shouldn’t sleep or the system time needs to be changed back and forth when this test is to be run. This makes it very difficult to test, either manually or automatically.
public void addNewAd(String description, String type,  int sellerID) throws FileNotFoundException {

// code

// more code…

AdData adData = new AdData(description, type, seller, LocalDateTime.now());

this.allAdsList.add(adData);

}
A better approach is to pass the date-time as parameter to the method. See the addNewAdInputLocalDateTime() method which is commented out in the AdHandler class.
public void addNewAdInputLocalDateTime(String description, String type, int sellerID, LocalDateTime localDateTime) throws FileNotFoundException {

// code

// more code…

AdData adData = new AdData(description, type, seller, localDateTime);

this.allAdsList.add(adData);

 }
Find another example code here
Writing Testable code
When a test for the current addNewAd() fails, what could be the reasons?
Test could fail due to
-
Description length check
-
Type check
-
Or the rest of the logic
This is because the description validation and type validation code isn’t tested separately. Due to how the code is written, this isn’t possible. If the method is refactored to include these validation checks as separate methods, both of them can be tested.

Current method (left), Refactored method (right) - (Click on image to zoom)
Curious Cats
-
Is there some reason why the application logic is under the src/main directory and tests are under src/test directory? (Try moving the test file somewhere else)
-
In the upcoming version, we’ll be using the Maps API (costly service) to find the location of a user. How would you test the methods that depend on the API response?
Summary
-
Unit testing helps with the software development cycle by spotting bugs earlier as well as reducing testing time.
-
It is recommended to have one Test class with unit tests for every Java class that needs testing.
-
JUnit is a popular library for Unit Testing in Java
-
The test methods are annotated with the
@Testannotation -
JUnit provides different assert statements like
assertEquals,assertTrue,assertNullto check if correct values are returned by methods -
Annotations like
BeforeAll,BeforeEach,AfterAll,AfterEachcan be used to run setup code once per class or once per each test
-
-
Passing system specific code as parameters and breaking down code to smaller components helps improve the quality of unit tests.
-
Find the
-
Further Reading
Newfound Superpowers
-
You understand the need for Unit Testing
-
Practical know-how of the Java JUnit library
Now you can
-
Write Unit Tests for your projects
-
Use the JUnit library with ease
-
Use JUnit annotations to improve tests
-
Utilise unit testing best practices to write better quality of code