This project will show you how to set up your environment to start developing apps for Kubernetes right away. We'll move forward in carefully thought steps that will help you build a mental picture of how things operate and what are the best practices for a quick and easy setup. There won't be any program code or logic that I'll ask you to implement here; it will just make you familiar with building cloud applications and the transformation from local monolith apps to distributed systems.
Going from containerising your code using Docker, employing automation for building and pushing to an image registry, we'll cover all the way up to setting up your first Kubernetes cluster and running your apps on it.
The video below presents an overview for the entire course. It also has useful tips for navigating the different steps.
Project Context
The shift to cloud native technologies is happening at an unprecedented pace. The benefits to running your applications on distributed systems with automatic scaling are huge. Apps running on Kubernetes, for example, can leverage many technologies to be more resilient. An example could be fail-safe methods of calling important functions and automatic retries. The flexibility to switch environments, with little to no change in code along with the extensive monitoring options available makes your deployment very robust. There are countless other benefits to switch to a cloud-native approach (downsides too, but we'll skip that for now).
By the completion of this project, you'll be able to code applications and run them on Kubernetes almost instantaneously. You'll be better positioned to steer through the sea of cloud-native technologies with the help of the knowledge from Kubernetes which literally means helmsman ;)
Project Stages
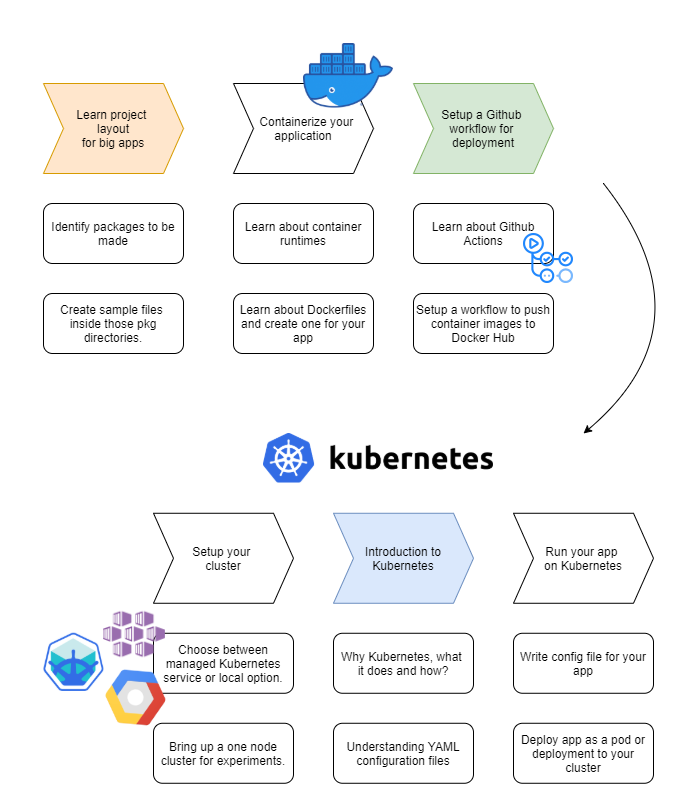
The project is completed in two stages and six steps.
The first three steps deal with containerising your application and making it deployable on a distributed platform. You also set up the workflow that helps you build your app faster.
The next three steps deal with the orchestration platform of your choice; here I'm using Kubernetes. Most of the sub-steps covered here would not vary much with the choice of the platform.
Identify packages to put your code in (structure determined by utility)
Learn about Docker and Dockerfiles.
Get familiar with Github Actions and build a workflow.
Set up a Kubernetes cluster.
Introduction to Kubernetes
Run your app on Kubernetes.
Objective
This project will show you how to set up your environment to start developing apps for Kubernetes right away. We'll move forward in carefully thought steps that will help you build a mental picture of how things operate and what are the best practices for a quick and easy setup. There won't be any program code or logic that I'll ask you to implement here; it will just make you familiar with building cloud applications and the transformation from local monolith apps to distributed systems.
Going from containerising your code using Docker, employing automation for building and pushing to an image registry, we'll cover all the way up to setting up your first Kubernetes cluster and running your apps on it.
The video below presents an overview for the entire course. It also has useful tips for navigating the different steps.
Project Context
The shift to cloud native technologies is happening at an unprecedented pace. The benefits to running your applications on distributed systems with automatic scaling are huge. Apps running on Kubernetes, for example, can leverage many technologies to be more resilient. An example could be fail-safe methods of calling important functions and automatic retries. The flexibility to switch environments, with little to no change in code along with the extensive monitoring options available makes your deployment very robust. There are countless other benefits to switch to a cloud-native approach (downsides too, but we'll skip that for now).
By the completion of this project, you'll be able to code applications and run them on Kubernetes almost instantaneously. You'll be better positioned to steer through the sea of cloud-native technologies with the help of the knowledge from Kubernetes which literally means helmsman ;)
Project Stages
The project is completed in two stages and six steps.
The first three steps deal with containerising your application and making it deployable on a distributed platform. You also set up the workflow that helps you build your app faster.
The next three steps deal with the orchestration platform of your choice; here I'm using Kubernetes. Most of the sub-steps covered here would not vary much with the choice of the platform.
Identify packages to put your code in (structure determined by utility)
Learn about Docker and Dockerfiles.
Get familiar with Github Actions and build a workflow.
Set up a Kubernetes cluster.
Introduction to Kubernetes
Run your app on Kubernetes.
Create a Project Layout
Project structure is really critical when building huge projects.
This is important for a variety of reasons:
It helps you get to the code you want, quickly. This is because functions are distributed in packages that best represent their use.
If you're working on an open source project, the first thing a person looks at is your repository structure. If your code follows industry standards, it is easier for folks to comprehend your app and make contributions.
Standard naming conventions and other practices generally make your code more readable and you grow into a better developer too.
Requirements
Learn what packages are and why they are useful in organising code.
Given the purpose of the application you're willing to build, identify the different packages involved and create directories as such.
Verify that the naming convention, folder structure and code distribution matches the best practices followed by the community for your language.
Create a sample hello-world application in a suitable file which prints a welcome message on the terminal. This is required for demonstrating containerisation in the next step.
Do not hesitate in creating more packages as long as you're convinced that the functionality between two different functions or set of functions is separate.
Expected Outcome
You should have a preliminary project structure set up. This structure will help you chalk out the future plans for your applications.
A sample project layout is shown below (for Go projects).
Containerize your app
Containerizing your app involves encapsulating or packaging up the code and all its dependencies so that it can run uniformly and consistently on any infrastructure. It allows developers to create and deploy applications faster and more securely. With traditional methods, code is developed in a specific computing environment which, when transferred to a new location, often results in bugs and errors.
Containerized applications are “isolated”; in the sense that they do not bundle in a copy of the operating system. Instead, an open source runtime engine (such as the Docker runtime engine) is installed on the host’s operating system and becomes the conduit for containers to share an operating system with other containers on the same computing system.
Check out this video to learn more about containers:
Get familiar with writing Dockerfiles. Understand what each of the commands mean and determine which of those to use for a simple application.
To write a Dockerfile for your app, first choose a base image that you want your app to run on. Take ubuntu as a base image if you are unsure.
Understand that all commands inside a Dockerfile can be thought of as being run on a Linux instance. Find out the commands used to change directories, copy/move files into directories and such.
Copy your program code from its directory into any directory inside the image using a simple command. After that, change to the new directory on your Dockerfile and write down a command to compile (or run) your application.
Explore options available to specify what commands to run in your container when it starts. Use that command to run your application (the hello-world app you built in the first milestone) everytime a container is spawned.
The best way to know if your container is working properly is to check the logs. Docker makes it very easy to check the logs of a container. Verify that the logs reflect your welcome message. The message might already have been displayed without running the logs (as by default, messages are sent to STDOUT)
Most of the time, you can search for Dockerfiles online for your use case. You do not have to write one, entirely on your own.
You can also find readymade Docker images to run containers on, from the internet. Search for common image registries (Docker Hub, for instance) online and explore the open source images available.
Bring it On!
Walkthrough for this section:
How are different operating systems being run on your local machine? How does Docker achieve this?
Write a Dockerfile that accepts arguments from the command line directly and make these variables available to the code inside your container. Check this link for some help.
How can you make some directory on your local machine available to a container? Can you read/write to this directory? (The write function could be used to persist state or store important results that last even after the container has died). Read more about volumes here.
Can you access the terminal inside a container? Check this link for how to go about doing that. Keep in mind that to run a shell inside your container, your image should have a shell installed in the first place (add commands to your Dockerfile for adding a shell or use an image that already has one installed, like ubuntu).
Do you know what happens behind the scenes when you create a container? Check out this video I made to learn more about container networking:
Expected Outcome
You should have a Dockerfile that builds an image for your application. You should be able to build a container over this image that runs your application code; and you should be able to monitor the outputs.
A sample hello-world docker image, when run should look like the following on a terminal.
Learn about Github Actions and build a Workflow
GitHub Actions help you automate tasks within your software development life cycle. GitHub Actions are event-driven, meaning that you can run a series of commands after a specified event has occurred. For example, every time someone creates a pull request for a repository, you can automatically run a command that executes a software testing script.
These actions form the steps to a workflow. A workflow can be imagined as a fixed set of instructions (actions) that are run at some particular event occurrence. Github workflows play an important part when it comes to developing apps.
Two use cases for using workflows:
Automate testing your code everytime you push to your repository. This way you'll know in advance whether any new code that you've written still passes all your logic and layout tests.
Set up automatic deployment of resources. Everytime you update your app, you'll have to build a new image to be used for your containers. Instead of doing it manually, we can assign that task to a workflow.
This way, you can focus more on your application logic and less on building and deployment. Building applications on the cloud becomes a little easier with help of Github Actions. Check this video where I demonstrate the idea of using Github Actions to build your images and push them to a registry:
Requirements
Read the Github Actions documentation to understand the anatomy of an action, how they're built and the purpose they serve.
Learn how to write Github worflows using Github Actions in a YAML file.
Write a workflow that builds an image from a Dockerfile in your repository and pushes it to a registry of your choice.
Configure this workflow to run on every push you make to the main branch. Verify that a run is scheduled when you push your code.
You don't need to write all the actions on your own. Just like Dockerfiles, almost all the common use cases are already covered by actions built by the community. Check out the marketplace to explore.
Bring it On!
Explore how an action is built. Look at the source code of the action that builds the Docker image for you and try to understand the architecture of the solution.
Expected Outcome
The Actions tab of your repository should show the workflows that you have built. The right pane will show all the runs that have happened so far. Clicking on them would show you more details and step by step analysis of the workflow.
The following image can be taken as a reference.
Set up your Kubernetes cluster
You have not been introduced to Kubernetes yet but I feel it is better to have a cluster set up and ready to experiment with when you actually start learning the concepts and need a handy environment to try them out.
There are multiple options for the choice of environment to deploy Kuberenetes on. You can choose one of the many cloud providers to host your cluster on their systems. You can also choose to host a single node (machine) cluster on your own machine.
The pros for choosing an online platform:
Easier to set up (mostly at the click of a few buttons)
Most configurations are handled at the backend by the provider.
Extensive documentation and support if you run into infrastructure errors.
The cons:
Expensive to run.
Inexperience with an online portal that manages the resources might slow down development.
Requirements
Choose a mode of deployment for your cluster, based on feasibility and your own comfort.
Check out the resources for setting up a cluster on Azure, GCP and AWS.
If you're looking for a local deployment, consider installing Minikube. Installation instructions are here and a sample application, here.
Once your cluster is set up, you can connect to it through your terminal. This allows you to create or modify resources on the cluster, in addition to monitoring them.
The command to connect is similar for all environments and most of the tutorials cover that information. Verify that you can run kubectl commands on your terminal. We'll learn what it means in the next step.
Local options such as minikube or kind are good ways to test your application before it is eventually deployed on a more broader and distributed network. These options don't form a substitute to using Kubernetes on a vendor service (like AKS) or your own cluster (bare metal).
Expected Outcome
You should have a Kubernetes cluster set up and functioning. You can verify this situation by running the following command which checks for all resources deployed to the cluster in the kube-system namespace.
kubectl get all -n kube-system
OR
You can try the following command, with an example output shown:
kubectl get pods --all-namespaces
Understanding Kubernetes
You have learnt about containers, understood why they are important and even built one for your app, so far. The containers ran on your local machine and utilised your system's resources. It is a good method for testing out your app and your Dockerfile but not an ideal way to deploy real applications. Some of the reasons for that are:
Network configuration: To make your app accessible to the outside world (your customers), you'll have to connect your container to a port that has external access. It requires knowledge of networking and a good amount of planning to execute, especially when you have multiple containers running different applications and have varied needs for communication. It would be better to have a service that standardizes exposing your apps to the public, while handling common tasks like load-balancing.
Availability: The application you're building should be accessible at all times, which means your computer must be running 24x7 to ensure a good service, but it is
impractical to keep your machine running throughout the day, every day.
Scalability: What happens if our app becomes popular and we see a surge in client traffic?
The response times would be affected, and we would want to have a more powerful
machine or maybe multiple machines altogether depending on the situation.
Again, this is not possible, going by the current implementation.
Going by the arguments above, you need an "orchestration platform" that can manage your containers across different machines (nodes), handle discovery of the different services (apps), configure the bulk of networking for you and allow you to observe and monitor for errors. These are some of the functions among the host of others that orchestration platforms support. One such, and the most popular among them, is Kubernetes.
With this context, watch the following video to get a clearer picture of why Kubernetes comes into the picture and what it can do for you. Also, check out this page to gain an insight into what Kubernetes is and what it is not, as well as the following video -
I'll link a few more videos in the References section that you can check out if you're unclear about the technology. Feel free to search for more resources and learn from multiple sites to get a hold on this notoriously complex subject.
In the 'Requirements' section below, we'll be covering step by step, some important components of Kubernetes. The knowledge of them will help you explore more on your own and will keep from you getting intimidated by the jargon when you go ahead with building more complex applications on Kubernetes.
Requirements
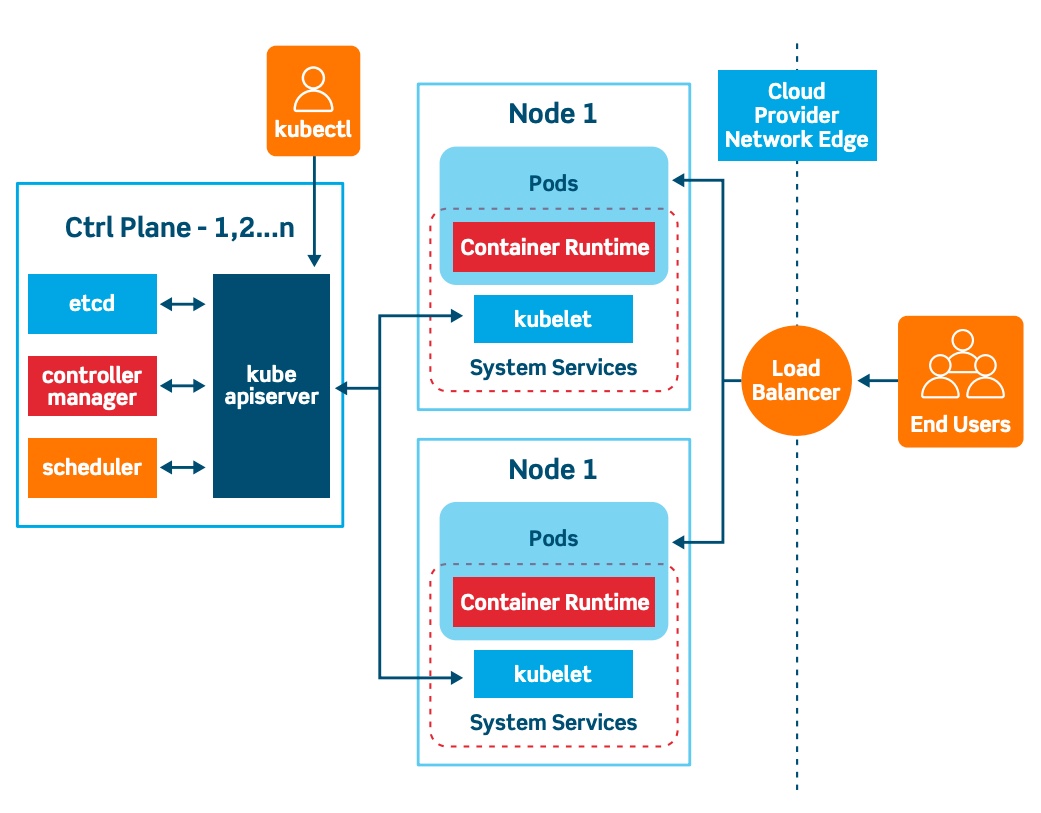
Hopefully, by now you understand that Kubernetes makes deploying apps easy on distributed systems. There is a master and one or more workers. The master has a lot of components that allow Kubernetes to function. Among them is the api-server that exposes the Kubernetes API. The API server is the front end for the Kubernetes control plane. You can learn more about the different components here.
Study the architecture of Kubernetes :
Watch this video to gain a deeper understanding of what the different components are.
The kubectl is used by clients (as shown in the diagram above) to access the api-server and in turn access the Kubernetes API as a whole. kubectl is the Kubernetes command-line too which allows you to run commands against Kubernetes clusters. You can use kubectl to deploy applications, inspect and manage cluster resources, and view logs. You used kubectl get in the previous milestone to get a list of all objects in the cluster. Similarly you can create objects using kubectl apply. A list of all kubectl commands are available here.
The official documentation is the best place to learn more about Kubernetes. Head over to this website and explore all the pages. The ideal way would be to dive right in and go through the concepts, step by step, implementing them simultaneously on your local cluster.
Expected Outcome
By this stage, you should know what Kubernetes is, how it is structured and what the major components are. You should be familiar with the command-line too kubectl and should've run a few commands using it.
Make sure you know how to-
View all objects in a namespace.
Create an object from a configuration file (we'll learn about them in the next step).
Run your app on Kubernetes
Once Kubernetes is set up and you know what it is, you can get to the task of actually making your app run on the cluster. Using the knowledge from the previous step and combining it with the information in the steps listed below, create a running implementation of your application. Keep in mind that all interactions with the api-server will be handled by the kubectl command-line tool and you now know how to create objects using it. What you may have noticed from the syntax of kubectl apply is that it has a flag -f which requires a file to be supplied. What is this file? And how does it convey all the information that kubectl needs to run your resources?
You'll learn about the specification for the different Kubernetes objects, write one for your app and see your app running on the cluster.
Requirements
Up to this point, all you needed to run applications in containers was a Dockerfile and an image that you built on top of it. To run an app on Kubernetes, you need to define a configuration file for every object you wish to deploy. How is this file written and what information does it convey? Read the page here to learn extensively about writing specifications in YAML.
You are familiar with running containers but the smallest units that can be deployed in Kubernetes are pods. Nothing to fret about, pods are just a group of closely related containers that share the same network (localhost). Learn more about Pods here. How do you deploy pods? It will be through applying a configuration file too, like all other objects.
Write a YAML file for a Pod that has a container, running your application. Use the image that we pushed to Docker Hub before (in milestone 3).
When running your container locally on docker, you could check the logs using the docker logs command. How can we achieve a similar functionality in Kubernetes? Check out this page to find out. Verify that you can obtain the logs for your application and establish that your app runs as expected.
Using a YAML specification file isn't the only way to create objects in Kubernetes. Find out what imperative and declarative methods mean, here. Try creating an object using the imperative method.
Pods aren't the only objects that you can deploy on Kubernetes. Find out about more options that you have, here.
Create a deployment object which runs your application inside a pod.
Expected Outcome
You should now be running your app on Kubernetes.
Verify that you can find your pod by using
kubectl get pod/<pod-name> -n <namespace>
command. You have seen how you can take an application, containerize it using a Dockerfile, build an image for it, push it to a registry and then use the image for a container you run inside a Kubernetes cluster. You also have a workflow in place that automatically updates your app image every time you push changes to your repository. Hooray!!