This project is focussed on creating a simple, fun, interactive brain training android game (using Java).
Objective
Project Context
Android is a mobile operating system based on a modified version of the Linux kernel and some other open source softwares, designed primarily for touchscreen mobile devices such as smartphones and tablets. Android is developed by a consortium of developers known as the Open Handset Alliance and commercially sponsored by Google.
About 70 percent of Android smartphones run Google's ecosystem. Android was primarily built on Java (and Kotlin) language. Java is the best option when it comes to building core native android apps. Hence, here we will be using Java.
People spend hours at the gym, lifting weights, doing cardio exercises and following proper diets to keep their bodies physically fit. But what do people do to keep their brains in shape? Usually, when people are done at the gym they crash in front of a TV and put their brain into a passive mode where all the skills the mind has, i.e. memory, thinking and logical reasoning stagnates. Your brain is the most important part of your body and to not keep it fit is to invite laziness and lethargy into your life. Brain exercise is an approach to train the brain to perform at optimum levels and be sharp and strong even as old age acts to deteriorate your memory. In our daily life, we always feel stressed out. We exercise for the physical wellness of our body. But what do we actually do for the mental health? This game is like an exercise for the brain. Games of these kinds are categorically termed as cognitive games.
The game's walkthrough is shown below:
The app can also be found at the Amazon store. If you face some issue with the Amazon store, you can download Bfit_2.32 from here instead.
So do try the app first!!
Project Stages
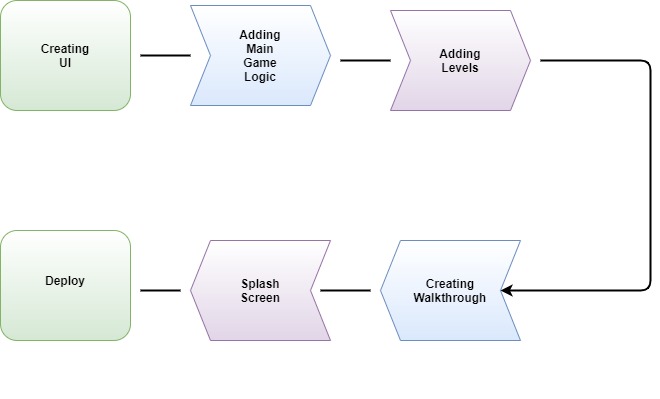
The project can be broadly classified into 4 sections:-
- Setting up the UI for the game with buttons and other game screens
- Adding logic to the game
- Creating a walkthrough/guided tour of the game to introduce first-time users to our app.
- Creating a splash screen to load important files in the background.
Each of these stages are covered in detailed multiple milestones ahead.
High-Level Approach
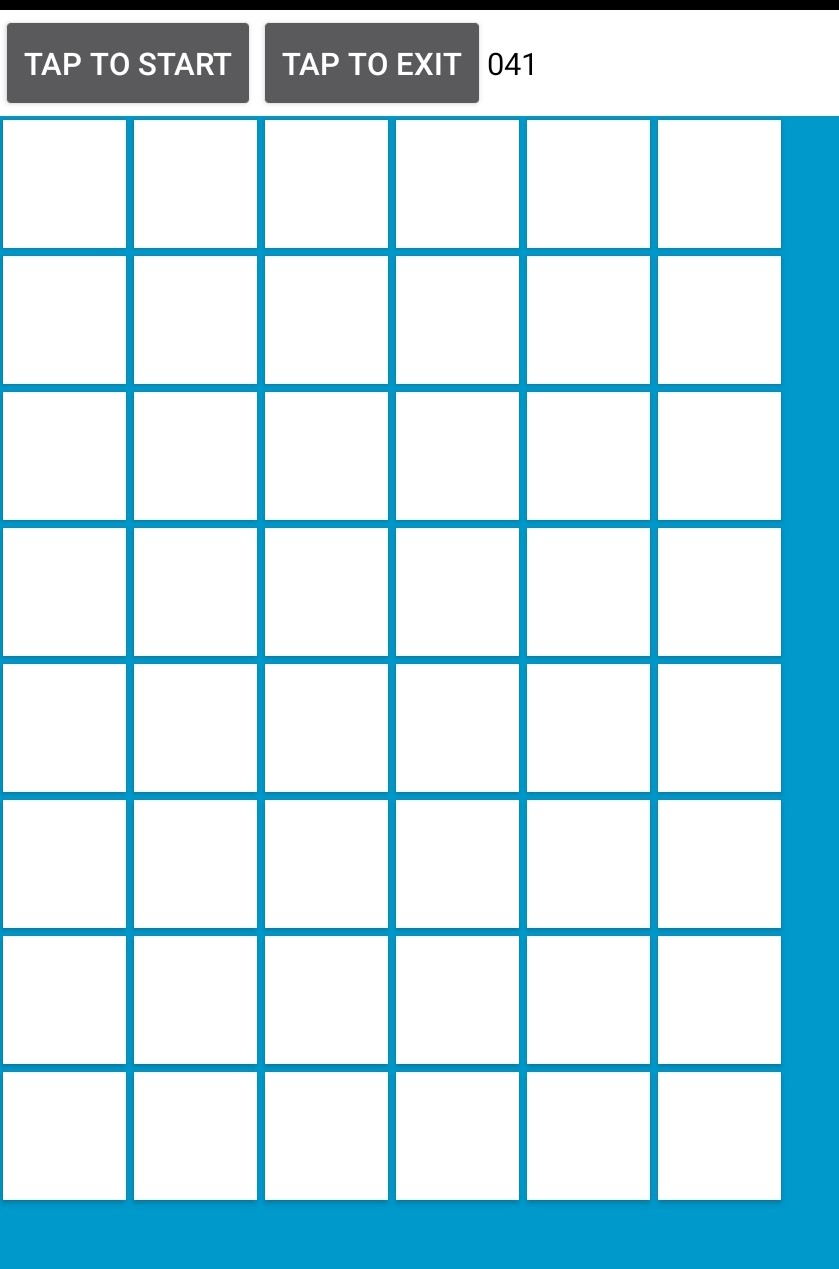
- Firstly we build the UI for the game. Ideally, it can be 12 x 10 clickable boxes. Also, three more buttons for the start, stop and help section should be optional.
- Build the controller of the app or the logic i.e. how it works.
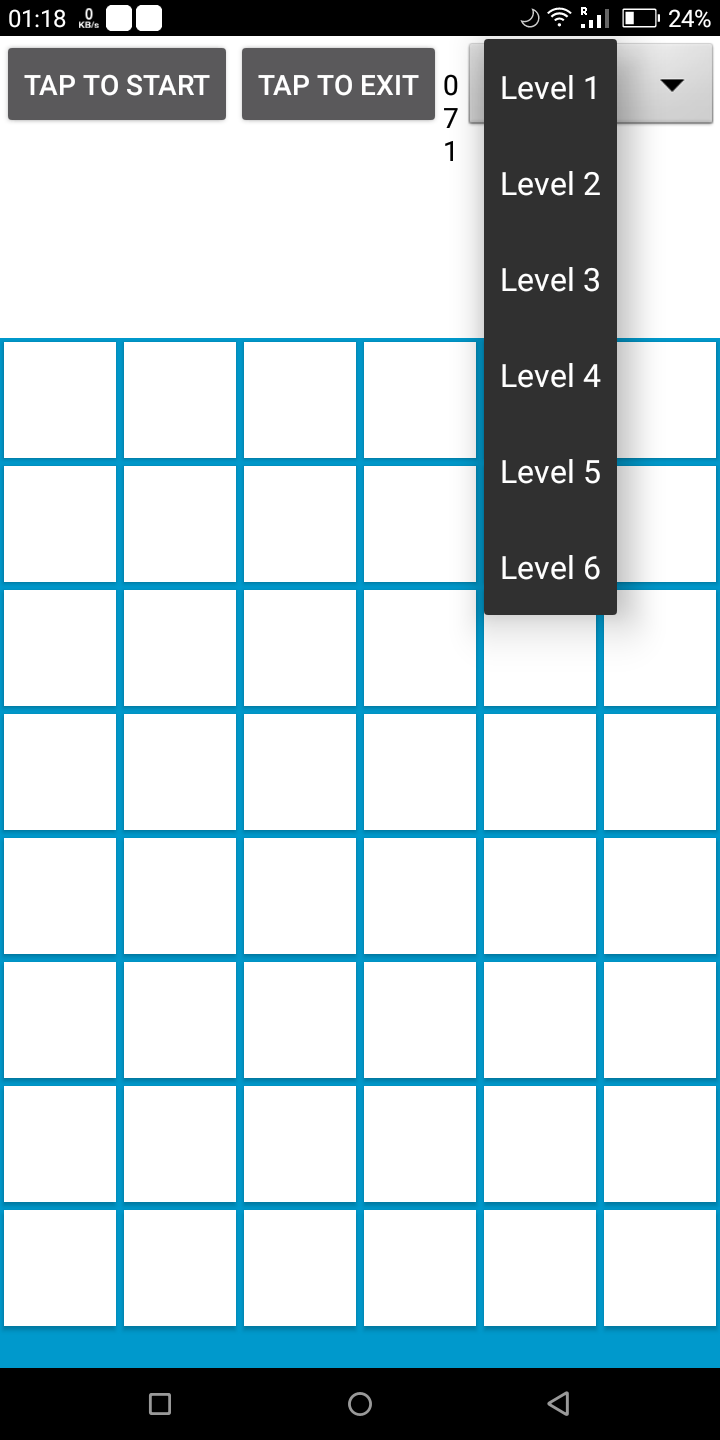
- Add game levels that keep up the user's excitement.
- Then learn how to create a walkthrough of the game to introduce first-time users to our app.
- Create a splash screen. It is the introductory screen that shows an image when we load the game for the first time ever; to actually download important files in the background.
- Finally, we will deploy the app by using "best practice of deploying Android apps" like obfuscating, modifying apps for multiple screens etc.
Applications
- It can be used as an alternate for the cognitive game.
- These types of cognitive i.e. brain-training games are de-stressing activites. So they can serve as excellent relaxants.
- Improves attention and concentration.
- Improves the brain's speed.
- Enhances multitasking skills.
Credits
This is an android app adaptation of the brainmetrix.
Objective
This project is focussed on creating a simple, fun, interactive brain training android game (using Java).
Project Context
Android is a mobile operating system based on a modified version of the Linux kernel and some other open source softwares, designed primarily for touchscreen mobile devices such as smartphones and tablets. Android is developed by a consortium of developers known as the Open Handset Alliance and commercially sponsored by Google.
About 70 percent of Android smartphones run Google's ecosystem. Android was primarily built on Java (and Kotlin) language. Java is the best option when it comes to building core native android apps. Hence, here we will be using Java.
People spend hours at the gym, lifting weights, doing cardio exercises and following proper diets to keep their bodies physically fit. But what do people do to keep their brains in shape? Usually, when people are done at the gym they crash in front of a TV and put their brain into a passive mode where all the skills the mind has, i.e. memory, thinking and logical reasoning stagnates. Your brain is the most important part of your body and to not keep it fit is to invite laziness and lethargy into your life. Brain exercise is an approach to train the brain to perform at optimum levels and be sharp and strong even as old age acts to deteriorate your memory. In our daily life, we always feel stressed out. We exercise for the physical wellness of our body. But what do we actually do for the mental health? This game is like an exercise for the brain. Games of these kinds are categorically termed as cognitive games.
The game's walkthrough is shown below:
The app can also be found at the Amazon store. If you face some issue with the Amazon store, you can download Bfit_2.32 from here instead.
So do try the app first!!
Project Stages
The project can be broadly classified into 4 sections:-
- Setting up the UI for the game with buttons and other game screens
- Adding logic to the game
- Creating a walkthrough/guided tour of the game to introduce first-time users to our app.
- Creating a splash screen to load important files in the background.
Each of these stages are covered in detailed multiple milestones ahead.
High-Level Approach
- Firstly we build the UI for the game. Ideally, it can be 12 x 10 clickable boxes. Also, three more buttons for the start, stop and help section should be optional.
- Build the controller of the app or the logic i.e. how it works.
- Add game levels that keep up the user's excitement.
- Then learn how to create a walkthrough of the game to introduce first-time users to our app.
- Create a splash screen. It is the introductory screen that shows an image when we load the game for the first time ever; to actually download important files in the background.
- Finally, we will deploy the app by using "best practice of deploying Android apps" like obfuscating, modifying apps for multiple screens etc.
Applications
- It can be used as an alternate for the cognitive game.
- These types of cognitive i.e. brain-training games are de-stressing activites. So they can serve as excellent relaxants.
- Improves attention and concentration.
- Improves the brain's speed.
- Enhances multitasking skills.
Credits
This is an android app adaptation of the brainmetrix.
Setting up the development environment
First you need to set up the development environment for the android. For this, you need to install Android Studio, Java 8 or higher.
Requirements
- Install Java (JDK 1.8)
- Install Android Studio
- Do the environment setup for Java on your local machine
- Create a blank android project by choosing the Empty Activity template.
- Provide the project name and the base package and Minimum SDK of API .
- Make sure the version used is API Level 23 or later.
- Make sure you have minimum RAM of 8 GB installed on your system and SSD is preferable.
Check the version of java to know whether you have successfully installed it or not-
java -version
Congratulations!!! Your initial set up is done!
Expected Outcome
You should be able to set up the initial development environment required to develop the game.
Creating the game's main screen
This milestone can be primarily utilised to get familiarised with Android Studio.
- Android Layout : A layout defines the structure for a user interface in your app, such as in an activity. All elements in the layout are built using a hierarchy of View and ViewGroup objects. A View usually draws something the user can see and interact with, whereas a ViewGroup is an invisible container that defines the layout structure for View and other ViewGroup objects.

- Gradle : Gradle is a build automation tool for multi-language software development. By Default Android uses Gradle as a build tool.
Basic knowledge of Java, XML is recommended prior to starting this task.
Requirements
- Go to layout in
resfolder and create a file withactivity_main.xmlthat will contain code for UI of the Game. - With the help of LinearLayout create the layout for the start, stop button.
- Create onClick for start and stop buttons so that when you click the button then it calls that particular method.
- With the help of GridLayout create 12 x 10 clickable buttons/boxes (a grid); the size of the whole screen must be such that the grid fills 3/4th of the screen. We have to also build three buttons for start-stop and the help button.
- You can also add a background image as per your choice.
Tip
- Always use camelCase for variable name
- Always use relevant names for methods, functions, variables, etc. so that you understand your code at all times.
- Linear Layout for start button (example implementation)
  <LinearLayout
        android:layout_width="match_parent"
        android:layout_height="wrap_content">

        <Button
            android:layout_width="wrap_content"
            android:onClick="runme"
            android:text="click me to run"
            android:layout_height="wrap_content" />

        <TextView
            android:layout_width="wrap_content"
            android:id="@+id/twview"
            android:hint="your score"
            android:layout_height="wrap_content" />
    </LinearLayout>
Bring It On!
- Try to add rowCount and columnCount to the 12x10 grid boxes so that it will fix the number of rows and columns.
- Don't forget to add background color (like green) and padding to the buttons.
Expected Outcome
Implementing the logic of the game
Now it's time to implement the logic. Here we have to create a multithreading algorithm such that when we click the start button it will randomly flash multiple blocks with green light one by one, that we have earlier created. The user must click consecutive blocks within that time framework. If the user misses the block or clicked (touched) the wrong block then the block the user touches must become red temporarily. Please see the references for a better understanding. After 60 seconds we have to show the result to the users, i.e. how many the user had missed and how many were clicked correctly.
Requirements
-
Create a class MainActivity in src by extending AppCompatActivity class. This AppCompatActivity class provides a method called onCreate() that is used when our activity or particular screens start.
-
Override the onCreate() method here we have to write all logic that has to perform when our activity has been created. Here we have to set our view by the setContentView() method. We have to give ID to all the buttons in continuous order to track them.
-
Create integer buttonNumber to , score, and create an array of Button class to store id of these buttons.
-
Create runme() method
- The above is the same method that we had created the onClick in milestone 1 for the start button. Here we have to write code for starting our Thread class.
- Create a thread class by implementing runnable. In the run, the method creates a loop for 80 times such a code that it will randomly flash one of the blocks with a green light in the UI that we have created in milestone 1. By using Thread.sleep() method after 600 milliseconds it then turns the green light to white.
- Set the buttonNumber to that instance which is currently flashing.
-
Create check() method
- Now here our main logic starts.
- In milestone 1, we have created an onClick tag for start and stop, so create those methods. Whenever someone clicks Start/Stop buttons, then the code inside these tag methods would run.
- Write the code such that if the id of the box is currently flashing green and that the id of the box which we have just clicked now are equal then increase the score else change the background of the clickable button to red for 500 ms.
-
Creating levels of difficulties for the game
- By creating an Option button with different levels we can create levels.
- In the background (i.e. code) you must change the speeds of blocks accordingly.
Tip
- Use Log.d() for logs; helps in code debugging.
- Use Math.random() for getting random numbers.
- How to set Green Color on the current UI so that screen does not freeze? Refer to this example for implementing Green Color for the current thread.
    try {
            runOnUiThread(new Runnable() {
                @Override
                    public void run() {
                        runOnUiThread(new Runnable() {
                            @Override
                                public void run() {
                                    buttons[finalN].setBackgroundColor(Color.GREEN);
                                }
                            });
                        }
                    });
        }
Bring It On!
How do you match the id of the boxes (/grid buttons)? No idea? Think harder :p
Expected Outcome
Please refer to the walkthrough of the game again.
Creating the walkthrough screen of the game
Now our game is almost completed. But when a new user starts using the app, the user should ideally be given a quick tour of the app's functionalities. Now we are creating the walkthrough or Guided Tour to introduce first-time users to our app. Here we use ShowcaseView gradle library for this purpose. Using this library you can keep indicating what each button does and what all the app's major features are.
Requirements
- We have to use compile 'com.github.amlcurran.showcaseview:library:5.4.3' as dependency directly.
- For using ShowcaseView we have to use Builder Pattern only.
Tip
- ShowCase builder Pattern example -
A simple example of the Showcase Builder pattern that you may use is given below. You can find various other methods in the ShowcaseView library or you can choose alternative libraries as an option.
new ShowcaseView.Builder(this)
    .setTarget(new ActionViewTarget(this, ActionViewTarget.Type.HOME))
    .setContentTitle("ShowcaseView")
    .setContentText("This is highlighting the Home button")
    .hideOnTouchOutside()
    .build();
Here setTarget() and build() are mandatory. By setTarget() you have to choose where you have to use showCase.
-
How to chain multiple showCase views?
We can choose addView() in showcase Builder to run multiple Showcase view one after one.
-
How will the app know that you are using your app for the first time?
The SharedPreferences is the answer. By SharedPreferences, we can store and retrieve small amounts of primitive data. It can be thought of as a dictionary or a key/value pair.
-
Where should we check SharedPreferences value?
The onCreate() method which we had overridden from AppCompatActivity is the correct place to check. As we know the onCreate() method runs when our Activity instance is run. If we run our app for the first time it checks the value from our SharedPreferences and then later decides that we have to show the walkthrough or not.
References
Expected Outcome

You are free to use your own styles and texts. These are only for demo purposes. So keep innovating!!
Creating the splash screen.
A splash screen is mostly the first screen of the app when it is opened. It is a constant screen that appears for a specific amount of time, generally shows for the first time when the app is launched. The Splash screen is used to display some basic introductory information such as the company logo, content, etc just before the app loads completely.
Requirements
- Create a class called MainSplash for our splash screen.
- Change the AndroidManifest.xml file Launcher to MainSplash such that when someone launches the app for the very first time, the splash screen starts and gives a formal introduction to the app.
- Create another class that will represent our splash screen by extending the AppCompatActivity.
- From our MainSplash starts the SplashScreen class.
- Create a layout for our SplashScreen as activity_splashscreen.xml
- Create a thread that will start our MainActivity for the game after 3 seconds.
Tip
- We can use Thread.sleep() for Pause on current Activity
- How to Start the Main screen after 3 seconds? - Refer to the following example implementation to start MainActivity after 3 seconds of app's loading.
    Thread myThread = new Thread(){
            @Override
            public void run() {
                try {
                    sleep(3000);
                    Intent intent = new Intent(getApplicationContext(),MainActivity.class);
                    startActivity(intent);
                    finish();
                } catch (InterruptedException e) {
                    e.printStackTrace();
                }
            }
        };
Expected Outcome
Build for release
For game applications to be consumable by the end-users (public) we have to create a release-ready package. An optional step before building your app for release is obfuscating your code. Obfuscation hides functions and classes used in the Android code to provide security against reverse engineering attempts on the app.
Requirements
- Add a proper icon for your android app so that it looks appealing.
- Remove log and other debugging codes.
- Follow the steps here to build your android app for release.
Expected Outcome
Your app is now ready to be rolled out onto the Play Store.