You will be creating a web application which will perform real time video processing of a webcam video stream consisting of a green screen and replace it with a background video or an image of your choice.
Objective
Project Context
Have you ever seen a movie in which a superhero flies through the sky? You can see all the skyscrapers whizzing by in the background, and it looks so cool. Have you ever WONDERed how movie makers film such shots?
The special effects created during weather forecasts and many, many television shows and movies utilize a special tool called a green screen. Why is it called a green screen? Mainly because it consists of a large screen that is green! The green screen is an integral part of the special effects process known formally as chromakey.
Chromakeying, sometimes known as color keying, is the process of singling out a particular color in an electronic image and then using computer software to make that color transparent. This allows another image, which can be just about anything you can imagine, to show through.
This project is a good start for beginners, a new idea for intermediates and a refreshing hobby project for professionals. It involves the basic use of all of HTML, CSS and JS languages. Reason for following this tech-stack is that these languages are easy to use and are also fast in terms of execution time.
Project Stages
The project consists of the following stages:

High-Level Approach
- Capture input video stream with green background.
- Refine the captured stream.
- Merge the processed input stream with another background video or image of your choice.
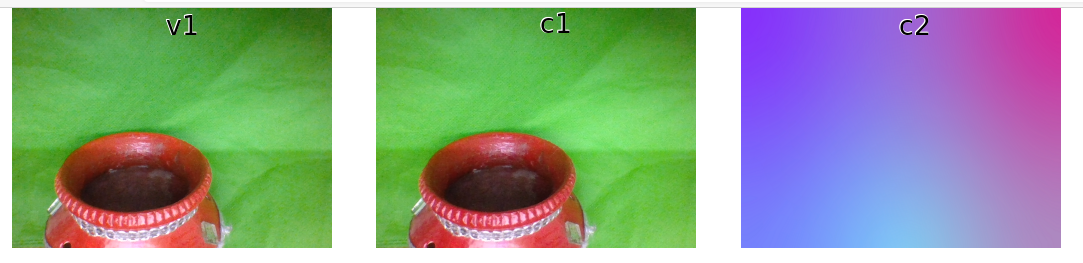
The desired end result of this project is like this:
Applications
Some of the applications of Green Screen Video Processing are:-
- Personalized background for video meeting applications like Zoom
- An important technique utilized for heavy computer graphics in film industry.
Credits
Objective
You will be creating a web application which will perform real time video processing of a webcam video stream consisting of a green screen and replace it with a background video or an image of your choice.
Project Context
Have you ever seen a movie in which a superhero flies through the sky? You can see all the skyscrapers whizzing by in the background, and it looks so cool. Have you ever WONDERed how movie makers film such shots?
The special effects created during weather forecasts and many, many television shows and movies utilize a special tool called a green screen. Why is it called a green screen? Mainly because it consists of a large screen that is green! The green screen is an integral part of the special effects process known formally as chromakey.
Chromakeying, sometimes known as color keying, is the process of singling out a particular color in an electronic image and then using computer software to make that color transparent. This allows another image, which can be just about anything you can imagine, to show through.
This project is a good start for beginners, a new idea for intermediates and a refreshing hobby project for professionals. It involves the basic use of all of HTML, CSS and JS languages. Reason for following this tech-stack is that these languages are easy to use and are also fast in terms of execution time.
Project Stages
The project consists of the following stages:
High-Level Approach
- Capture input video stream with green background.
- Refine the captured stream.
- Merge the processed input stream with another background video or image of your choice.
The desired end result of this project is like this:
Applications
Some of the applications of Green Screen Video Processing are:-
- Personalized background for video meeting applications like Zoom
- An important technique utilized for heavy computer graphics in film industry.
Credits
Getting Started
We'll start of by initializing the project structure.
Requirements
- Install Node.js.
- Create a project folder with appropriate name and inside this directory run
npm initand fill all the require details in the prompt. - Create the essential files required as mentioned below.
References
Tip
- Since this is a direct JavaScript based application, running the HTML file will suffice to view the webpage. But while developing the project you will have to reload each time you make a change in your code to view the corresponding changes.
- Download Live Server extension for VSCode users, Atom-live-server for atom users. For others the best ways are either using npm (article and package) or use python server. Other ways do exist. Feel free to explore them and implement if needed.
Update the required Skeleton Project files
Now we can implement the various components of our project.
In this milestone, a basic template of some code will be required in the project files.
Requirements
- Let’s start simple, with a bare-bones HTML5 code template in a
index.htmlfile with all the CSS and JS files imported present in the project folder. - The HTML document must contain two
<canvas>elements with the IDsc1andc2and one<video>element with IDv1. The given IDs for above three HTML elements will be used by JavaScript methods to access and interact with them in the further stages. - The
index.jsfile must contain references to the video and canvas elements along withCanvas 2D Contextfor the canvasc1andc2. - A background image or video of your choice must be programmatically created using JavaScript which will be required further to replace the green pixels in the input video stream.
Expected Outcome
A required skeleton document with HTML elements is created to display three different video streams present at each different stages in the video processing pipeline.
Capture Webcam Video Stream and Draw it to Canvas
In this milestone, we will capture the input webcam video stream and display it on the <video> and 1st <canvas>.
Requirements
- Capture the
<video>element's Webcam stream usingMediaDevices.getUserMedia()which is available as a Web API underMediaDevicesinterface. - Create an empty function
computeFrame()which will be used for frame by frame video processing. - Attach event listener with event type as "play" to
<video>element with IDv1and pass second parameter as anonymous function enclosed ofsetInterval()method attached tocomputeFrame()function. - Add source code for drawing Video stream to Canvas Context
c1and programmatically created background image or video of your choice to Canvasc2incomputeFramefunction.
Expected Outcome
After implementing the above requirements, video is displayed in the <video> element and canvas1, selected background image is displayed in the canvas2.
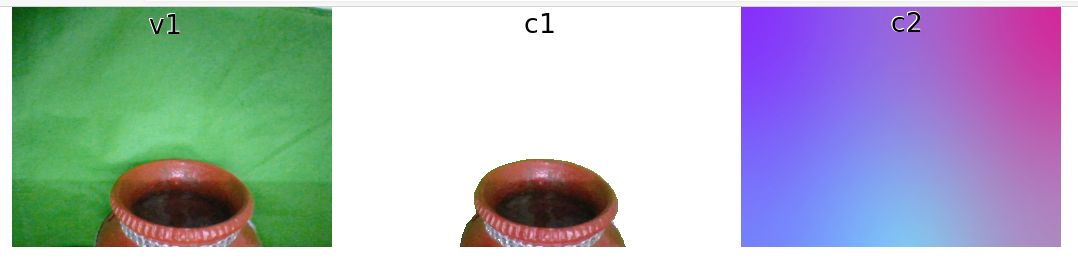
Display video stream with removed green pixels
In this milestone, we will set the green pixels alpha value to transparent ( i.e zero ) and display in the 1st Canvas.
Requirements
In the computeFrame() function,
- Get frame from the Canvas Context
c1and extract pixels from thedataattribute of the frame. - Loop through the pixels where each pixel contains an array of
(r,g,b,a)values and convert each pixel from RGB to HSL format. - Set the Alpha Value
aof each pixel to zero if the Hue value lies in the range of Green color. - Re-assign the modified pixels to the original frame and display it in the Canvas Context
c1at the end of the function outside the pixel manipulation loop.
References
Expected Outcome
After implementing the above requirements, processed video with transparent pixels is displayed in the canvas1.
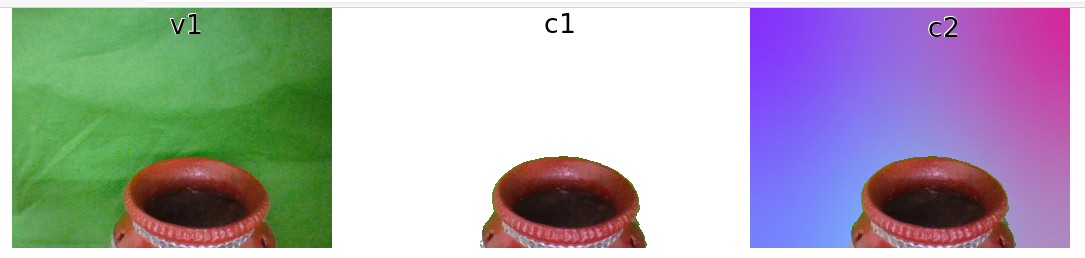
Merge Processed Video Stream with Personalized Background
In this milestone, we will merge the processed video stream with a personalized background image or video and display it in the 2nd Canvas.
Requirements
In the Pixel Manipulation loop of computeFrame() function,
- Set the original color values of
rgbafor pixels from the frame usingfillStyleattribute of the Canvas Contextc2if the Hue value doesn't lies in the range of Green color. - Calculate the X co-ordinates of the pixel by the formula
((Current Pixel iteration value/ length of pixel array) % Width of Canvas c2). - Calculate the Y co-ordinates of the pixel by the formula
((Current Pixel iteration value / length of pixel array) / Width of Canvas c2). - Fill the original pixel located at the above calculated co-ordinates using
fillRectmethod of Canvas Context.
References
Expected Outcome
After implementing the above requirements, below is the processed video with personalized background.
Spice it up!
As the basic implementation is all done, for all the curious cats out there, these are some of the line items which can be implemented to spice up the existing functionality.
[Note: This is not a mandatory milestone]
Requirements
- Try to do the following:
- Can you add a toggle option to switch between different personalized backgrounds?
- Can you add color filter functionality like grayscale,brighten,etc?
- Can you add a functionality to support dynamic Background Screens other than Green ( eg. Blue Screen ) ?
References
Expected Outcome
You should be able to add more features to your application.