Build a full stack web application - OurApp (a social media app) using Node.JS, Express.Js, MongoDB, EJS (Template Engine for server side rendering) and deploying the application to Heroku.
Objective
Project Context
OurApp is a simple real world application where users can write short tweets, follow each other and also chat with each other. You can have a look at the final product's demo video before starting the project.
This project is best for those who want to dive deeper into full stack using Nodejs and MongoDB after learning HTML, CSS and JS. Building a full stack application single-handedly is a tough task, but learning and building such applications will help you master your skills.
Building this project will be a challenging task where you will get to learn and explore all about the MVC pattern, NoSQL Database (MongoDB) and much more.
Project Stages
We can divide the project based on the stack used:
- HTML, CSS, Bootstrap: Building the UI of the application
- Serving HTML dynamically and use of EJS (template engine)
- Familiarising the NodeJS environment
- ExpressJS: Framework for creating servers.
- MongoDB: Using NoSQL Database.
- Socket.IO: Building live chatting feature
- GitHub: To publish your project.
- Heroku: Deploy the full stack application
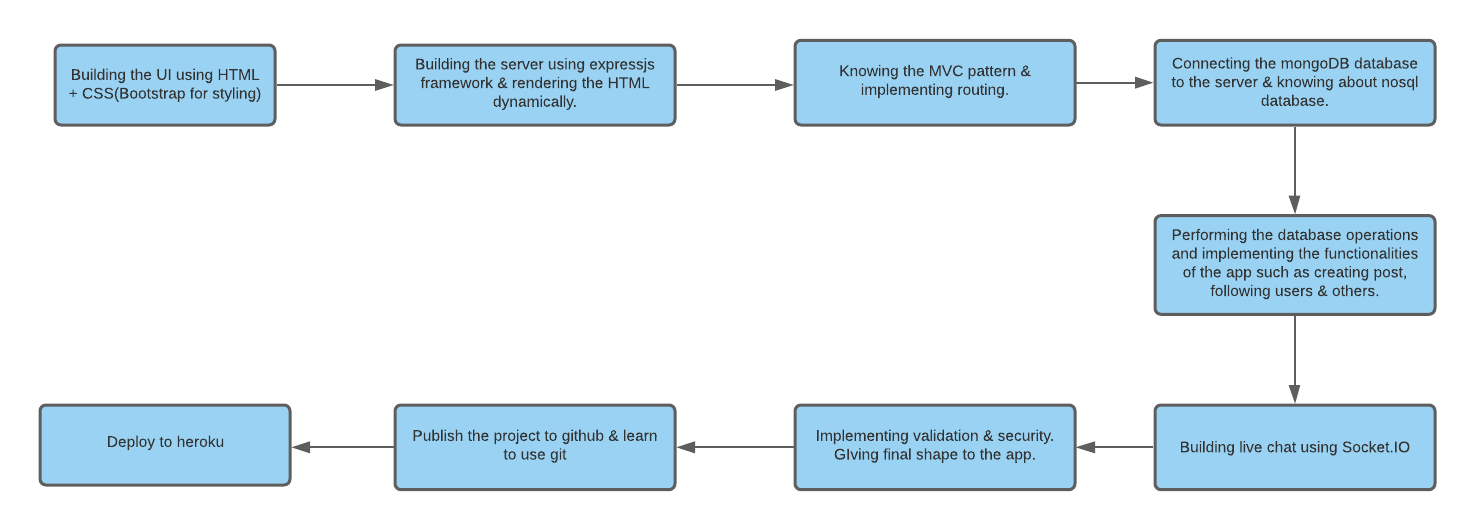
High-Level Approach
- Building the UI of the app: the guest page, the home dashboard, profile page, create post, single post screen and more.
- Set up your server and dynamically render HTML.
- Implementing authentication (login and signup) for users.
- Implementing routing and MVC patterns.
- Building models for database and connecting database to server.
- Building live chat using socket.IO.
- Adding validators and security features to the project.
- Publish to Github and finally deploy to heroku.
Demo of the project:
Primary Goals
- Build this app from scratch and use it in your real life; best by adding some additional advanced features to this base project.
- The main goal is to master your NodeJs and MongoDB skills and begin your full stack journey by developing this project.
- After building this app, your goal should be implementing private chat, image upload in the post section and like, comment feature to make it more practical.
Applications
- You can use it among your friends or family and use it as a real world small scale social media application.
Objective
Build a full stack web application - OurApp (a social media app) using Node.JS, Express.Js, MongoDB, EJS (Template Engine for server side rendering) and deploying the application to Heroku.
Project Context
OurApp is a simple real world application where users can write short tweets, follow each other and also chat with each other. You can have a look at the final product's demo video before starting the project.
This project is best for those who want to dive deeper into full stack using Nodejs and MongoDB after learning HTML, CSS and JS. Building a full stack application single-handedly is a tough task, but learning and building such applications will help you master your skills.
Building this project will be a challenging task where you will get to learn and explore all about the MVC pattern, NoSQL Database (MongoDB) and much more.
Project Stages
We can divide the project based on the stack used:
- HTML, CSS, Bootstrap: Building the UI of the application
- Serving HTML dynamically and use of EJS (template engine)
- Familiarising the NodeJS environment
- ExpressJS: Framework for creating servers.
- MongoDB: Using NoSQL Database.
- Socket.IO: Building live chatting feature
- GitHub: To publish your project.
- Heroku: Deploy the full stack application
High-Level Approach
- Building the UI of the app: the guest page, the home dashboard, profile page, create post, single post screen and more.
- Set up your server and dynamically render HTML.
- Implementing authentication (login and signup) for users.
- Implementing routing and MVC patterns.
- Building models for database and connecting database to server.
- Building live chat using socket.IO.
- Adding validators and security features to the project.
- Publish to Github and finally deploy to heroku.
Demo of the project:
Primary Goals
- Build this app from scratch and use it in your real life; best by adding some additional advanced features to this base project.
- The main goal is to master your NodeJs and MongoDB skills and begin your full stack journey by developing this project.
- After building this app, your goal should be implementing private chat, image upload in the post section and like, comment feature to make it more practical.
Applications
- You can use it among your friends or family and use it as a real world small scale social media application.
Prototyping the Application and environment setup
First validate the idea by doing a low level implementation (Proof of Concept) of the components and architecture involved in the project.
This will help you to:
- Get more clarity about the application by watching the app's demo video.
- Get a better understanding of the stages involved in the project. For example: setting up the server and database, create-edit-delete the user posts, live search, letting users follow each other, live chat and deploying it to heroku.
Further in this task you will be setting up the required environment for the application's development.
Requirements
- Explore the OurApp's demo
- Node.js must be installed on your machine. You may use npm (recommended here) or yarn to get started with the necessary dependencies' installation for this project (cover later in this task).
- A MongoDB atlas account to manage your data in the cloud.
- Get familiarised with chrome dev tools. Elements panel in the dev tool can be used to inspect DOM or CSS (Optional).
- This is a Node.js app built using Express.Js framework to build the web server and project following the MVC pattern. You can get started by developing one.
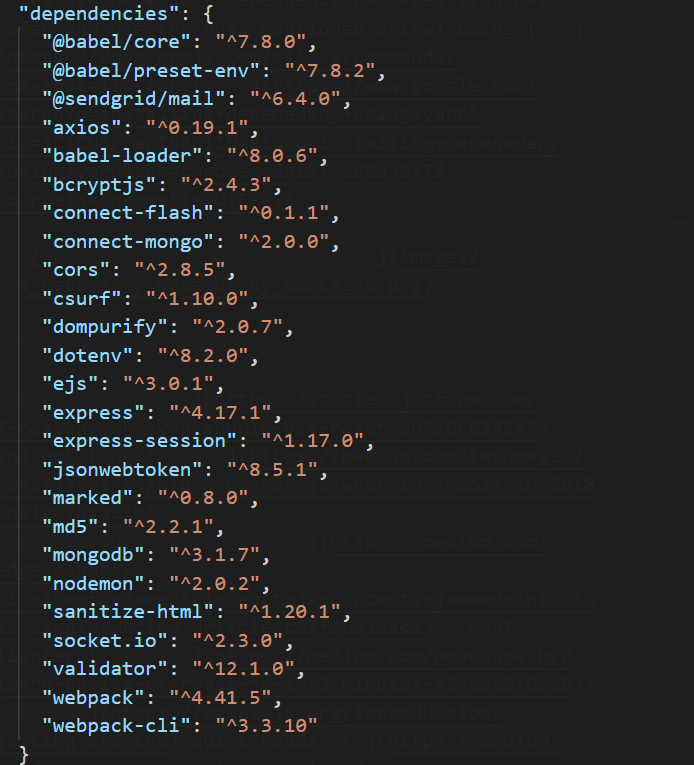
- Install necessary dependency packages (you may refer to the ones mentioned below) using npm. Explore what each of these packages are for!
Note
- The useful tools and skills needed for this project is briefly covered in the
Frontendsection of Crio Bytes. You can check them out too, they are absolutely free of cost!
Building the pages layout using HTML, CSS and Bootstrap
-
If you have gone through the app's demo, you might have observed the layout of the pages. We can categorize the frontend into:
- home-guest page
- home-dashboard page
- create-post page
- profile page
- single post screen page
- header
- footer
-
Try to inspect the pages and break it into divisions. You can also try to come up with your CSS styles for building a similar app interface. It will be impressive if you come with your own design.
-
Bootstrap plays the most important role to build these components easily.
Requirements
-
Create the basic UI for guest pages and home dashboard (that are seen after the initial login/register forms' landing page).You can start using bootstrap components here itself.
-
Create the header and footer of the webpage.
-
Flexbox plays the most important role while building the layouts. For reference you can use this.
Bring it On!
- Build all pages using bootstrap and use your own CSS. Refer this
- Implement media queries for mobile view. Refer this
Expected Outcome
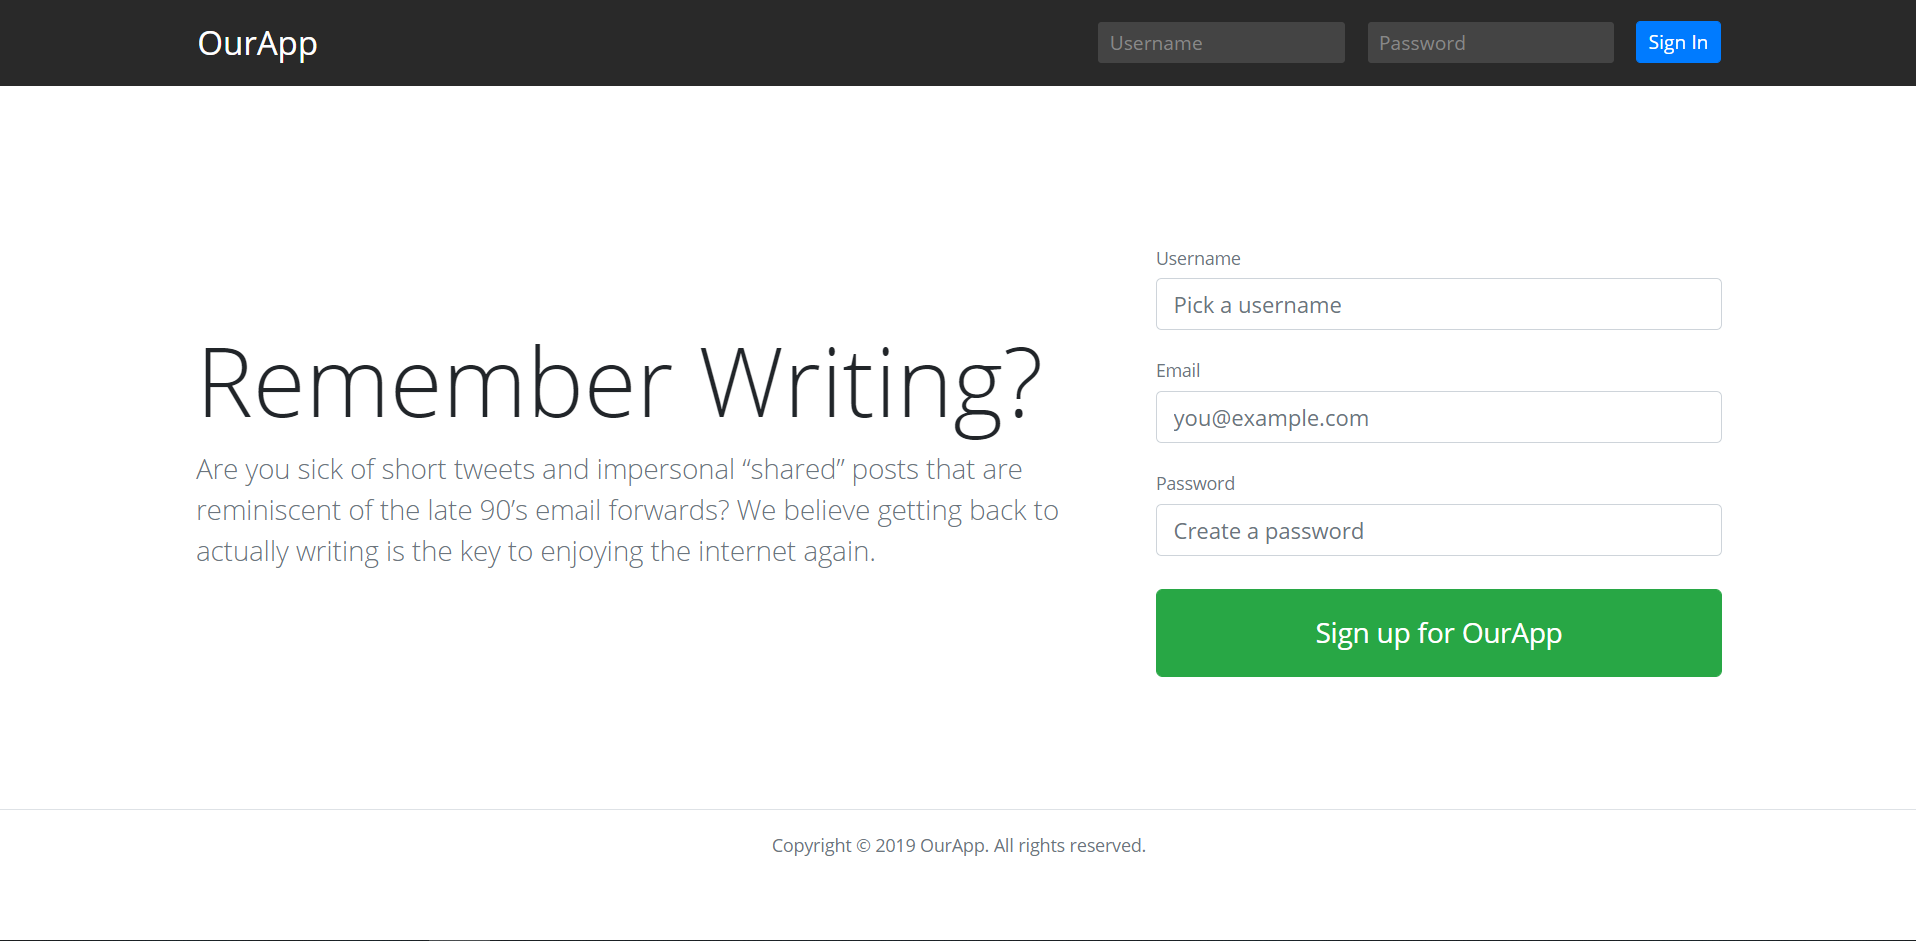
At the end of this task the html pages must be made. Building one 404 error code page would be a plus for the app. Homepage is shown below:
Building the Express server and rendering the HTML dynamically
In this task, we will start using Node.js and Express.js to build the backend of the application. Let's break this task into some steps:
- Building the web server using Express.
- Knowing about the file structure and setting up the project.
- Using EJS (template engine) to build dynamic contents into the HTML templates.
- Building the HTML templates in a reusable fashion.
Requirements
-
Start building a server using express. Express.js, which is a lightweight framework for creating web servers, makes it easier to organize your application’s functionality with middlewares and routing.
-
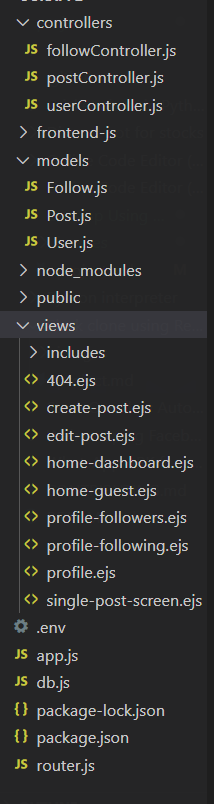
After building the server, your project folder must be consisting of
server.jsfile along with package.json, package-lock.json and node_modules. -
Now create a folder named
viewsinside your main folder and place all HTML files inside it and create a folderpublicand place the CSS files inside it. -
Use EJS; it lets you embed javascript into HTML templates i.e, build dynamic content into your templates. It is faster and simpler than using a full framework like Angular or React, although less feature rich.
Bring it On!
- Use nodemon to restart your server Nodejs app automatically each time a change is saved in your code.
- Build your templates in a reusable fashion using partials. Such as not using header and footer repetitively in all pages, using condition to render divisions (
div). Example of a template-
/*include('includes/header') */

  <div class="container py-md-5 container--narrow">
        <div class="text-center">
              <h2>Whoops, we cannot find that page.</h2>
              <p class="lead text-muted">You can always visit the <a href="/">homepage</a> </a> to get a fresh start.</p>
        </div>
  </div>

/* include('includes/footer') */
Expected Outcome
At the end of this task your server should be listening for requests at a port. And, your views folder should contain the partials and pages using EJS. The terminal should look like this after using nodemon when starting the server.

Using MongoDB database with Express server by following the MVC architecture
In this project, we will be using MongoDB as the database. Refer this to know why we should prefer NoSQL over SQL databases in some cases.
Let's divide this task into some steps:
- Creating a mongoDB atlas account to manage our data.
- Connecting database to the express server.
- Knowing about MVC architecture in Node.js applications.
We will now start breaking the project into MVC pattern. M which stands for Model is where we will include all our business logic or all the rules that we want to enforce on our data. V which stands for Views i.e, the UI (User Interface). C which stands for Controller is the middleman depending on the incoming request. It will call the appropriate model with appropriate logic.
Once that's done the Controller will call the appropriate View and pass it any relevant dynamic data from the Model.
Requirements
- Create an Atlas account. Connect to your cluster, insert and view data in your cluster.
- Create a
db.jsfile in your folder and create a connection to a MongoDB instance which returns the reference to the database. - Make the connection in such a way that the server starts listening to requests only after the connection to the database is made.
- Explore the MVC architecture before starting to implement the functionalities in the next task.
Bring it On!
- Use environment variables to store the connection string. Make a
.envfile and store the private keys and attributes there and use it wherever required. This ensures safety and privacy of your database cluster. - Use the dotenv package to access the environment variables.
- You can use MongoDB Compass - The easiest way to explore and manipulate your MongoDB data. It gives the GUI and is easier to use than MongoDB atlas or Mongo Shell.
Expected Outcome
- At this point of project the integration of the database must be completed. You should have got an idea about the MVC architecture which we will be building from the next task. Get hands on with mongoDB. Refer this.
Implementing user registration and login
In this task, we will be building the authentication for the app. Let's divide this task into smaller steps:
- Building models for users.
- Hashing the password before storing it in the database.
- Implementing session-based authentication.
- Using Gravatar for User profile photos.
Requirements
- Implement routing of all routes in a separate file and call controller functions, respectively.
- Separate the controllers and models w.r.t their functionalities. For example, make user related functions in
userController.jsand models inuserModel.js. Validate attributes before storing it to the database. Like this, divide others based on functionalities. Refer this - Implement hashing before storing the passwords to the database. For hashing bcryptjs and md5 packages can be used.
- You can use Mongodb without Mongoose also. But using mongoose makes it easier to implement the functionalities.
- Use Session for authentication of Users.
- Use gravatar for user profile photos.
References
- Salt & hash Password with bcrypt
- A quick way for hashing passwords using Bcrypt with Nodejs
- NodeJs & Authentication with Cookies and Session
- Node.js Express Login example with MongoDB
- Build database relationships with Node.js and MongoDB
- Create MongoDB database models in Node.js
- How to use Gravatar in your Node.js App
Bring it On!
- Build a template for flash messages when there is error.
Expected Outcome
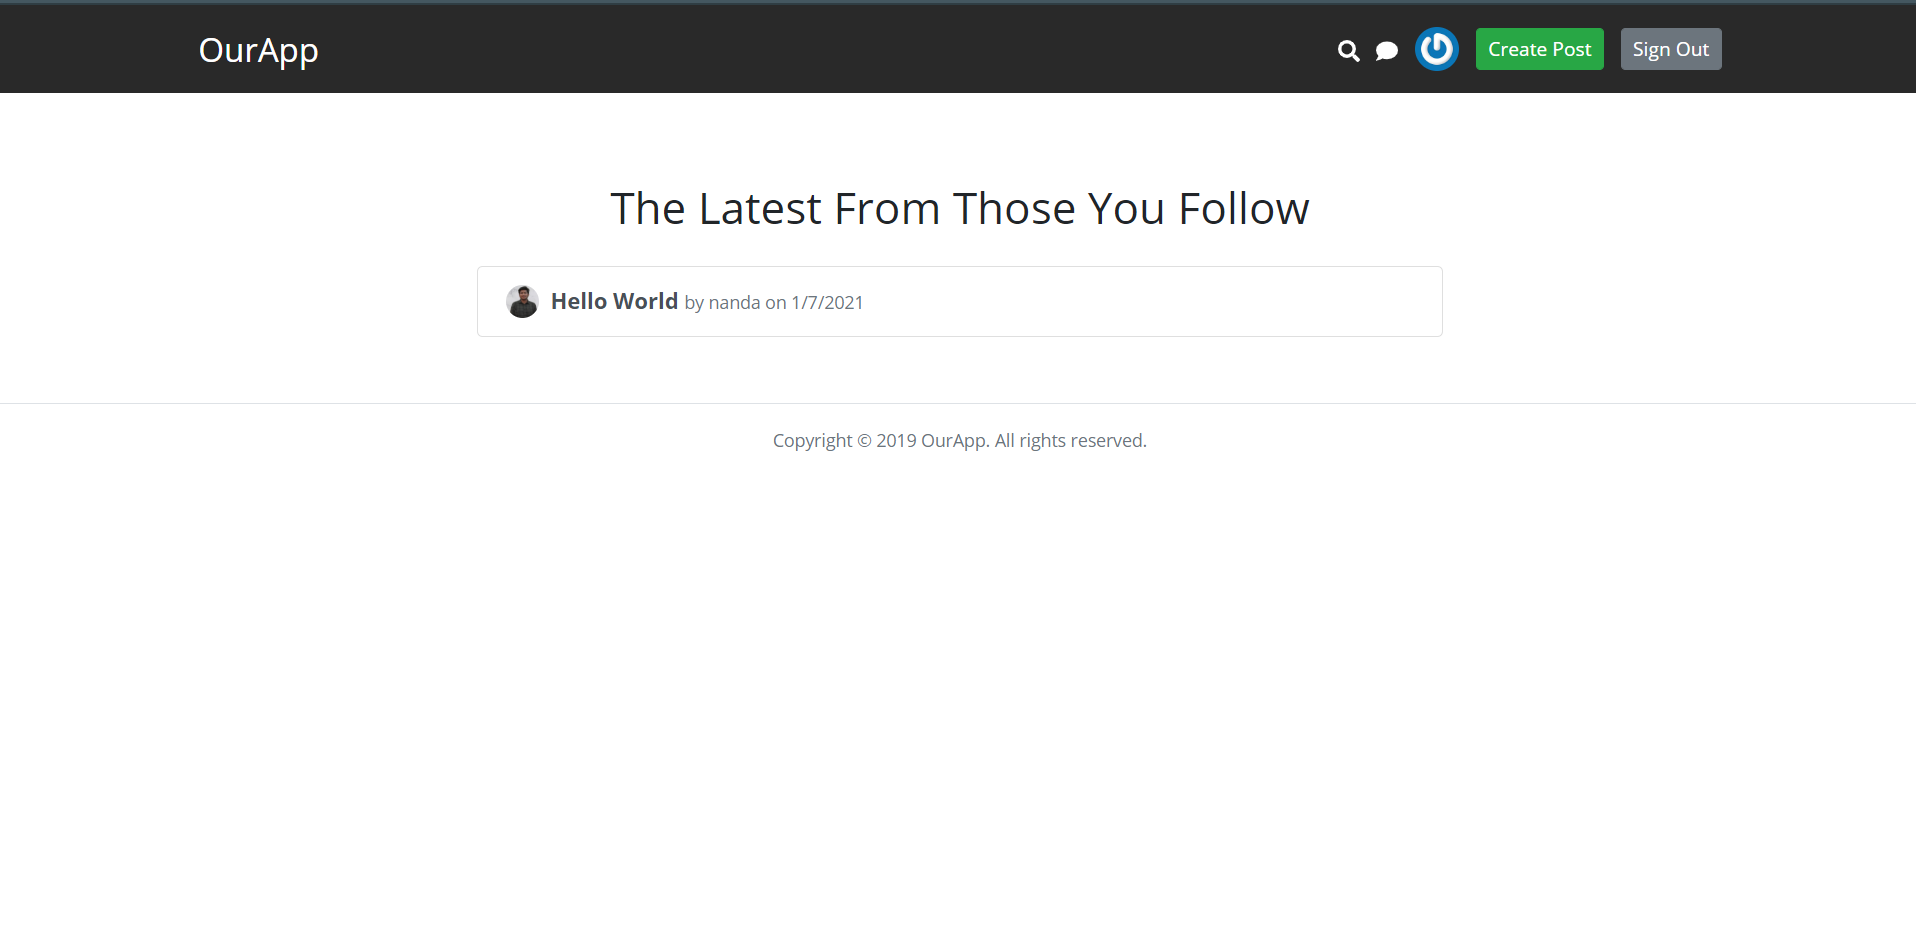
- At the end of this task, an user must be able to create an account and login to the app and visit their homepage and should have the liberty to access different sections of his profiles.
Expected outcomes are shown below:
Implementing core functionalities of users
In this task, we will be building the core functionalities of the app. Let's divide this task into smaller steps:
- Building the model for posts.
- Letting users create and edit their posts.
- Letting users follow each other.
- User dashboard will consist of posts of the other users that they follow.
Requirements
- Build a database model for the posts by including all the attributes which are required to be saved for the post.
- Write your controller function to save and edit the posts by the user.
- Build the model in such a fashion that the followers and followings can be retrieved by the user. (Hint: Use collection inside collection, no foreign key in noSQL database)
- Fetch the posts of the users whom you follow in their respective dashboard.
References
- NodeJs CRUD Operations Using Mongoose and MongoDB Atlas
- CRUD Operations with Mongoose and MongoDB Atlas
- CRUD Operations in Express, Nodejs and MongoDB
- Data Modeling
- Model One-to-Many Relationships with Embedded Documents
- Node.js: create a simple social network with ExpressJS
- Learn mongoose models and functions
Bring it On!
- Functionalities should be implemented in the correct way, i.e the owner of the post should only delete and edit the post. Try to implement this concept.
- Make all the routes authenticated/protected.
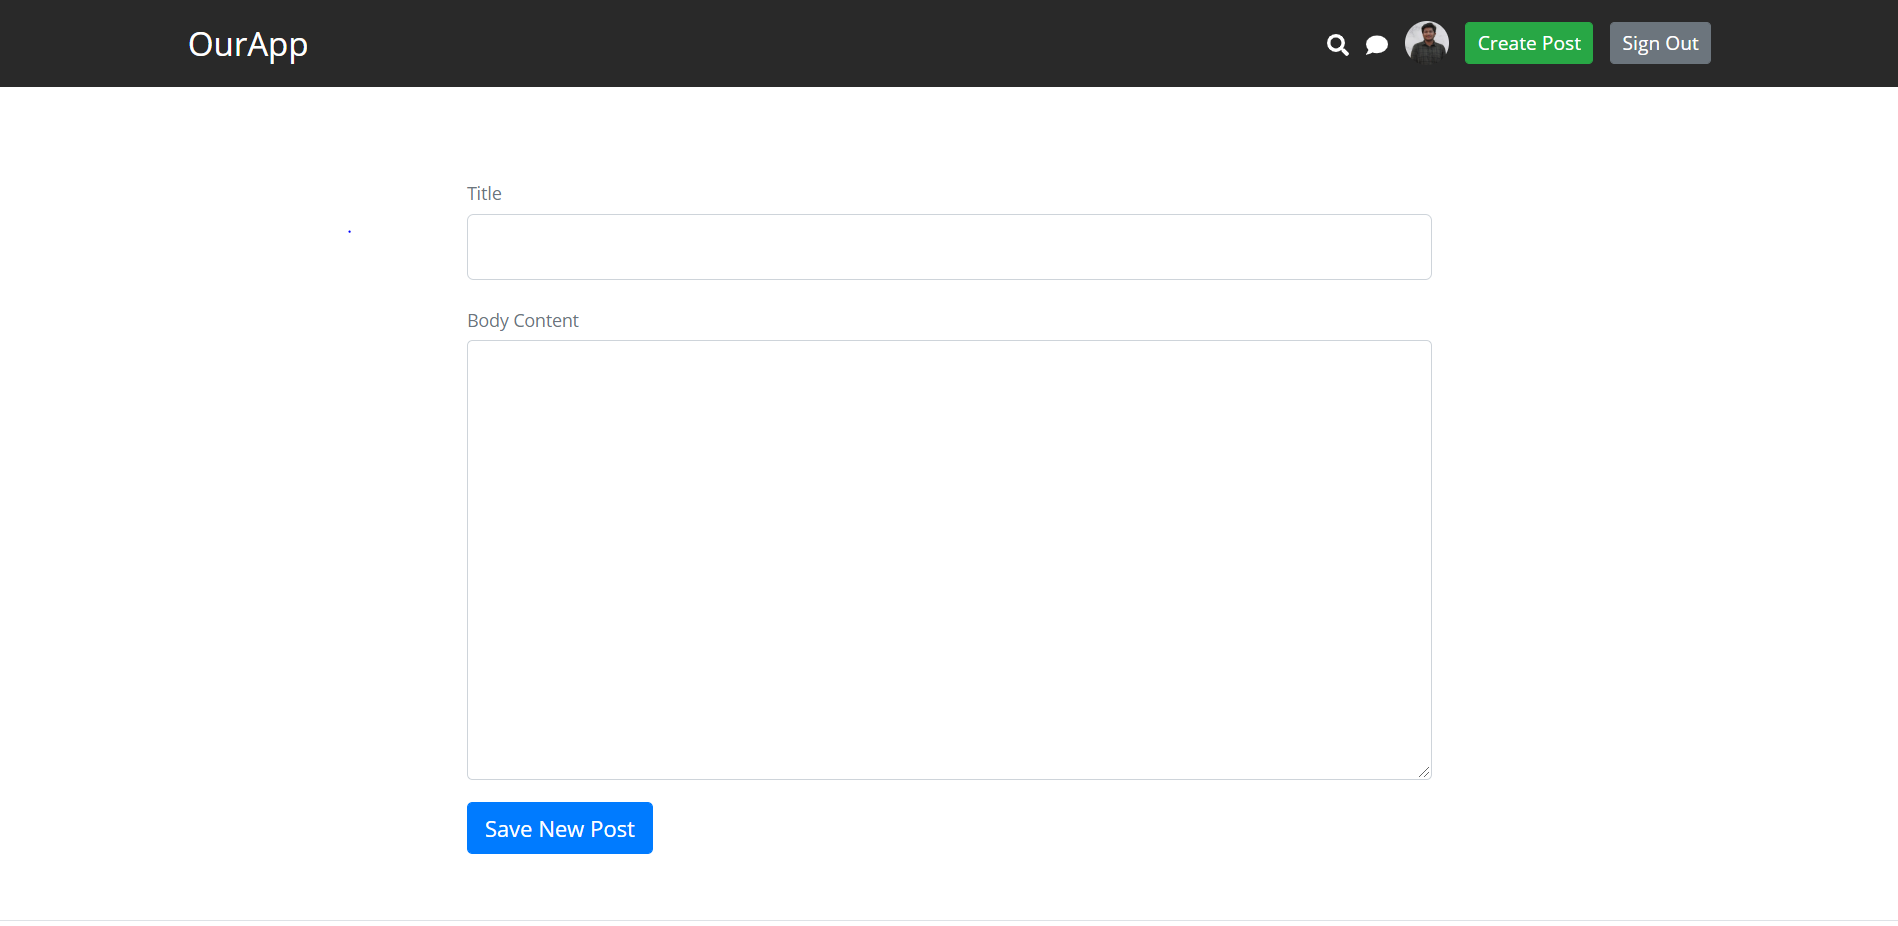
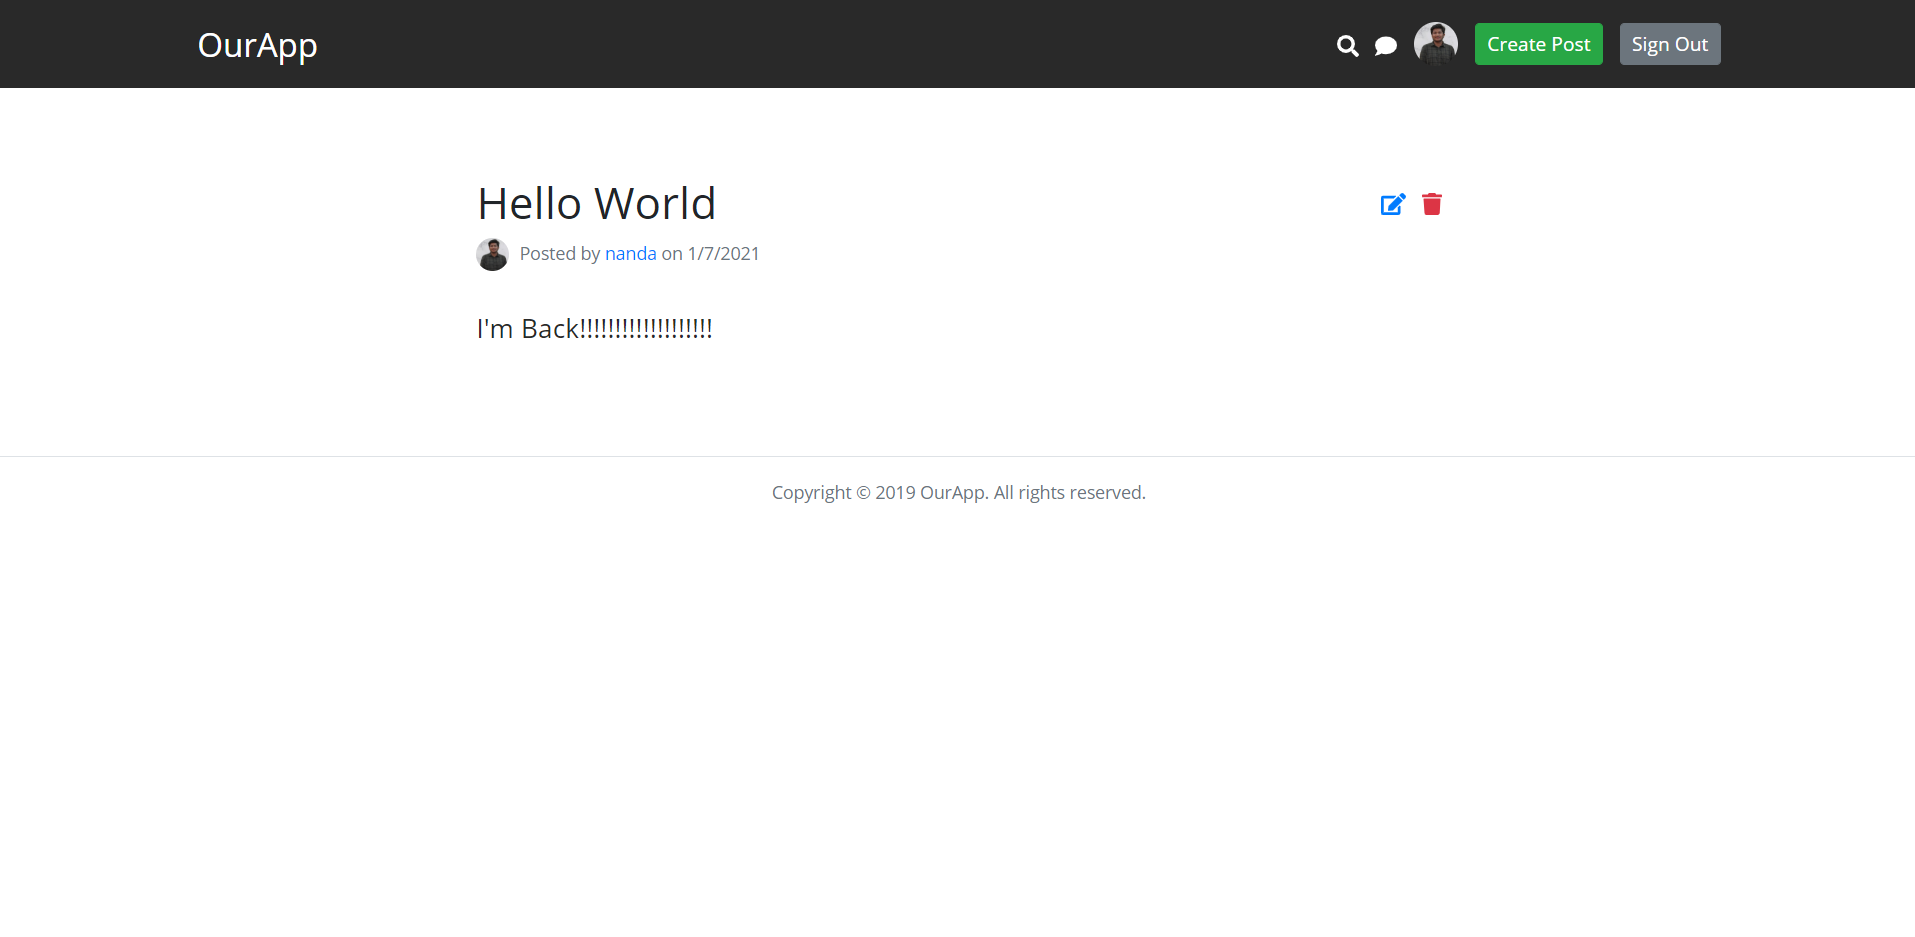
Expected Outcome
- At the end of this task, users should be able to create, edit and delete posts. Users can follow each other and view each others' posts. Expected outcomes are shown below:

Implementing the live chat and live search feature
In this task, we will be building a live chat and live search feature of the app. Let's divide this task into smaller steps:
- Use front-end javascript to build search panel.
- Create one separate folder for the front-end JS files and bind it using webpack.
- Similarly, build a chat panel and bind it.
- Use Socket.IO for chat.
Requirements
- Create one separate folder
frontend-jsand install webpack, webpack-cli, @babel/core and @babel-loader. - Configure the webpack.config.js file and change the watch option according to it in the package.json file.
- Now run the npm watch and check the public folder, there will be a main-bundled.js file in it.
- Start building the frontend files for search and chat panels.
- Create a controller function for searching the results by posts.
- Use socket.io for building chat functionalities.
Bring it On!
- Try to build private chat with users also.Refer
- Try to implement live search features by users also or you can build your own search mechanism.
- Hint: use sanitize-html and domurify
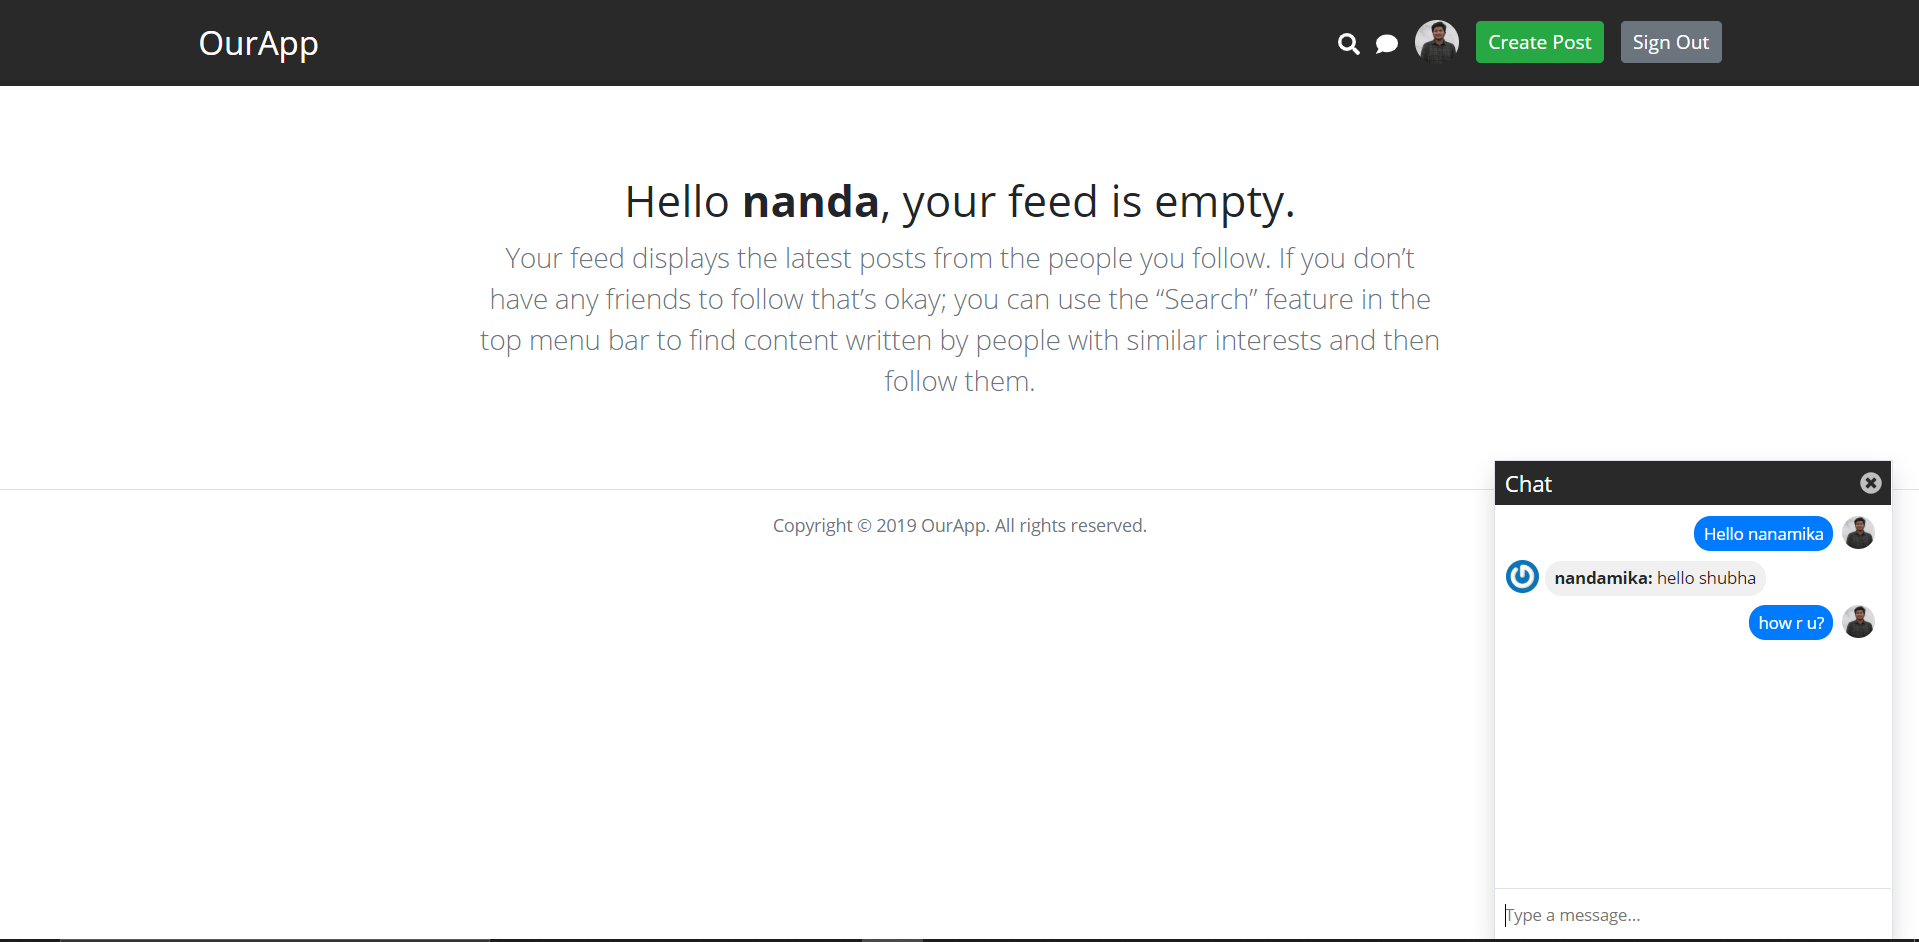
Expected Outcome
- At the end of this task, users can search posts and chat with other users who are currently active. The project structure and some of the outcomes are shown below:
const path = require('path')
const webpack = require('webpack')

module.exports = {
  entry: './frontend-js/main.js',
  output: {
    filename: 'main-bundled.js',
    path: path.resolve(__dirname, 'public')
  },
  mode: "production",
  module: {
    rules: [
      {
        test: /\.js$/,
        exclude: /node_modules/,
        use: {
          loader: 'babel-loader',
          options: {
            presets: ['@babel/preset-env']
          }
        }
      }
    ]
  }
}
Implementing live validation in registration form and adding CSRF protection
In this task, we will be building live validation for the registration form and implementing csrf security to the app.
Requirements
- Implement the live validation as separate frontend-js done before for live search.
- Prevent Cross-Site Request Forgery (CSRF) in your application using csurf package.
Expected Outcome
- At the end of this task the signup form should have live validation as shown below.

Pushing the project to github
In this task, you will be pushing your project into GitHub. Make a good README for your project so that your project is well-documented.
Requirements
- Initialize the project as a github repository using
git init. - You will get to see a
.gitfile inside your repository and the unstaged files. - Ignore the
node_modulesand.envfile (if any) before pushing it to GitHub using.gitignorefile. - Commit your changes and push it to github.
Expected Outcome
- At the end of this task your project will be published onto GitHub.
Making the app live
In this task, we will be deploying it to Heroku to make it live.
Requirements
- Go ahead and go to Heroku and create your free account. The dashboard is incredibly simple and user friendly so do explore it.
- If you have secret key value pairs in your
.envfile, use config vars in the setting menu of heroku to store those values before deploying. - Now use the command line to deploy your node app.
Expected Outcome
- At the end of this task, your project should become live and you can share the link among your peers, add it in your resume and do add it in your GitHub repository ;)