Create an online code editor for HTML, CSS and JS code snippets using HTML, CSS and JQuery. The code editor’s functionality will be similar to that of jsbin.com
Objective
Project Context
Online code-editor is a tool that resides on a remote server and is accessible via browsers. Some online code editors have basic features like syntax highlighting or code completion similar to text editors while others are like complete IDEs.
For any developer, be it amateur or professional, often the liberty of using a local code editor may be unavailable. As online code-editors are fast, efficient and greatly popular, it is a familiar tool among developers. If you have used one, ever wondered how it can be made? This module will guide you through the process that can be followed to build your own code-editor for HTML, CSS and JS code snippets. Implementing the project will add an immense value to your profile.
This project is a good start for beginners, a new idea for intermediates and a refreshing hobby project for professionals. It involves the basic use of all of HTML, CSS and JS languages. Reason for following this tech-stack is that these languages are easy to use and are also fast in terms of execution time.
You are free to use JavaScript instead of JQuery but it is recommended to use JQuery as it is lighter to implement.
Product Stages
We can segregate the product architecture based on tools used:
- HTML, CSS - Site user interface (site’s skeleton layout)
- JQuery - Site’s core functionality
- GitHub - To host the web application

High-Level Approach
- Creating the structural aspect of code-editor using HTML, CSS (i.e. without any animations and features)
- Implementation of core functionalities and other small features using JQuery, a JavaScript library
- Publish to GitHub and finally host your deployed code-editor
The desired end result of this project is like this:
Applications
Some of the applications of online code editors are:
- For online interviews/hiring: With online code editors, you can do interviews with ease. It helps to see candidates’ approach towards solutions and work with code.
- Prototyping: You can validate your ideas and get instant feedback from users as sharing and collaboration options are available and saves you from the pain of local setup.
Objective
Create an online code editor for HTML, CSS and JS code snippets using HTML, CSS and JQuery. The code editor’s functionality will be similar to that of jsbin.com
Project Context
Online code-editor is a tool that resides on a remote server and is accessible via browsers. Some online code editors have basic features like syntax highlighting or code completion similar to text editors while others are like complete IDEs.
For any developer, be it amateur or professional, often the liberty of using a local code editor may be unavailable. As online code-editors are fast, efficient and greatly popular, it is a familiar tool among developers. If you have used one, ever wondered how it can be made? This module will guide you through the process that can be followed to build your own code-editor for HTML, CSS and JS code snippets. Implementing the project will add an immense value to your profile.
This project is a good start for beginners, a new idea for intermediates and a refreshing hobby project for professionals. It involves the basic use of all of HTML, CSS and JS languages. Reason for following this tech-stack is that these languages are easy to use and are also fast in terms of execution time.
You are free to use JavaScript instead of JQuery but it is recommended to use JQuery as it is lighter to implement.
Product Stages
We can segregate the product architecture based on tools used:
- HTML, CSS - Site user interface (site’s skeleton layout)
- JQuery - Site’s core functionality
- GitHub - To host the web application
High-Level Approach
- Creating the structural aspect of code-editor using HTML, CSS (i.e. without any animations and features)
- Implementation of core functionalities and other small features using JQuery, a JavaScript library
- Publish to GitHub and finally host your deployed code-editor
The desired end result of this project is like this:
Applications
Some of the applications of online code editors are:
- For online interviews/hiring: With online code editors, you can do interviews with ease. It helps to see candidates’ approach towards solutions and work with code.
- Prototyping: You can validate your ideas and get instant feedback from users as sharing and collaboration options are available and saves you from the pain of local setup.
Getting Started
First validate the idea by doing a low level implementation (Proof of Concept) of the components involved in the project.
This helps you to:
- Get more clarity around the unknowns.
- Get a better understanding of the stages involved in the project.
Explore various aspects of the terms mentioned in the preceding sections, like why to use JQuery instead of JavaScript (ES6), XML vs HTML, why use HTML5/CSS3 and not the other versions, etc.
Requirements
- Ideally this is a simple JQuery-based app. So start by creating one by first downloading jQuery
- Then create an appropriate project folder with essential files. It is a good practice to follow the below mentioned file structure.

References
- Check out Crio’s HTML, CSS byte to get yourself fully equipped with HTML/CSS.
- Get started with jQuery
- Quick tutorial for jQuery
- Don’t know what the .gitignore file is? No problem, just refer to this.
Tip
- Since this is a direct JavaScript based application running the HTML file will suffice to view the webpage. But while developing the project you will have to reload each time you make a change in your code to view the corresponding changes.
- Download Live Server extension for VSCode users, Atom-live-server for atom users. For others the best ways are either using npm (article and package) or use python server. Other ways do exist. Feel free to explore them and implement if needed.
Create the site’s main layout
In this milestone, the basic structure of the code-editor is built (excluding the core functionality) using HTML.
Requirements
- The main components to be created are HTML, CSS, JS buttons (render upon toggling) and a ‘run’ button. This can be done using simple lists in HTML.
- Wrap all the components and containers in appropriate classes and divisions which will then be used for references in styling. This step must be done in the future too, when the need arises.
- Create (three) containers in which the HTML, CSS, JS code snippets will be inputted by the user. For this use the textarea HTML tag.
- Finally wrap the ‘run’ button with the
iframeelement (can be done later).iframeelement is used to render the desired output as a webpage within a webpage.
References
Expected Outcome
Since only HTML has been used, the site should look something like this-

Styling the code-editor
Now that we have the basic skeleton ready, we can start our styling process. Needless to mention this is an iterative process as styling is dynamic to features and addition/removal of features does affect overall styling.
Requirements
- Go back to currently existing code divisions and give appropriate class names to every relevant sub-structure of the code-editor. Few examples you may follow:

- Observe the sample code-editor image and also visit jsbin.com and implement similar styling to your code-editor. The reason for picking jsbin is because it’s styling is very beginner-friendly. But try to improve the styling of your site.
- Style each of the sub-structures like body, header, run, codeContainer, code label, iframe, etc.
.png)
References
Tip
- To check (and correct) your site’s styling you may use chrome dev tools.
- How to use chrome dev tools for CSS styling? Check this and this.
- Want to professionalise in chrome dev tools, check out both of Crio’s bytes on chrome dev tools. Links- 1, 2
Expected Outcome
After implementing the styling (using CSS) and importing the stylesheet in the main HTML file, the site should look something like this (but keep improving the styling) -

Implement the core-functionality of the code-editor
Let's code the cool features now. The basic features to be implemented are the following:
- HTML, CSS, JS buttons should open/close it’s corresponding container for users to easily input and handle respective code inputs.
- A ‘run’ button that will execute the code on toggle.
- A result window which will show the corresponding output after the code is run. Implement the logic for this part using the
iframeelement.
Requirements
- Since JQuery is being used, include its script (as a JavaScript tag) in the main HTML file. There are two ways of doing it. Explore them!
- Use .ready() method to wrap all the logic of the app’s functionalities. This is so that as soon as the DOM (Document Object Model) has been loaded, the functions and events can be triggered immediately.
- Now implement the logic of assigning a height to your code container (the pane of the code-editor where the code is input).
var windowHeight = /* Use .height() method for window-class selector */;
var headerBarHeight = /* Use .height() method for header-class selector */;
var codeContainerHeight = /* TODO */;

$(".codeContainer").height(/* Give the height's value along with units */);
- Then implement the logic for toggling (of buttons) the code containers to open/close.
$(".toggle").click(function() {
  $(this).toggleClass(/* Use an appropriate class name */);
  var activeDiv = /* use .HTML() method on 'this' constructor reference */;
  $(/* Logic to have a general class name */).toggle(500);
  var showingDivs = /* use .filter() and then .css() for this logic */

  console.log(showingDivs);

  var width = 100/showingDivs;
  /* Assign codeContainer it's width */
- Finally implement the ‘run’ feature which should be triggered when the user clicks the button.
- The webpage corresponding to the HTML, CSS, JS code snippets that were inputted must be rendered now. For this implement the required logic.
- For this use .contents() method (on the selector of
iframeelement). Using this you can insert HTML code. Basically you need to collect all the codes for the three code containers and form an HTML page containing the styling (CSS code input) and scripting (JS code input) and finally render the webpage of this new temporary HTML page made in a fourth container(the result container). This ‘new’ HTML page created is often referred to as Source Document orsrcDoc. - The code structure referred before looks like this-
$("#run").on( /* Event */, function() {
  $("iframe")./* TODO */
  /* Implement the 'run' logic command */
})
References
- Jquery selectors
- Button inside
iframeelement - Events in JavaScript
- How to inject HTML,CSS, JS code into iframe - 1 , 2 , 3
- Rendering HTML, CSS using
iframeelement
Wrapping up the app code
Check if the code editor works as expected. At this point, the styling of the app may not be as intended. If that is the case, refer to milestone 3 again and do the necessary changes. Check out the status of all the features you have implemented; at the same time the style should be dynamic to all features.
Requirements
- Make sure that the styling code (CSS) and scripting code (JQuery/JavaScript) are included in the main HTML file.
- Create appropriate classes and IDs to execute all milestones while doing both styling (particular components need to be targeted) and scripting (while using selectors it becomes critical to use names that can be inter-connected).
References
Expected Outcome
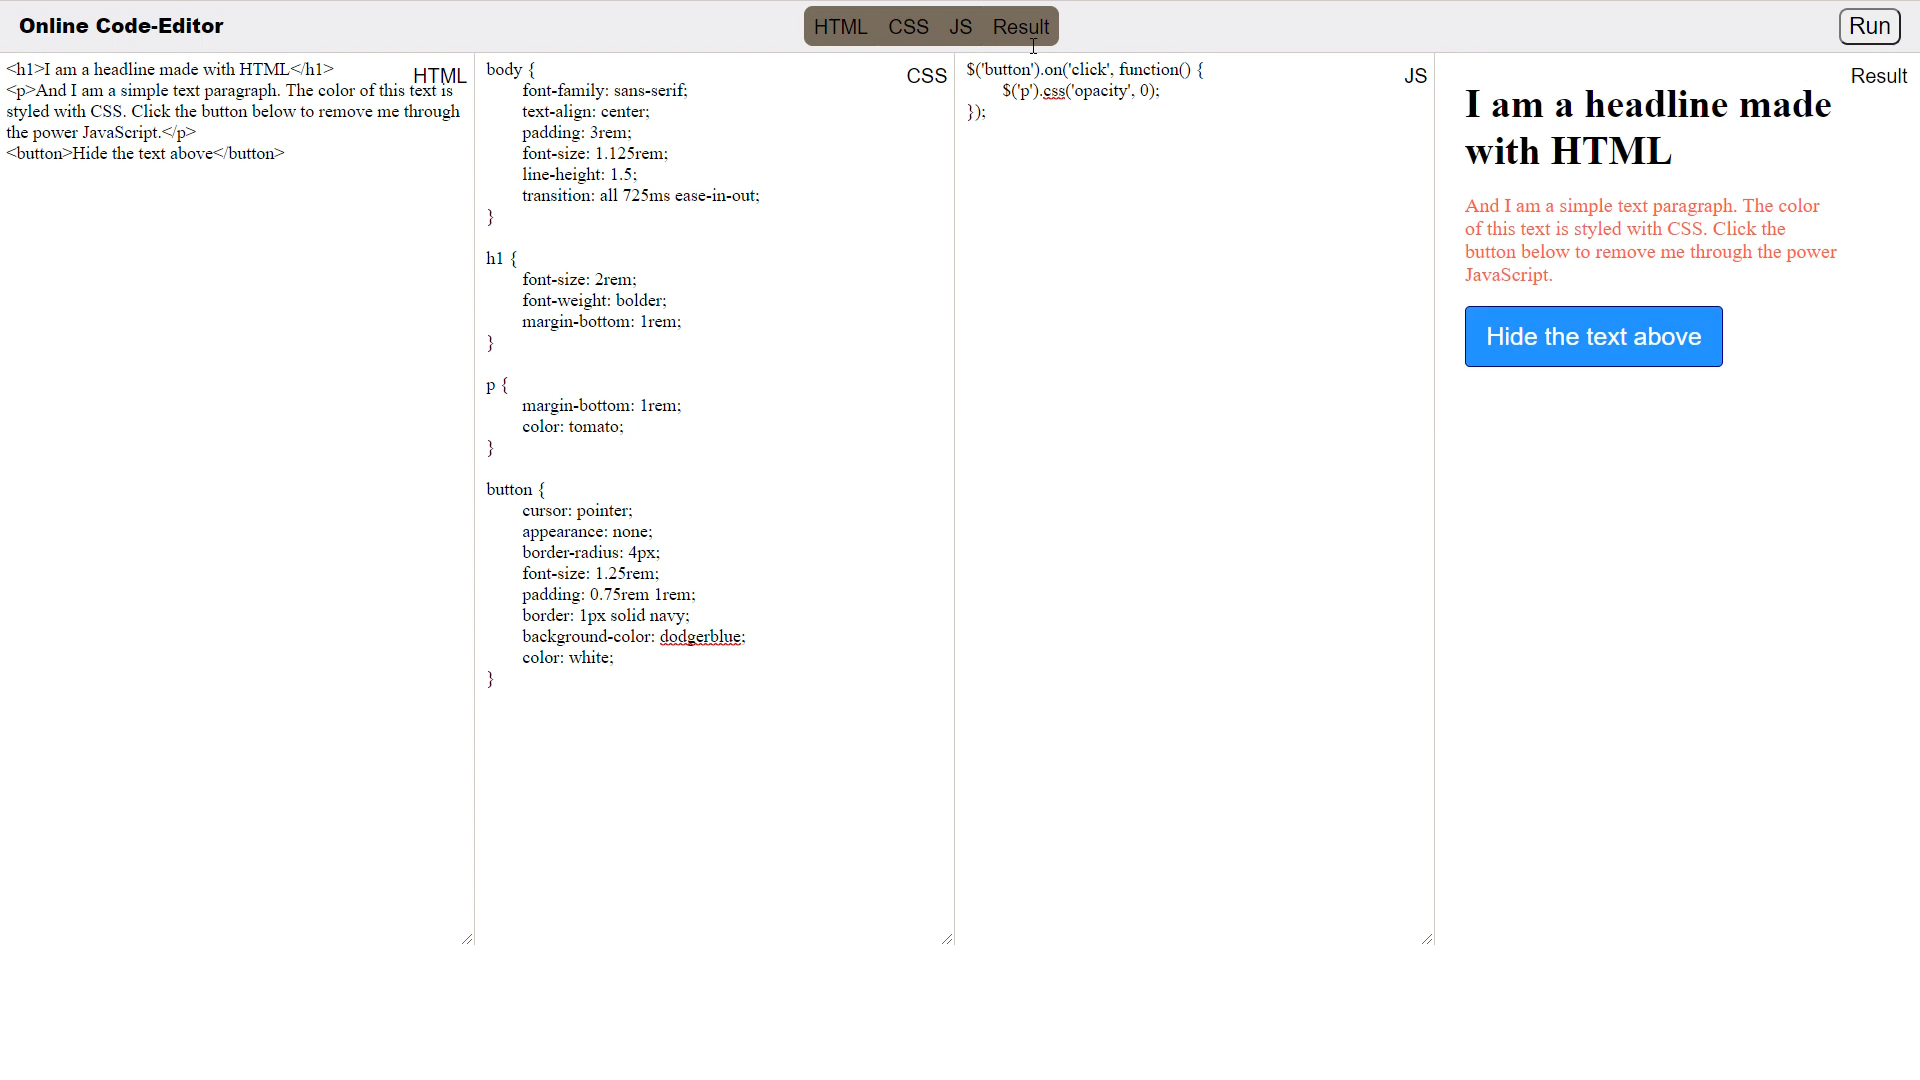
Your final code-editor should function as shown in the demo below. Do keep improving your code-editor once this stage has been reached.
Host your website live
Finish your work in complete style.
Since this is a simple Javascript application, go one step further by using GitHub pages to host your app live (simplest way).
Share this link among your peers and add this project (with the link and proper documentation) to your resume and voila, you have just boosted your resume.