Customer Relationship Manager web application is widely used by managers to store, retrieve and modify their customers' information. This project is the implementation of a backend web application where we can create, read, update and delete (CRUD) customer information. This exciting CRUD application will be built using Spring MVC, Hibernate (ORM framework) and MySQL (for managing RDBMS).
Objective
Project Context
Customer Relationship Manager web application is used by the managers to store, retrieve and modify their customer information.
Spring is one of the best frameworks for backend development while working on Java since it uses the MVC design pattern. For the front end side, HTML and CSS has been used here. The purpose of Spring framework is to allow designers and developers to focus on building an unique feature for their web based projects rather than re-inventing the wheel by using the very basics of Java. You will be learning the Spring framework over the course of building this Customer Relationship web application.
After completion of the project, you will learn how to use CRUD operations, MVC design pattern and Object-relational mapping framework (by connecting the backend web app to a database) majorly. You will also be familiarised with HTML, CSS languages by then.
Some of the advantages of web applications include:
- Accessible from any Internet-enabled computer.
- Usable with different operating systems and browser applications.
- Easier to roll out program updates since only software on the server needs to be updated.
- Centralized storage on the server means fewer security concerns about local storage.
You can also use Spring Boot as it needs minimum configurations without the need for an entire Spring configuration setup. There are other frameworks as well like Node JS, Angular JS etc. Finally, which technology to choose totally depends on what applications we want to build and also on developer requirements. If you're going to develop an app that depends on I/O, then go to Node.js. But if you want to build a super-fast application (eCommerce platforms, IoT, etc.) with a crazy amount of computing, then go to Spring boot framework.
The main context of this project is to learn building a web based CRUD application using Spring MVC.
Get started with the following links to refresh your memory (and maybe learn something new too ;) ) -
Starter Resources
Product Architecture
The product Architecture can be divided into 4 stages as follows:
- Design the front-end of the web app using HTML and CSS.
- Implement controllers to handle requests and responses for all the CRUD operations.
- Implement the hibernate queries to fetch results
- Integrate the web app with the database to fetch data from the backend
The flowchart is as follows:

High-Level Approach
-
Create a Maven project using spring MVC.
-
Design the database table for customers. It should have a unique id, first name, last name and an email id.
-
Once the database table design is ready, write the controller, service and dao layers to execute the CRUD operations.
-
Build the front end of the web app using HTML, CSS to accept input and render data correspondingly.
-
Integrate the controller with the database to successfully build the Customer Relationship Manager web application.
Customer Relationship Manager app's demo video:
Primary goals
-
Every user should have the following privilege operations-
- Create a customer
- Read the customer details
- Update customer details
- Delete a customer
-
While deleting a customer, all the associated information should be deleted from the database.
Objective
Customer Relationship Manager web application is widely used by managers to store, retrieve and modify their customers' information. This project is the implementation of a backend web application where we can create, read, update and delete (CRUD) customer information. This exciting CRUD application will be built using Spring MVC, Hibernate (ORM framework) and MySQL (for managing RDBMS).
Project Context
Customer Relationship Manager web application is used by the managers to store, retrieve and modify their customer information.
Spring is one of the best frameworks for backend development while working on Java since it uses the MVC design pattern. For the front end side, HTML and CSS has been used here. The purpose of Spring framework is to allow designers and developers to focus on building an unique feature for their web based projects rather than re-inventing the wheel by using the very basics of Java. You will be learning the Spring framework over the course of building this Customer Relationship web application.
After completion of the project, you will learn how to use CRUD operations, MVC design pattern and Object-relational mapping framework (by connecting the backend web app to a database) majorly. You will also be familiarised with HTML, CSS languages by then.
Some of the advantages of web applications include:
- Accessible from any Internet-enabled computer.
- Usable with different operating systems and browser applications.
- Easier to roll out program updates since only software on the server needs to be updated.
- Centralized storage on the server means fewer security concerns about local storage.
You can also use Spring Boot as it needs minimum configurations without the need for an entire Spring configuration setup. There are other frameworks as well like Node JS, Angular JS etc. Finally, which technology to choose totally depends on what applications we want to build and also on developer requirements. If you're going to develop an app that depends on I/O, then go to Node.js. But if you want to build a super-fast application (eCommerce platforms, IoT, etc.) with a crazy amount of computing, then go to Spring boot framework.
The main context of this project is to learn building a web based CRUD application using Spring MVC.
Get started with the following links to refresh your memory (and maybe learn something new too ;) ) -
Starter Resources
Product Architecture
The product Architecture can be divided into 4 stages as follows:
- Design the front-end of the web app using HTML and CSS.
- Implement controllers to handle requests and responses for all the CRUD operations.
- Implement the hibernate queries to fetch results
- Integrate the web app with the database to fetch data from the backend
The flowchart is as follows:
High-Level Approach
-
Create a Maven project using spring MVC.
-
Design the database table for customers. It should have a unique id, first name, last name and an email id.
-
Once the database table design is ready, write the controller, service and dao layers to execute the CRUD operations.
-
Build the front end of the web app using HTML, CSS to accept input and render data correspondingly.
-
Integrate the controller with the database to successfully build the Customer Relationship Manager web application.
Customer Relationship Manager app's demo video:
Primary goals
-
Every user should have the following privilege operations-
- Create a customer
- Read the customer details
- Update customer details
- Delete a customer
-
While deleting a customer, all the associated information should be deleted from the database.
Setting up the development environment
First off you need to set up the development environment for the web application project. For a java web development project, you need to install Java and Maven. Additionally you need a code-editor or IDE to write the code, configure a database to store the data and finally configure a local server to host the application.
Requirements
- Install MySQL workbench or SQL Developer in your local system as we will be using MySQL/Oracle as our database
- Install Java (JDK 1.8)
- Install Maven 3 or higher
- Install IntelliJ (Community edition) or Eclipse
- Install Tomcat 6 or higher to run the web application locally
- Do the environment setup for Java and Maven on your local machine
- Feel free to change the server running PORT if needed
Check the versions of java and maven to know whether you have successfully installed it or not-
java -version
mvn -v
Congratulations!!! Your initial set up is done!
Expected Outcome
You should be able to set up the initial development environment.
Creating a new Spring MVC project and a new table in database
After the initial set up is done, you need to add a new Maven project in the IDE installed and also need to add a new table in the database to store and retrieve data.
Requirements
- Create a maven project using Spring MVC archetype. You can refer to the below reference to set-up your first maven project using spring archetype to pom xml step wise.
- Create separate packages for controller classes, service classes, entity classes and dao classes.
- Auto download any spring dependencies if needed (Check the colour codes in the xml files- if the colour is red, you need to import the dependency).
- Create a schema in the database and add a new table. The table should consist the below column names -
- Id (number)
- First name (only string)
- Last name (only string)
- Email (valid email with @ sign)
Congratulations!!! You have completed creating your first Spring MVC project!
References
Bring It On!
Id is auto-incremental. You can also go for a randomly generated id. Research a bit to know how you can generate random uids (unique-identifiers).
Expected Outcome
If everything is successful, you will have the table created in the MySQL/Oracle database and a maven project being set up.
Creating the JSP pages using HTML and CSS
JSP or Java Server Pages is a server side technology. It is used for creating web applications. It is used to create dynamic web content. In this, JSP tags are used to insert JAVA code into HTML pages. Check out more on Java Server Pages- JSP documentation
Requirements
-
Create two JSP pages-
- Home page
- Customer form
-
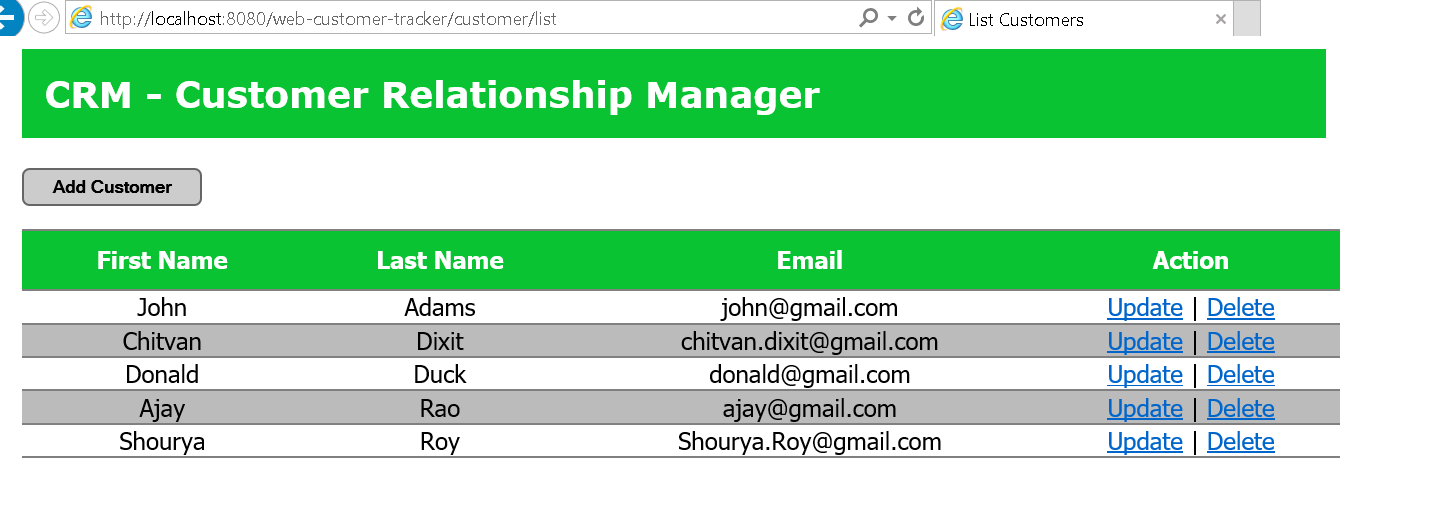
Attributes present in Home page-
- Project name as header (CRM - Customer Relationship Manager)
- Add Customer button (To add the customer information)
- View of already added customers (if any) in a table format
- Update and Delete link/button on the right side of each customer information
-
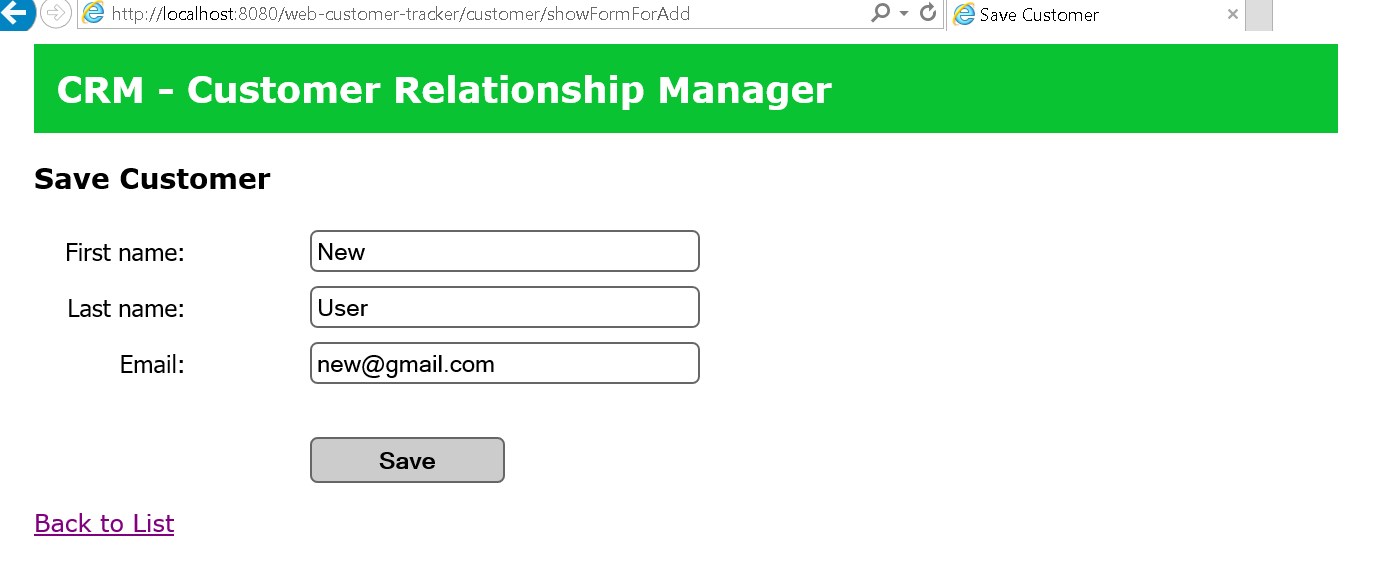
Attributes present in Customer Form page-
- Project name as header (CRM - Customer Relationship Manager)
- Input fields for First name, Last name and email address
- Save button to save all information
- Back button to go back to the home page
-
Design templates for the two pages-
- Home page
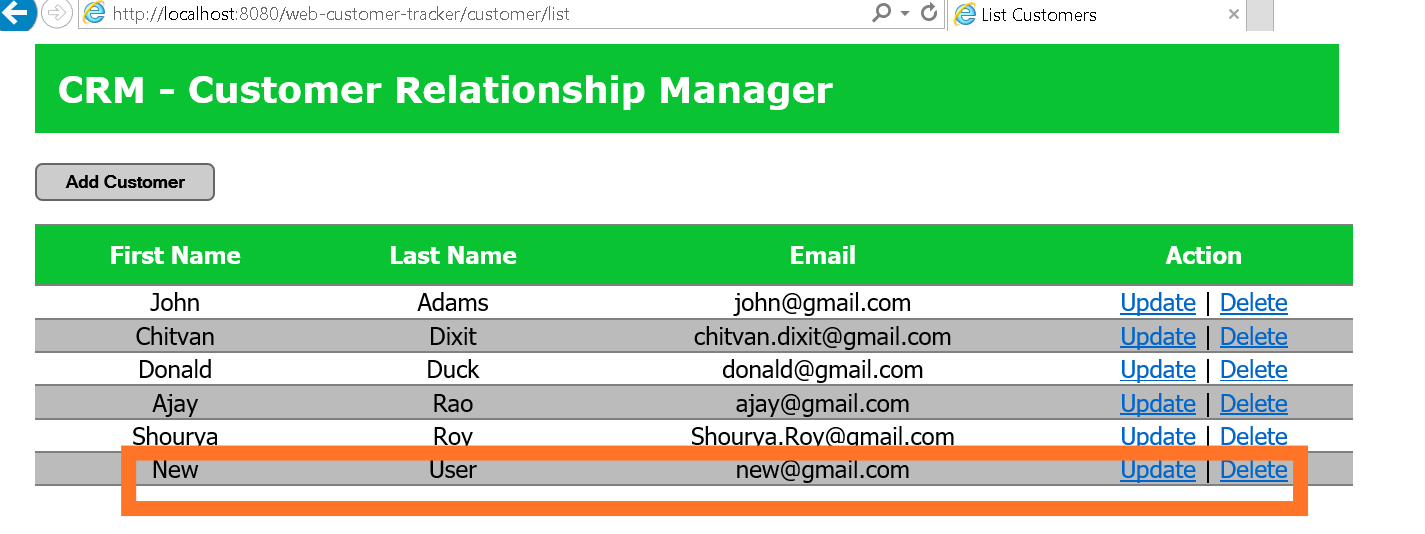
- Add Customer
- After Adding
Congratulations!!! You have completed creating the front-end of this web application!
References
Bring It On!
You can design your own JSP page. However, the functionalities should be the same.
Expected Outcome
Run the jsp file in the browser to check the output
Creating entity class
A JPA entity class is a POJO (Plain Old Java Object) class, i.e. an ordinary Java class that is marked (annotated) as having the ability to represent objects in the database. The only unique JPA addition is the @Entity annotation, which marks the class as an entity class. Check out the use of Persistent Fields in entity classes.
Requirements
- Create the entity java class under the entity package.
- Import the java persistence API library packages (if not auto downloaded). Check below to find more about JPA imports-
- Write the code in the entity java class to create a POJO class.
Congratulations!!! You have completed creating the entity class using JPA!
References
Expected Outcome
The objects created in the entity class should be aligned with the columns in the database.
Create Object-Relational Mapping (ORM) connectivity
Java is one of the most powerful and popular server-side languages in the current scenario. One of the main features of a server-side language is the ability to communicate with the databases. There are two ways of connecting to the database - JDBC and Hibernate (using ORM framework).
Object Relational Mapping (ORM) is a programming ability to convert data from object type to relational type and vice versa. The main feature of ORM is mapping or binding an object to its data in the database. While mapping we have to consider the data, type of data and its relations with its self-entity or entity in any other table.
Requirements
- Create a package and a class inside it for the ORM connection.
- Import the javax servlet library packages (if not auto downloaded). Check below to find more about javax servlet imports-
- Write the code in the ORM java class. Check how to create a ORM class-
- Provide the JDBC url and driver path.
- Similarly provide the connection details, i.e.- username and password.
Congratulations!!! You have completed the ORM connection!
References
Tip
You can use an online database builder as well. For that you don't need to install any MySQL Workbench or Oracle SQL Developer for that instance. Check it out-
Bring It On!
You can also use a file to write and read data instead of using any database. For this you don't need any ORM connectivity. Find it out!
Expected Outcome
On success, your web project will be connected to the database you are working with
Create controller to handle requests and responses
In Spring MVC, a controller class is written to handle requests coming from the client. Then, the controller invokes a business class to process business-related tasks, and then redirects the client to a logical view name, which is resolved by Spring's dispatcher servlet in order to render results or output. Spring Controller annotation is typically used in combination with annotated handler methods based on the RequestMapping annotation.
Requirements
- Create a controller class under the controller package.
- Create five methods:
- For listing the customer details
- For adding new customers
- For saving the customer details
- For updating customer information
- For deleting customer information
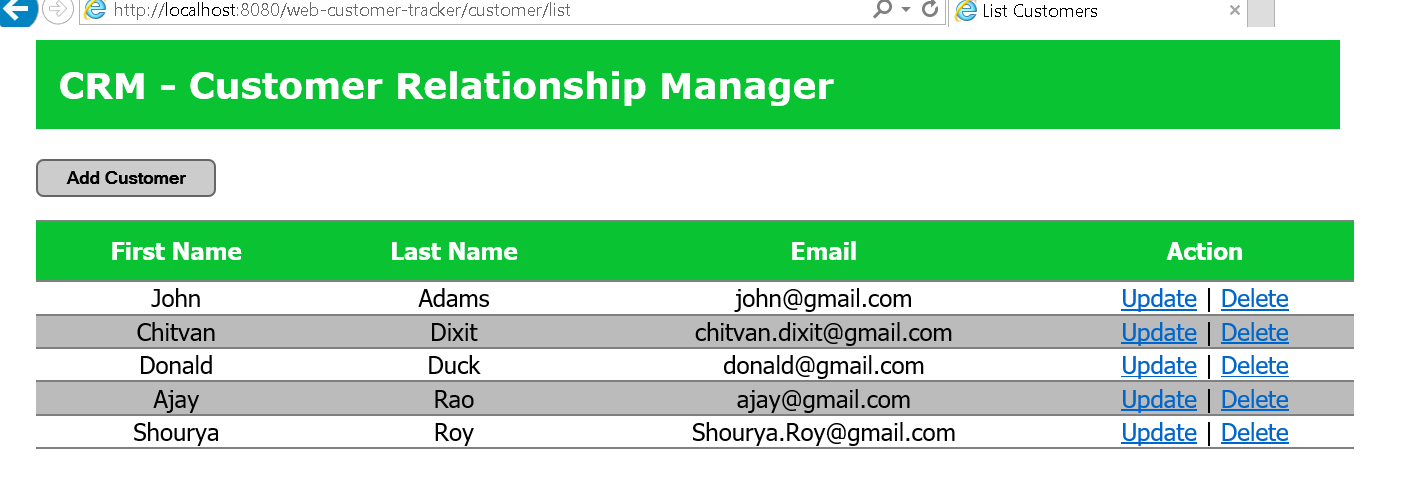
- Listing customers will get the customer details when the home page loads.
- Adding customers will input the customer details from front-end to the model. (Check out more on MVC framework)
- The save option will save the customer details and return back to the home page.
- Update option will pre-populate the customer form with information regarding that particular customer so that the user can update.
- Delete option will permanently delete the record from the database. Use a dialog box pop up when a user wants to delete a candidate.
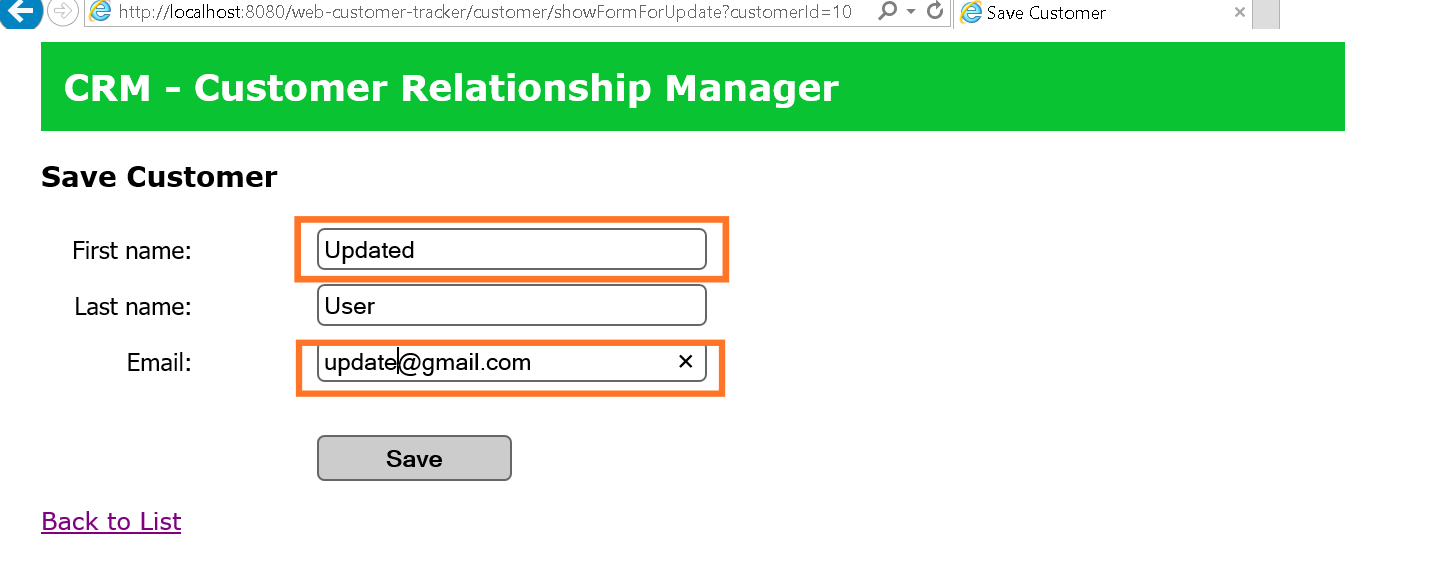
Design functionality for updation and deletion-
-
Before Update

-
Update Page
-
After Updation

-
Delete details
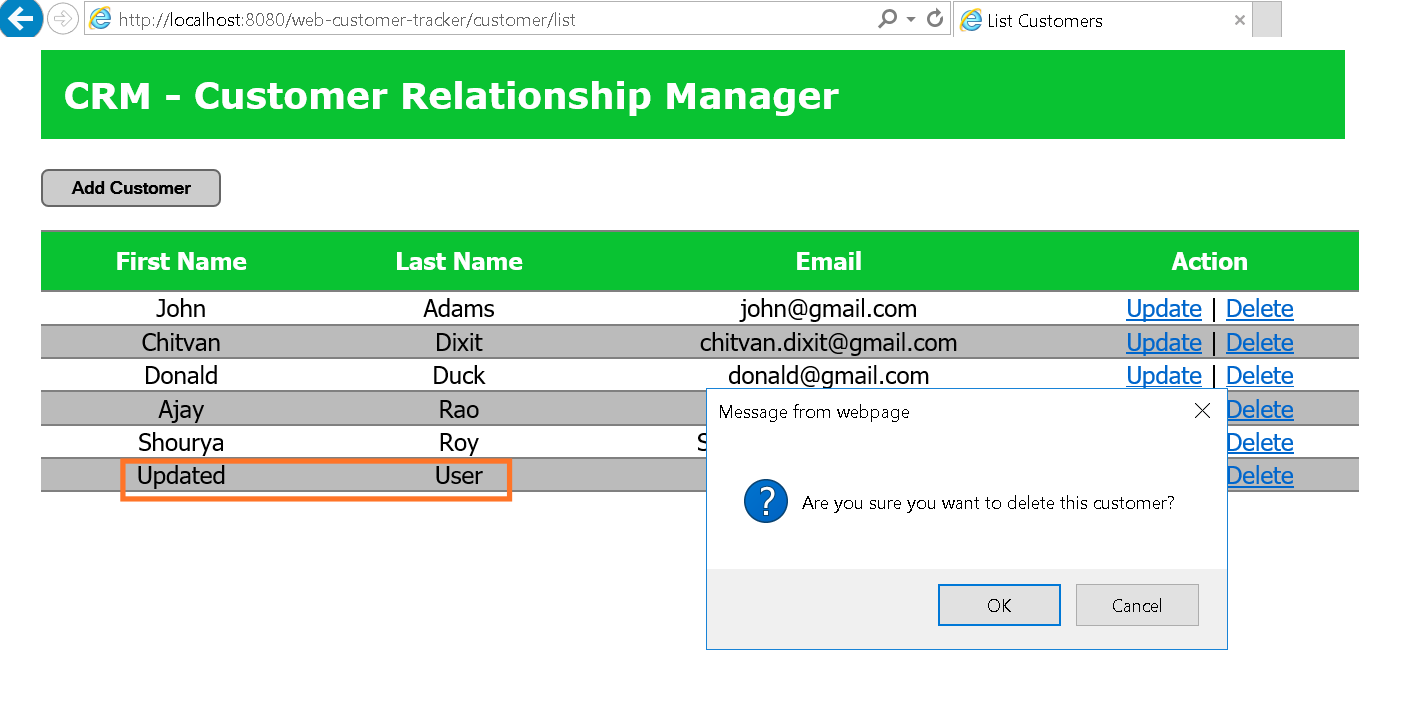
-
After deletion
Congratulations!!! You have successfully completed the controller!
References
Expected Outcome
On success, your web project will be able to handle the CRUD operation requests.
Creating service classes
The service layer is there to provide logic to operate on the data sent to and from the DAO and the client. Very often these two pieces are bundled together into the same module. Service layer provides code modularity and can also be used to serve loose coupling in the application.
Requirements
- Create a service interface and a service implementation class under the service package.
- Write the four method definition on the interface class-
- Get the total customer list
- Save customer information
- Get the customer list from a given customer id (for update functionality)
- Delete customer information
- Write down the service implementation class by defining the four methods implemented from the interface.
Congratulations!!! You have successfully completed the service class!
References
Tip
Spring creates proxies for all the classes annotated with @Transactional – either on the class or on any of the methods. Check it out!
Expected Outcome
On success, your web project will be able to create an interface that defines the functionality provided by the service.
Creating data access object classes
DAO stands for Data Access Object. It’s a design pattern in which a data access object (DAO) is an object that provides an abstract interface to some type of database or other persistence mechanisms. By mapping application calls to the persistence layer, DAOs provide some specific data operations without exposing details of the database. While developing a web application, one of the most important aspects is to deal with the database like connection management and transaction management.
Requirements
- Create a dao interface and a dao implementation class under the dao package.
- Write the four method definition on the interface class as given in the service class.
- Write down the dao implementation class by defining the four methods implemented from the interface. Use hibernate to create the queries. Check out the use of hibernate-
Congratulations!!! You have successfully completed the dao class!
References
Bring It On!
Files can also be used to store and retrieve data. You don't need hibernate queries to fetch them. Check out the use of file writers!
Expected Outcome
On success, your web project is finally complete! Complete the next task to run your web application!
Run the web application on localhost
After several hours of design, coding and testing, your application is ready to be published. As it is a web application, it requires an HTTP server to host it. Apache Tomcat server will manage to do it. It’s an open-source program that processes HTTP requests to access the files stored within a server. These files can be static (it means that whenever a client asks for it they will be shared as they are) or dynamic (before sending files to the client they are generated by the software hosted on a server). In short, Tomcat handles communication via HTTP protocol and delegates requests to the Spring MVC application.
Requirements
-
Build the project. There are two ways to build a project-
- From the IDE terminal
- From the CMD
Open the command (CMD) terminal. Go to the path where the project is residing. Run the below command-
mvn clean install -
Create a WAR file. If built from IDE. You need to manually build a war file.
-
Run the tomcat server from IDE or independently
- From IDE. Define and run application server
Else keep the WAR file on the tomcat webapps folder and click on start.bat file present in the bin folder.
-
Write down the web URL and start your web application.
https://localhost:<port number>/<home page name>.html/
Congratulations!!! Your application is running successfully!
References
Bring It On!
You can also use Visual Studio Code instead of IntelliJ IDEA or Eclipse. Check out the different IDEs.
Expected Outcome
Customer Relationship Manager web application is finally running on your local machine!