You will be building your own URL Shortening service from scratch and host it live on a server.
Objective
Project Context
On a daily basis often we have to use gigantic (and not so good-looking) URLs. Keeping the URLs short often saves space and makes it look legit. Be it in your Resume, CV or in a document, often we need to hyperlink several URLs, keeping them short and concise not only makes it look good, but also pleases the person examining them. So isn't it an amazing idea, to embed the URLs made using your own URL shortener? Yes, that's exactly what we are trying to do.
From now use your own creation to shorten those gigantic Google App links and share it with your friends.
Project Stages
The project consists of the following stages:
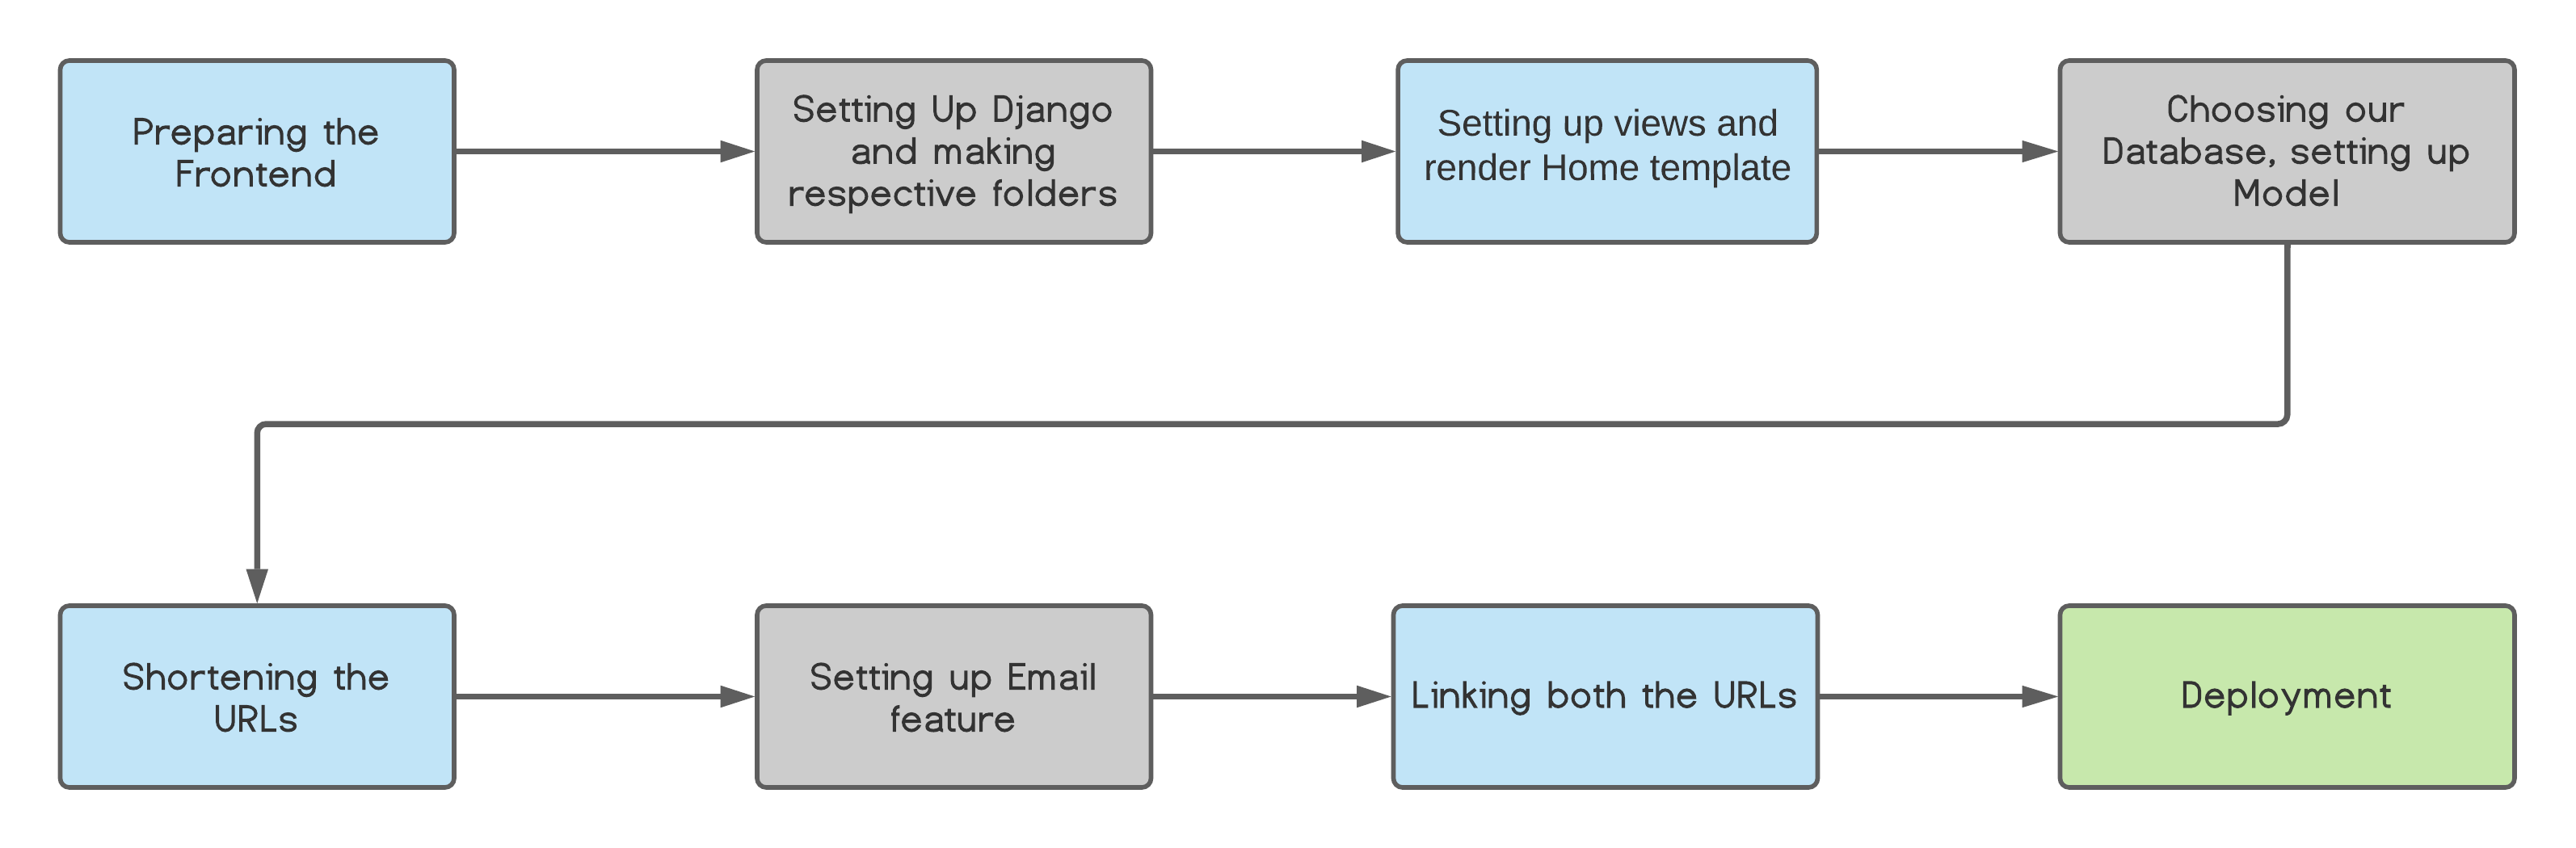
High-Level Approach
- Preparing the Frontend
- Creating the Django Backend and setting up folders for Templates and Static files
- Setting up views and urls to render the templates
- Choosing our Database, setting up the models/schemas
- Implementing URL Shortening
- Implementing the mailing feature
- Linking the new and the original URL
- Hosting and Deployment
Objective
You will be building your own URL Shortening service from scratch and host it live on a server.
Project Context
On a daily basis often we have to use gigantic (and not so good-looking) URLs. Keeping the URLs short often saves space and makes it look legit. Be it in your Resume, CV or in a document, often we need to hyperlink several URLs, keeping them short and concise not only makes it look good, but also pleases the person examining them. So isn't it an amazing idea, to embed the URLs made using your own URL shortener? Yes, that's exactly what we are trying to do.
From now use your own creation to shorten those gigantic Google App links and share it with your friends.
Project Stages
The project consists of the following stages:
High-Level Approach
- Preparing the Frontend
- Creating the Django Backend and setting up folders for Templates and Static files
- Setting up views and urls to render the templates
- Choosing our Database, setting up the models/schemas
- Implementing URL Shortening
- Implementing the mailing feature
- Linking the new and the original URL
- Hosting and Deployment
Environment setup
We'll be using HTML, CSS and JavaScript for the frontend. Nothing to install in specific. Open your text-editor and start coding a beautiful front-end.
Initially there can be two main pages:
- The Home Page to enter the long URL
- The Second page to display the shortened URL and the mailing option
In the next few parts, you'll be guided throughout the entire project from scratch in detail.
Hope you mesmerize your peers with your designs.
References
Requirements
-
Ensure you have Python (3.5 and above) installed in your system. Follow this Link to get the latest version of Python.
-
After installing Python, open terminal and type
python3 --versionIf you get a proper response showing the version you installed, you are good to go
-
Setting up the virtual environment
pip install virtualenv virtualenv <name of environment> source <name of environment>/bin/activate pip install django -
Now its time to start setting up Django
django-admin startproject <Name of Project> cd <Name of Project> django-admin startapp <Name of the subproject/app> -
Now its time to start the server(default)
python manage.py runserverGo to 127.0.0.1:8000 and you can see your server running.
If you face any error you can refer here
-
Now its time to restructure your files
-
In your root directory [with project (URLProject), app (URLapp) folders and
manage.py], create two new folders with the name Templates and Static -
Under the Templates folder, place your HTML files
-
Under the Static folder, create another folder CSS and place all the static files there. This applies the same for images and JavaScript files.
-
Ensure to update the new assets/CSS/JS files
-
Change the Templates DIR in
URLProject/settings.pyto the relative path of Templates
-
Expected Outcome

Getting started with cookies and session
Requirements
-
Ensure you have your server running as mentioned in Task 2.
-
Add your Django app (URLapp) name to
URLProject/settings.pyin theINSTALLED_APPS -
Import path and include from
django.urlsinURLProject/urls.pyandURLapp/urls.py -
Set the path with a blank (
/) route accordingly to render the home templateIn
URLProject/urls.py:from django.contrib import admin from django.urls import path, include from django.conf import settings from django.conf.urls.static import static import app urlpatterns = [ path('admin/', admin.site.urls), #Django-Admin page path('', include('app.urls')) #URLapp routes ] + static(settings.STATIC_URL, document_root=settings.STATIC_ROOT)In
URLapps/urls.py:from django.urls import path from app import views from django.conf import settings from django.conf.urls.static import static urlpatterns = [ path('',views.index, name="index") ] + static(settings.STATIC_URL, document_root=settings.STATIC_ROOT) -
Head over to
URLapp/views.pyand set the cookies using uuid -
Render the HTML templates using render function.
In
URLapps/views.py:from django.shortcuts import render, redirect from django.core.mail import send_mail from django.http import HttpResponse import urllib3 from django.views.decorators.csrf import csrf_exempt from .models import URL import uuid import pymongo from pymongo import MongoClient import os, json def index(request): request.COOKIES['key'] = str(uuid.uuid1()) response = render(request, 'index.html') response.set_cookie('key', str(uuid.uuid1())) return response -
Now its time to run the server on your localhost
python manage.py runserverGo to 127.0.0.1:8000 and you can see your server running rendering your HTML Template.
References
Expected Outcome
You should be able to see your home HTML template being rendered onto your localhost server.
How to choose between MySQL or NoSQL
-
Here we are chosing MongoDB (NoSQL) owing to the fact that we might need to store unstructured data, upon entering multiple URLs.
Requirements
-
Open your Terminal
pip install pymongo -
Head over to
URLapp/views.pyto link your database -
Connect your application to MongoDB using the connection string:
mongodb://[username:password@]host1[:port1][,host2[:port2],...[,hostN[:portN]]][/[database][?options]] -
Use environment variables to hide your Keys and Passwords
Inside a
.envfile in the root directory-mongo = "mongodb+srv://username:password@cluster....mongodb.net/DB_name?retryWrites=true&w=majority" database = "Database Name" collection = "Collection Name" SECRET_KEY = 'unique to every django app, present in settings.py' EMAIL_HOST_USER = 'email ID' EMAIL_HOST_PASSWORD = 'password' tokendb = 'tokens' max = any number -
Ensure that you add
.envin your.gitignorefile to ensure this isn't pushed to github repo -
Set up Models in
URLapp/models.pycreating the required schema along with their datatypes.from django.db import models # Create your models here. class URL(models.Model): link = models.CharField(max_length = 1000) new = models.CharField(max_length = 6) uid = models.UUIDField(primary_key = True, default=uuid.uuid4(), editable = True, max_length=36) -
To get the NoSQL commands ready which are necessary to use the models as our custom data structures
python manage.py makemigrations -
To migrate the custom model for use while inserting or updating data in the Database
python manage.py migrate -
In
views.py, to establish a connection to the databaseclient = MongoClient(os.environ.get('mongo')) db = client[os.environ.get('database')] coll = db[os.environ.get('collection')] tokendb = db[os.environ.get('tokendb')]
Expected Outcome
Connection to the Database must be established. Head over to the next task to learn more about these.
Idea behind this:
- First we create a Database
- A database consists of collections which in turn store our data
- Our collection has a unique id (unique for all users), the original url and the new url.
Requirements
-
pip install urllib3 uuid -
Ensure the request is strictly
POSTand notGET -
Create a short 5 letter code slicing a UUID string
-
Validate it using urllib3 and return the user the newly generated uuid concatenated with the link in the template (Jinja2 Python format)
-
Also we have the store the values in the cookies (browser local storage)
-
Insert the values into the database using
insert_one(<schema>)command -
Redirect user to the net page based on whether the response is valid of not
-
In
views.py, the shorten method:def short(request): if request.method == 'POST': user = request.COOKIES.get('key') url = request.POST['link'] if url.find('<name of your domain>') != -1: return render(request, 'index.html', {'status': 'Funny'}) #dynamic data onto your HTML template http = urllib3.PoolManager() valid = False if url.startswith("http"): url = url else: url = "http://"+url try: ret = http.request('GET',url) if ret.status == 200: valid = True except Exception as e: valid = False if valid == True: new_url = str(uuid.uuid4())[:5] surl = "<name of your domain>"+new_url sch = {'uid' : user, 'link' : url, 'new' : surl} coll.insert_one(sch) return render(request, 'short.html', {'user':user, 'url': url, 'new':surl}) #dynamic data onto your HTML template else: return render(request, 'index.html', {'status': False}) return redirect('/') -
in
URLapp/urls.pyurlpatterns = [ path('',views.index, name="index"), path('s/short',views.short, name="short") ] + static(settings.STATIC_URL, document_root=settings.STATIC_ROOT) # loads the static files without trouble
References
Expected Outcome
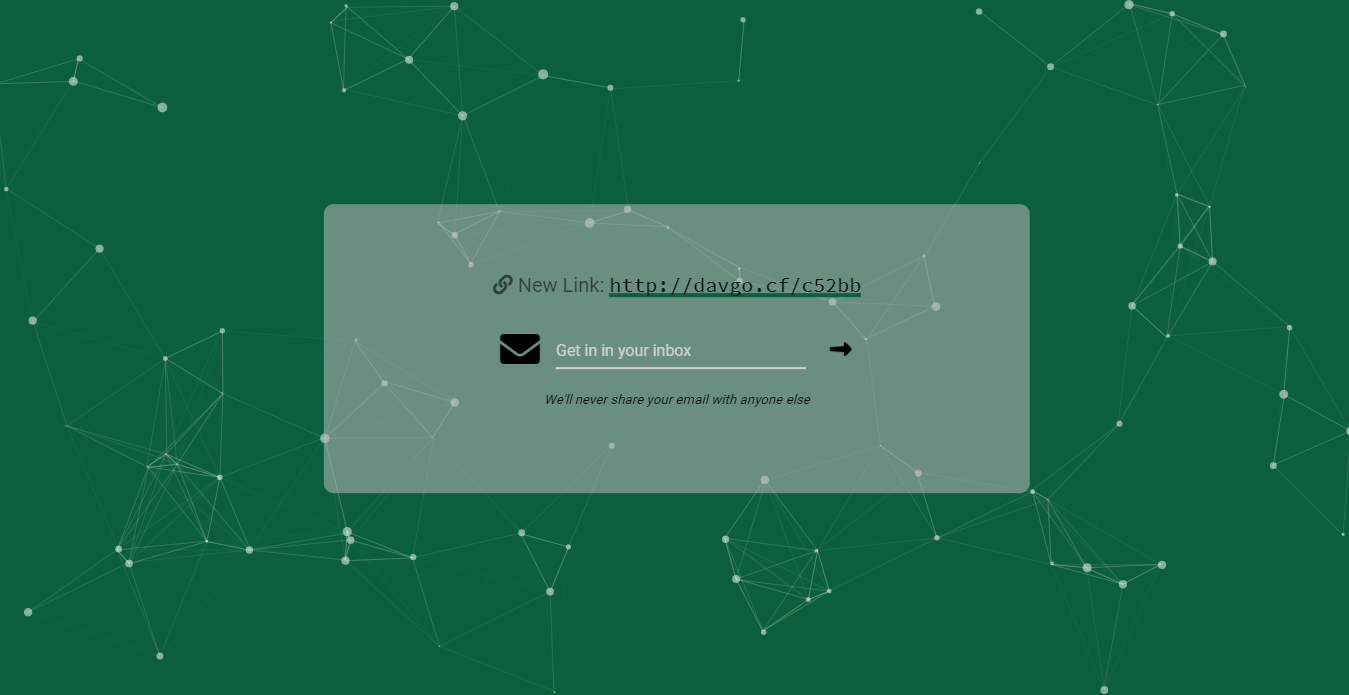
Your database should now have your inserted links along with the newly generated links identifiable by an unique ID. Upon clicking the submit button, you should be redirected to a new template displaying the new link (shown below in my case) and the mailing feature that we are going to implement next.
Idea behind this:
So it's highly likely that we might lose the shortened link right after creating it. So why not mail it to yourself to keep it stored for future use.
Requirements
-
We just need to import
send_mailfromdjango.core.mailinURLapp/views.py -
Using the cookies stored in our browser's local storage, we retrieve the Unique ID for our shortened link.
-
Using the Unique ID, we search the database and show the retrieved link with the mailing option in our template
-
Here the
request.COOKIES.get('key')helps us to extract the Unique ID andcoll.find_one(...)gets the schema from MongoDB. -
In
URLProject/settings.pyadd the EMAIL Details as shown hereEMAIL_BACKEND = 'django.core.mail.backends.smtp.EmailBackend' EMAIL_HOST = 'smtp.gmail.com' EMAIL_USE_TLS = True EMAIL_PORT = 587 EMAIL_HOST_USER = os.environ.get('EMAIL_HOST_USER') EMAIL_HOST_PASSWORD = os.environ.get('EMAIL_HOST_PASSWORD') django_heroku.settings(locals()) -
In your environment variables, add your email ID and password from where emails will be outgoing. Ensure the email you provide has smtp enabled
-
Generate a custom message as the email template and send the email using
send_email(...) -
Update the
URLapp/urls.pywith a route of your choice that calls this function inviews.pydef mailing(request): if request.method == 'POST': mail = request.POST['mail'] #requesting data entered by user user = request.COOKIES.get('key') details = coll.find_one({"uid": user}) details = parse_json(details) mssg = f"Hey,\nThanks for using <name of your domain>.\nThe new url for {details['link']} is:\n{details['new']}.\nRegards,\n<your name>\n<your contact details>" surl = details['new'] try: send_mail("Shorten URLs", mssg, settings.EMAIL_HOST_USER, [mail]) return render(request, 'short.html', {'user':user, 'new':surl, 'success': True}) #dynamic data onto your HTML template except Exception as e: return render(request, 'short.html', {'user':user, 'new':surl, 'success': False}) #dynamic data onto your HTML template return redirect('/')
References
Expected Outcome
An email with your custom message should be delivered to the email you enter as test with the Original and the Shortened URL. If it fails, try checking URLProject/settings.py or if SMTP is enabled.
Idea behind this:
- Database schema consists of Unique ID (id), Original URL (link) and new URL (new)
- The new URL is uniquely created every time, so there isn't any chance of duplicates
- Whenever the new URL is called, we filter and search the database schema and redirect the user to the original URL of the schema
- Validate the
HTTPorHTTPSprotocols for the original URLs
Requirements
-
Try searching the collection in the database using
find_onemethod -
If details are found we try validating the original URL and redirect the users back to there
-
If details aren't found i.e an invalid link, a
404Response is returned -
Update the
URLapp/urls.pywith a route of your choice that calls this function inviews.py -
My
URLapp/urls.pylooks like this:urlpatterns = [ path('',views.index, name="index"), path('s/short',views.short, name="short"), path('m/mail', views.mailing, name="mailing"), path('api/shorten', views.geturl, name="geturl"), path('<str:uid>', views.openurl, name="open"), ] -
The
openurlfunction might resemble this:def openurl(request, uid): if uid != "": details = coll.find_one({"new": "<name of your domain>"+uid}) details = parse_json(details) if details: full_url = details['link'] if full_url.startswith("http"): return redirect(full_url) else: return redirect("http://"+full_url) else: return HttpResponse(404)
References
Expected Outcome
- Upon visiting the shortened URL, you should be redirected back to the original URL, which you had entered.
Idea behind this:
- Now finally, we have come to the stage to check if everything works fine on our localhost. If so, we can try deploying it onto a live server for everyone to use.
- We'll be using Heroku for deployment.
Requirements
-
Visit heroku.com and create an
account/login to your existing account. -
Create a new app, name it accordingly (but keep it short and concise). Select the region which suits you the best.
-
Go to settings in heroku. Under config vars, add all the environment variables you used in
.envone by one. -
In your root directory, add a
Procfile(without an extension) and addweb: gunicorn < name of app i.e URLapp > .wsgi -
Install
gunicornanddnspythonusingpip install gunicorn dnspython -
Since we are using virtual environment we can get a list of all installed modules.
pip freeze > requirements.txt -
Create a
runtime.txtfile and insert the python runtime i.epython-3.8.5 -
Sign in to your Heroku account via terminal and follow the commands here or as given under the deploy section of your Heroku app
heroku login -i

git init

heroku git:remote -a <name of project>

git add .
git commit -am "make it better"
git push heroku master
- This should deploy your code properly onto Heroku. Upon visiting the Heroku URL, you should see your web-app running
- You should be able to open your app from heroku dashboard itself, via "Open App" in the upper right section.
Expected Outcome
Your Final web app should be up and running live on server working properly without showing any error(s).
Congrats on making it till the end of this project, hope you have enjoyed making this and now its time to showcase it in your resume.