You will be creating a single-page web application using Streamlit (a python framework) and matplotlib to display weather data visualizations.
Objective
Project Context
We look at weather data and the future predicted weather to plan our days accordingly. Having visualizations helps us understand that data better.
Developing this project using the Streamlit library we can create a responsive front-end which gives us more time to work on the actual back-end and the services we aim to provide.
This project is a good start for beginners in python and it gives basic understanding of how to use APIs and related python frameworks.
Project Stages

High-Level Approach
- Setting up the Project environment
- Making the Streamlit front end
- Fetching the data from API calls
- Making the Data visualizations
- Adding other weather updates
- Deployment on Heroku
Checkout the application live here.
You can see the demo below.
Objective
You will be creating a single-page web application using Streamlit (a python framework) and matplotlib to display weather data visualizations.
Project Context
We look at weather data and the future predicted weather to plan our days accordingly. Having visualizations helps us understand that data better.
Developing this project using the Streamlit library we can create a responsive front-end which gives us more time to work on the actual back-end and the services we aim to provide.
This project is a good start for beginners in python and it gives basic understanding of how to use APIs and related python frameworks.
Project Stages
High-Level Approach
- Setting up the Project environment
- Making the Streamlit front end
- Fetching the data from API calls
- Making the Data visualizations
- Adding other weather updates
- Deployment on Heroku
Checkout the application live here.
You can see the demo below.
Getting started with required files and dependencies
We are going to setup up the project's environment by setting up the application's starter files/folders. Also the dependencies to be installed will be covered here.
By setting up the project environment we can get a low level idea about how the project will look like and how the project stages would be broken down.
Requirements
In your working directory, you can create the following file structure (Kindly ignore LICENSE and README.md since these files might be required if you host the project files on GitHub).

app.pywill be our main file.requirements.txtis created so that other developers can install the correct versions of the required Python packages to run your Python code.- The
runtime.txtcontains the version of python we need , when deploying to Heroku. - The
Procfileis created for deployment using Heroku. It is not needed to run the app locally. setup.shwill contain commands which will be executed on the Heroku platform.
Install necessary libraries using pip package installer. It is recommended to use the following packages/libraries for this project.
streamlit==0.63.1
matplotlib==3.2.2
DateTime==4.3
pyowm==3.0.0
References
Tip
- While installing the packages (preferably while using the terminal) you can install multiple packages/libraries in a single line of command (by separating them by spaces) like this:
pip install lib1 lib2 lib3
Note
- Streamlit is an open-source Python library that makes it easy to create and share beautiful, custom web apps for machine learning and data science.
- PyOWM is a client Python wrapper library for OpenWeatherMap web APIs. It allows quick and easy consumption of OWM data from Python applications via a simple object model and in a human-friendly fashion.
- Matplotlib is a plotting library for the Python programming language. It provides an object-oriented API for embedding plots into applications.
- DateTime provides a DateTime data type . DateTime objects represent instants in time and provide interfaces for controlling its representation without affecting the absolute value of the object.
Requirements
-
Import relevant libraries as shown below:
import os import pytz import pyowm import streamlit as st from matplotlib import dates from datetime import datetime from matplotlib import pyplot as plt -
Get the api key from the OpenWeatherMap website and use it as follows:
owm=pyowm.OWM('your-api-key') mgr=owm.weather_manager() -
For the streamlit frontend we will need a title and a placeholder text:
st.title("5 Day Weather Forecast") st.write("### Write the name of a City and select the Temperature Unit and Graph Type from the sidebar") -
Now we will input the city name and using store it in a variable called place
place=st.text_input("NAME OF THE CITY :", "") if place == None: st.write("Input a CITY!") -
Now we will create two selection forms as follows :
unit=st.selectbox("Select Temperature Unit",("Celsius","Fahrenheit")) g_type=st.selectbox("Select Graph Type",("Line Graph","Bar Graph")) -
To run the code use the following command :
streamlit run <filename>
References
Expected Outcome
Finally, our web app has the front-end ready. It will look like this :

Fetching the API data
Now that our front-end is done we need to fetch the data using the PyOWM API so that we can visualize it.
Requirements
-
The OpenWeatherMap free tier gives you access to 5 day forecasts. The forecasts contain the weather data in three-hour intervals.
-
The methods for retrieving the forecast are:
forecast_at_place('Los Angeles, US', '3h')forecast_at_id(5391959, '3h')forecast_at_coords(lat=37.774929, lon=-122.419418, interval='3h')
-
Create an
OWMobject. -
Next we get a
WeatherManagerinstance. -
Retrieve a 5 day forecast data with intervals of 3 hours.
References
Note
- At this point you might be wondering what's the difference is between the
forecasterobject and theforecastobject. A Forecaster object is returned by theforecast_at_place()method, containing a Forecast: this instance encapsulates Weather objects corresponding to the provided granularity. - The
Forecastclass gives you access to the actual values in the forecast, such as the temperature, amount of rainfall, etc . while theForecasterclass provides a high level interface to the forecast so you can check whether or not there are specific weather conditions (such as rain or clouds) in the forecast. We'll explore some of the methods for theForecasterclass in later steps.
Expected Outcome
You are expected to use the PyOWM API to fetch the weather forecast data.
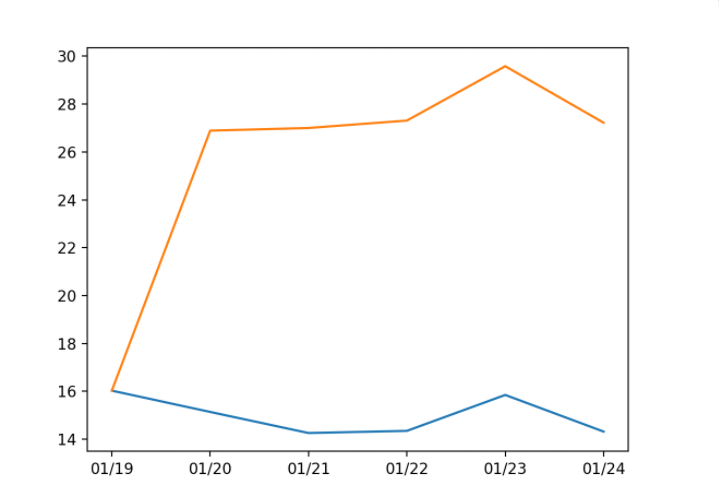
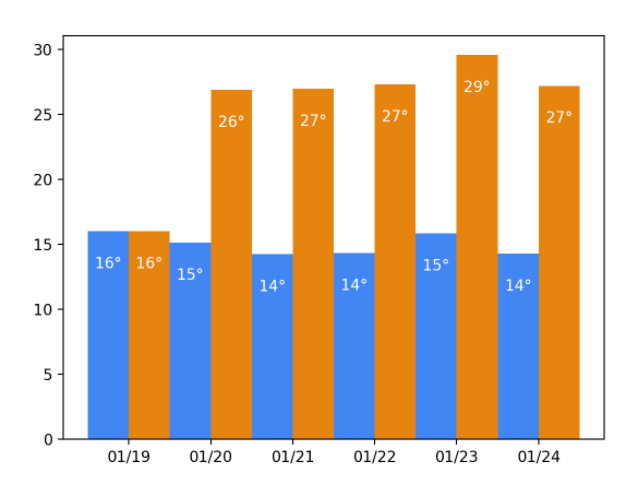
Plot the Temperature
Now that we have a function to retrieve the weather, we're ready for the fun part, plotting the temperature!
Requirements
- Create 2 functions one for bar chart and the other for line chart.
- Pass the
days,minimum temperatureandmaximum temperatureas parameters. - Use the
plt.bar(days,temp_min)andplt.bar(days,temp_max)for plotting minimum and maximum temperatures on the bar graph respectively. - Similarly use the
plt.plotfor the line chart. - At this point the plot should showing the forecast for the next five days.
Bring it On!
Optionally you can add the temperatures as labels on the bar charts as well as the line graphs.
Expected Outcome
The line and bar graphs should look like this :
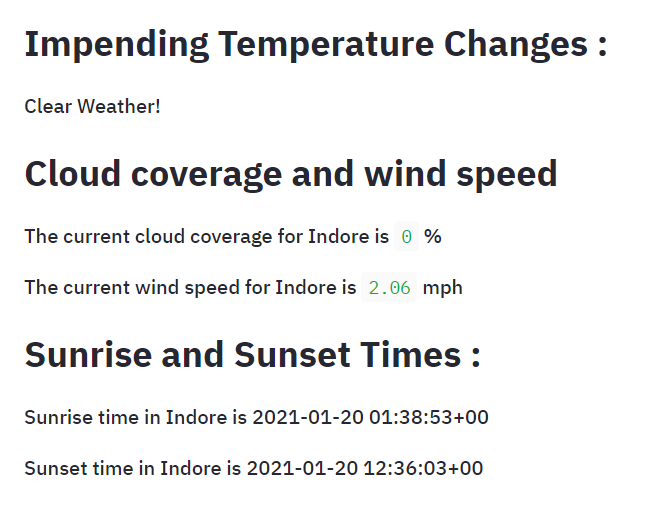
Adding the additional weather updates
Now that we have a function to plot the weather data, we can now include details like the impending weather changes, cloud coverage, wind speed and sunrise and sunset times.
Requirements
-
Python Open Weather Map provides methods to check for certain weather conditions in a forecast. The following methods are available:
will_have_rain() will_have_clear() will_have_fog() will_have_clouds() will_have_snow() will_have_storm() will_have_tornado() will_have_hurricane() -
For example, the following snippet checks if there is rain in this week's forecast for LA:
forecaster = mgr.forecast_at_place('Los Angeles, US', '3h') print(forecaster.will_have_rain()) -
Knowing what time the sun rises and sets is great information to have when planning your day! Let's see how we can get these times using PyOWM.
sunrise_time(): Returns the GMT time of sunrise
sunset_time(): Returns the GMT time of sunset
For example :
print(weather.sunrise_time()) -
PyOWM gives you access to other weather information in addition to the temperature. Some of the information you can get about is:
-
wind
-
clouds
-
humidity
The values in the clouds and humidity properties are of type
int. The values represents the percentage of cloud cover and the humidity percentage respectively. For example, to print the humidity after obtaining aWeatherobject, you could write:humidity = weather.humidity print(f'The current humidity is {humidity}%')
-
-
All we have to do is to integrate all these functions into the main file.
Note
-
You'll notice that the sunrise time looks a little cryptic. That's because the value returned is in UNIX time. PyOWM allows you to add a parameter to specify ISO time as well, which is more easily readable. For example, checkout the snippet below:
print(weather.sunrise_time(timeformat='iso')) -
Keep in mind that the times are for the GMT time zone, so they may still look a little strange. The solution is presented by the
pytzmodule.pytzis a Python module that simplifies working with time zones.
Expected Outcome
You should be able to access the following types of data and represent them as given.
Deploying the project on Heroku
Requirements
-
Run
pip freeze > requirements.txtin the terminal. This creates a text file containing all our dependencies. -
Create a
Procfilein the working directory. This file will contain commands to be run on the Heroku cloud. -
Run
sudo snap install --classic herokuon terminal to install the Heroku CLI. -
In the Heroku terminal, run the commands below:
heroku create unique-name-here
git add .
git commit -m 'Initial app template'
git push heroku master
References
Note
- The URL should be generated after following the aforementioned steps. It should look like
https://<unique-name-here>.herokuapp.com. - Heroku has some limitations on free plans. However, you can upgrade by paying a fee.
- In case of deployment errors, Heroku maintains a log of it for you to check out.
- You may use any another hosting services too if you are uncomfortable with using Heroku.
Expected Outcome
Finally, our web app is deployed and can be accessed by anyone in the world.