You will be building an e-commerce application using React, which is inspired by Amazon.
Objective
Project Context
Businesses, in any field, have a lot of competition. They are always on the lookout for a proven way to increase their business revenue. Restaurants, retail shops, vape stores - whatever a business may want to sell, if the business doesn’t have an e-commerce website, they are leaving money on the table!
The world has moved online – a fact that businesses have to accept and put up a website to address. Amazon is a prime example of a website with all the key elements making up a good e-commerce site.
The e-commerce website of Amazon was initially put together with simple HTML, CSS and JavaScript. But as time progressed and different frameworks came into the limelight, the website got a makeover.
Through this project, we’ll discover a way to build a functional clone of Amazon’s e-commerce website, relying on React and Firebase.
Project Stages
The project consists of the following stages:
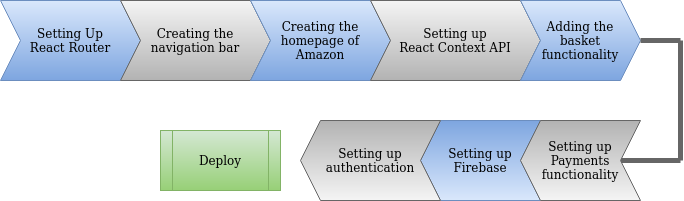
High-Level Approach
- The first task, once we get the development environment ready, will be to set up the React Router.
- Once we have everything in place, we can start off with creating the website header, which will basically serve as the navigation bar, as in most modern websites.
- Next up is the home page building. In this project, we’ll be keeping it simple by showing all our sample products on the homepage.
- Then we’ll be setting up the React Context API. The Context API is a component structure provided by the React framework, which enables us to share specific states across all levels of the application. In our project, we’ll need to manage two states: basket (to manage the shopping cart) and user (for managing the details of the currently logged in user).
- For setting up the payments functionality, we’ll be using APIs provided by Stripe.
- Handling our database and authentication needs to be supported and we’ll be using Firebase for the same. Basically the database will be used to store the login information for the users, but the resource can be used for storing product information as well.
- Once we have Firebase setup, we can work on the Login page of our application.
- Successful implementation of the above requirements will lead to completion of the core implementation of our e-commerce solution. Next up, deploy!
At the end, we’ll have a result similar to the one shown below.
Primary goals
- Create header/navigation bar to navigate between pages.
- Create a home page to display products.
- Create a login page for user login.
- Add functionalities like basket, payment and authentication.
Credits
"Clever Programmer organization"
Objective
You will be building an e-commerce application using React, which is inspired by Amazon.
Project Context
Businesses, in any field, have a lot of competition. They are always on the lookout for a proven way to increase their business revenue. Restaurants, retail shops, vape stores - whatever a business may want to sell, if the business doesn’t have an e-commerce website, they are leaving money on the table!
The world has moved online – a fact that businesses have to accept and put up a website to address. Amazon is a prime example of a website with all the key elements making up a good e-commerce site.
The e-commerce website of Amazon was initially put together with simple HTML, CSS and JavaScript. But as time progressed and different frameworks came into the limelight, the website got a makeover.
Through this project, we’ll discover a way to build a functional clone of Amazon’s e-commerce website, relying on React and Firebase.
Project Stages
The project consists of the following stages:
High-Level Approach
- The first task, once we get the development environment ready, will be to set up the React Router.
- Once we have everything in place, we can start off with creating the website header, which will basically serve as the navigation bar, as in most modern websites.
- Next up is the home page building. In this project, we’ll be keeping it simple by showing all our sample products on the homepage.
- Then we’ll be setting up the React Context API. The Context API is a component structure provided by the React framework, which enables us to share specific states across all levels of the application. In our project, we’ll need to manage two states: basket (to manage the shopping cart) and user (for managing the details of the currently logged in user).
- For setting up the payments functionality, we’ll be using APIs provided by Stripe.
- Handling our database and authentication needs to be supported and we’ll be using Firebase for the same. Basically the database will be used to store the login information for the users, but the resource can be used for storing product information as well.
- Once we have Firebase setup, we can work on the Login page of our application.
- Successful implementation of the above requirements will lead to completion of the core implementation of our e-commerce solution. Next up, deploy!
At the end, we’ll have a result similar to the one shown below.
Primary goals
- Create header/navigation bar to navigate between pages.
- Create a home page to display products.
- Create a login page for user login.
- Add functionalities like basket, payment and authentication.
Credits
"Clever Programmer organization"
Environment setup
Before the start of any development procedure, we need to set up the environment according to our application needs.
Requirements
-
Install Node.js on your machine.
-
Install and set up a React application.
-
Start the development server to verify prior installation.
-
Like any typical application, the source code should be in a
srcfolder. Delete the 3 optional files from that folder:App.test.js,logo.svgandsetupTests.js. You’ll not be needing them. -
Remove all the content of the
App.cssfile. -
Remove the unnecessary code from the App() function of
App.jsand add the below code to the App() function.return <div className="app">Hello World!</div>; -
Add the following code to
index.css.*{ margin: 0; padding: 0; }It helps in tackling various formatting issues.
References
Expected Outcome
The main objective of this milestone is to make sure that you have the required development environment in place.
On completion of the above requirements,run the application using npm start and the end result should be as shown in the screenshot below.

Navigation with the React Router
Requirements
-
Install React Router.
-
Make a new component called “Home”. Components are independent and reusable bits of code. They serve the same purpose as JavaScript functions but work in isolation and return HTML via a render function. Traditionally, every component has a
.jsfile and a.cssfile. Follow the BEM (Block Element Modifier) convention when naming your components. We’ll be working on functional components throughout this project. In simple words, functional components are javascript functions. By writing a javascript function, we can create a functional component in React Apps. -
Add the following code to your new component:
return <div className="home">Hello World Again!!</div>; -
To use the above component in our
App.js, we need to set up the React Router. For doing so, first import the required dependencies.import { BrowserRouter as Router, Route, Switch } from "react-router-dom"; -
Then, import the
Homecomponent and use it atRoute path = "/".
References
Expected Outcome
Your app should be able to render the data from the Home component by default at http://localhost:3000. The output should be as shown below.

Creating the navigation bar
Requirements
- We need a couple of icons in the navigation bar, like the search icon and the basket icon. React has a UI framework called Material-UI, which helps in building our frontend. Install the
@material-ui/coreand the@material-ui/iconspackages. - Create a new component called
Header. As mentioned earlier, we’ll be working on functional components throughout this project. Fulfill the following requirements:- Add the amazon logo to the navigation bar.
- Add a search bar. The search bar should also have a search icon. It need not be functional at the moment.
- Create the navigation section of the header. Add the following sections:
- Login
- Returns & Orders
- Amazon Prime
- Shopping Basket
- Add the necessary code in the
.cssfile of the component so that it looks similar to the one of Amazon.
- Include only the
Headercomponent in theApp.jsand use it atRoute path = "/".
Expected Outcome
On completion of this milestone, the header of your webapp should look similar to the one shown below.
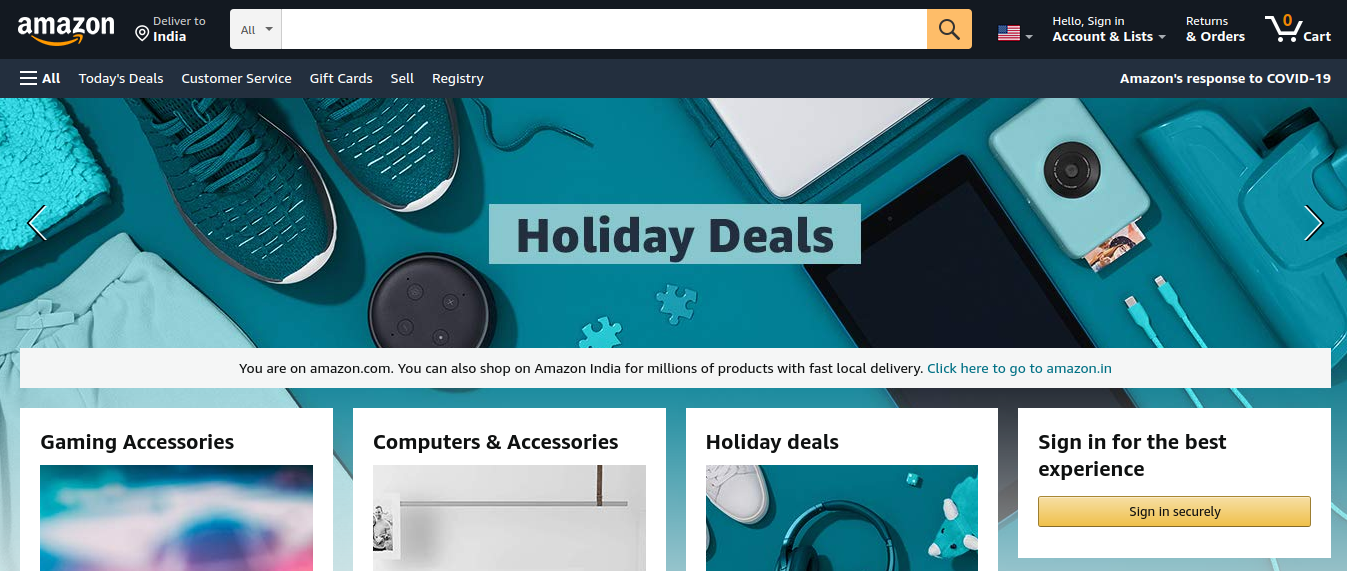
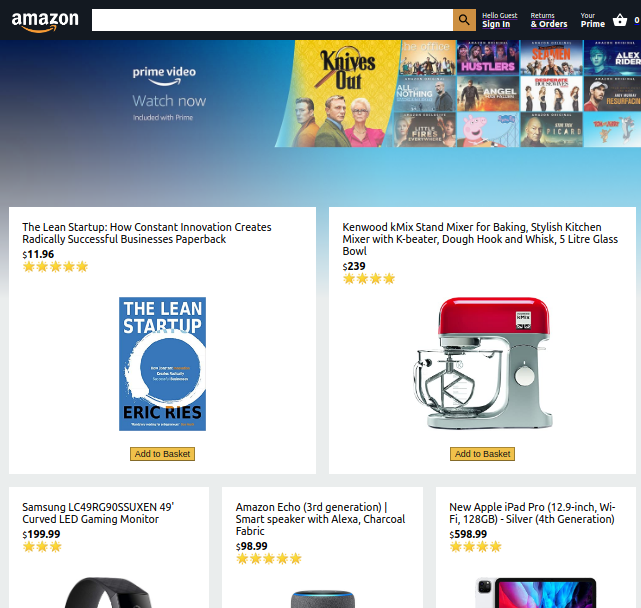
Creating the homepage
It’s time for us to work on the homepage. The homepage of any website serves as the default page of that website. That is reason enough for the homepage to be really expressive as well as creative.
Requirements
-
Go to your
Home.js, i.e., you Home component, and do the following:-
Similar to the image shown below, add an image to be displayed at the top of the landing page. You need to add this image in your home component.
-
If you observe the given image properly, you’ll notice that there’s a gradient style applied to the landing page image, which continues to turn into a greyish shade. You need to apply a similar gradient to the image you added. Go to Amazon.com or observe the image given below to get an idea about what we’re expecting.
As you can see, since the products have a white background, it's easy to spot the contrast between the background of the rectangular components for ‘Gaming Accessories’, ‘Computers & Accessories’, etc., and the surrounding greyish shade.
-
Create a
Productcomponent. As mentioned before, you’ll need two files:Product.jsandProduct.css. To attain reusability, pass parameters (referred to as props in React.js) likeid,title,image,priceandratingto your functional component (we’ll be discussing functional components throughout this project, but you are free to explore other alternatives). -
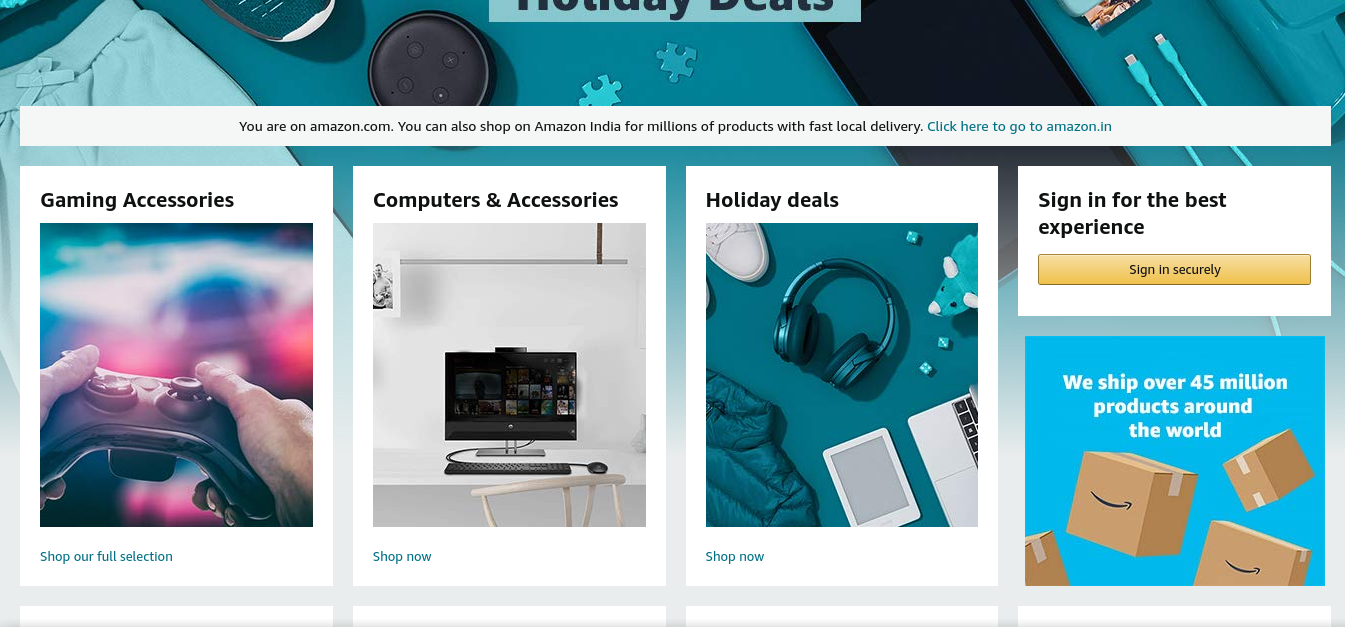
Utilize the
Productcomponent in yourHomecomponent to render out a few sample products. Use properflexCSS styles where required to get the desired (similar to Amazon.com products) result. You can refer to the image below to get an idea about how your component should look like on rendering.
[Note: We are not expecting you to integrate database features to your application yet, such that it can access the product information from a database. We’ll be discussing that in the optional milestones.]
-
Bring it On!
-
Can you add a new component called
Selectionfor example? In the given image below, you can see that there’s a ‘Gaming Accessories’ selection, another for ‘Computers & Accessories’, etc. Your functional component inSelection.jswill need 4 props:id,title,image,route. The givenroutein the component is to be responsible for redirecting the users to a page with the content related to theSelectioncomponent’s link they clicked. For example, on Amazon.com, if you click on Show full collection as given in the image below for “Gaming Accessories”, it redirects you to a page with such products.
Expected Outcome
On completion of this milestone, you should have a home page ready with sample products, which are rendered on the page at http://localhost:3000 by default.
The result should be similar to the web page shown below.
Setting up React Context API
The Context API provides a way to share data values between components without having to pass a prop through every level of the app tree. The React Context API is a component structure provided by the React framework. It basically solves the problem of prop drilling.
Requirements
-
Create a file
StateProvider.jswith the following contents:import React, { createContext, useContext, useReducer } from "react"; // Prepare the dataLayer export const StateContext = createContext(); // Wrap our app and provide the Data layer export const StateProvider = ({ reducer, initialState, children }) => ( <StateContext.Provider value={useReducer(reducer, initialState)}> {children} </StateContext.Provider> ); // Pull information from the data layer export const useStateValue = () => useContext(StateContext); -
Create a file
reducer.jswhich fulfills the following criteria:- Declare all application level states which are to be used later by the application. (You’ll need at least 2 states, namely basket, to contain shopping basket details of logged in user, and user, to contain details of the logged in user).
- Create a function which can calculate the total amount of the items in the shopping basket.
- Export the
reducer.
-
Do the following in
index.js:- Import the
reducerandinitialStatefromreducer.jsandStateProvidercomponent fromStateProvider.js. - Enclose the
Appcomponent withStateProviderso that the children components can get access to the states too. - Pass the
reducerandinitialStateto theStateProvider.
- Import the
Expected Outcome
You should be able to configure React Context API, along with the reducer, so that the components can access the basket and user info.
Adding the Basket functionality
What’s more exciting than adding items to your basket when you're shopping? In this milestone, we’ll be adding this functionality to our application.
Requirements
-
In your
Product.js, import theuseStateValuehook from theStateProvider. -
You need to use the
useStateValuehook to bring in a state namedbasket(for example) and also get a dispatch function which allows you to dispatch actions to change the state in the reducer.const [{ basket }, dispatch] = useStateValue(); -
You need to dispatch the item information to the data layer. Your code should look similar to the code block shown below:
const addToBasket = () => { dispatch({ type: "ADD_TO_BASKET", item: { id: id, title: title, image: image, price: price, rating: rating, }, }); }; -
Also, you need a
onClickfunction for executing the above dispatch code.<button onClick={addToBasket}>Add to Basket</button> -
In the
reducer.jsyou need to add something similar to this to theswitch (action.type)block:case "ADD_TO_BASKET": return { ...state, basket: [...state.basket, action.item], }; -
Import the
useStateProviderto yourHeadercomponent and make use of the basket information to show the number of items in the basket.
Expected Outcome
You should be able to see the updated count of the number of items in the basket beside the basket icon. Suppose we’ve got 4 items in the basket, then the desired result will be as shown below.

Setting up Firebase and Authentication
Firebase is a great service provided by Google for configuring the backend of any web application with all the general necessities like database preparation, authentication using various methods, etc. In this milestone, we’ll be preparing our database and setting up authentication using email and password.
[Note: Use the references provided to implement the following requirements.]
Requirements
-
Create a project on Firebase.
-
Setup the database and setup sign-in method using Email/Password.
-
Register your application and set up Firebase hosting.
-
Install necessary Firebase dependencies in your local setup.
npm install -g firebase-tools && npm install firebase && firebase login -
Open the
Firebase SDK snippetsection in your Firebase project and copy paste the necessary configuration in a file namedfirebase.js. -
In this file, utilize the below code to make use of Firebase authentication and database.
const firebaseApp = firebase.initializeApp(firebaseConfig); const db = firebaseApp.firestore(); const auth = firebase.auth(); export { db, auth }; -
Create a new component named
Login. Style the component so that it looks similar to the one shown below.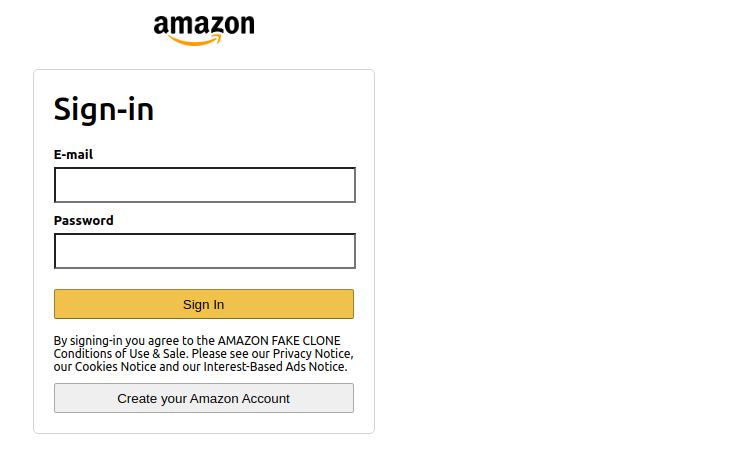
[Note: Feel free to check out Amazon.com for reference.]
-
Configure the Firebase authentication with the Login component.
References
- Setup up database and connect it to your application, additional reference
- Firebase authentication - 1, 2
- OnAuthStateChanged To Listen For Login/Register
- AuthStateListener in Firebase
- An example for authentication for React apps using firebase
- Sign-out feature using firebase authentication
Bring it On!
- Configure other sign-in methods like FB sign-in, Google sign-in, etc.
Expected Outcome
You should be able to create a Firebase project and prepare database and authentication for your application. Also, you should have a functional Login component in place.
The Checkout page
Now it’s time for us to work on the checkout page. So, let’s get right into it.
Requirements
-
Create a
Checkoutcomponent on the Checkout page. TheCheckoutcomponent renders this page and will use two more components. Let’s name themCheckoutProductandSubTotalfor example.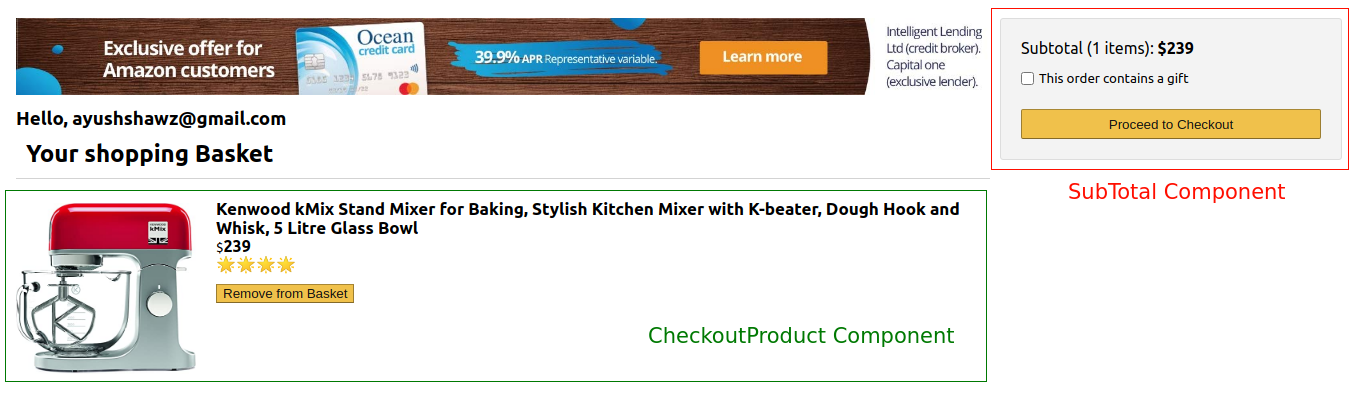
-
As you can see in the above image, we need the components styled as shown. [Note: You are free to refer to Amazon.com too.]
-
The mentioned components should be functional as desired. The
SubTotalcomponent should be able to calculate the total price and display the same and theRemove From Basketbutton of theCheckoutProductcomponent should be functional such that on clicking the button, the product is removed from the basket and the price is deducted from theSubTotalcomponent.
Expected Outcome
You should have a fully functional Checkout Page at your disposal. With a few products in the basket, the Checkout page might look something like this:

Payments functionality and more
By now our application looks good and is a proper e-commerce solution, except it is missing one very important aspect of commerce and that is the payment facility. Moreover, this application is a clone inspired from Amazon.com. We can add more functionality and tickle with the styling of the application to make it our own.
[Note: This milestone is not mandatory. Those who want to go that extra step are welcome to give it their best!]
Requirements
- Integrate Stripe in your React application.
- Give a new name to your e-commerce application and make a new logo for it. Use that logo in place of the Amazon logo.
- Change the styles of all the visual components.
- Integrate Firebase database functionality for storing product information in the database provided by Firebase and fetch the product information when required to display on the website.
Bring it On!
- Reach out to local businesses and present them your product and offer them the chance to make their business go online! This might spark a potential freelance career.
Expected Outcome
You should be able to integrate payment functionality using Stripe in your React application. Also, you should be able to customize the website to your needs and make it look like your own.
Deployment!
It’s time to deploy our website and show it to the world!
Requirements
-
Build your React application.
npm run build -
Setup Firebase hosting and deploy!
firebase deploy
Bring it On!
- Get your own domain name and configure it with your deployed application.
Expected Outcome
You should be able to deploy your React application to Firebase so that it’s accessible to everyone on the internet.