Create an online code-editor for HTML, CSS, JS code snippets using only HTML, CSS and React. The code editor’s functionality will be similar to that of codpen.io
Objective
Project Context
Online code-editor is a tool that resides on a remote server and is accessible via browsers. Some online code editors have basic features like syntax highlighting or code completion more similar to text editors while others are like complete IDEs.
For any developer, be it amateur or professional, often the liberty of using a local code editor may be unavailable. As online code-editors are fast, efficient and greatly popular, it is a familiar tool among developers. If you have used one, ever wondered how it can be made? This module will guide you through the process that can be followed to build your own code-editor for HTML, CSS, JS code snippets. Implementing the project will add an immense value to your profile.
This project is a good start for beginners, a new idea for intermediates and a refreshing hobby project for professionals. It involves the basic use of all of HTML, CSS and React languages. Reason for following this tech-stack is that these languages are easy to use and are also fast in terms of execution time.
Project Stages
We can segregate the product architecture based on tools used:
- HTML, CSS - Site user interface (site’s layout)
- React - Site’s core functionality and frontend features
- Hosting services like Heroku, Firebase, Netlify, etc.
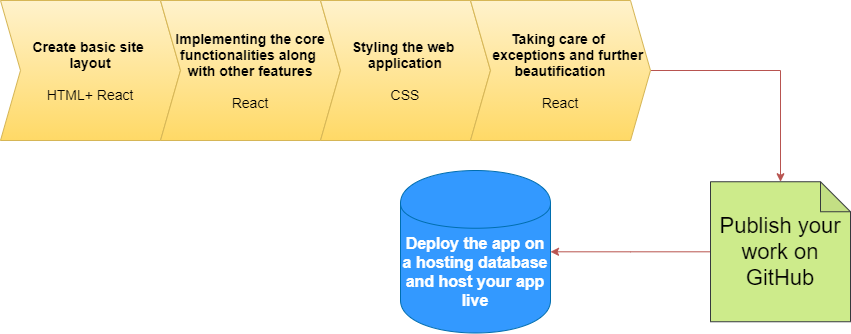
High-Level Approach
This module consists of the following milestones:
- Creating the structural aspect of code-editor using HTML, CSS
- Implementation of core functionalities and other frontend features using React
- Publish to GitHub and finally host your deployed code-editor.
The desired end result of this project is like this:
Applications
Some of the applications of online code editors are-
- For online interviews/hiring: With online code editors, you can do interviews with ease. It helps to see candidates’ approach towards solutions and work with code.
- Prototyping: You can validate your ideas and get instant feedback from users as sharing and collaboration options are available and saves you from the pain of local setup.
Objective
Create an online code-editor for HTML, CSS, JS code snippets using only HTML, CSS and React. The code editor’s functionality will be similar to that of codpen.io
Project Context
Online code-editor is a tool that resides on a remote server and is accessible via browsers. Some online code editors have basic features like syntax highlighting or code completion more similar to text editors while others are like complete IDEs.
For any developer, be it amateur or professional, often the liberty of using a local code editor may be unavailable. As online code-editors are fast, efficient and greatly popular, it is a familiar tool among developers. If you have used one, ever wondered how it can be made? This module will guide you through the process that can be followed to build your own code-editor for HTML, CSS, JS code snippets. Implementing the project will add an immense value to your profile.
This project is a good start for beginners, a new idea for intermediates and a refreshing hobby project for professionals. It involves the basic use of all of HTML, CSS and React languages. Reason for following this tech-stack is that these languages are easy to use and are also fast in terms of execution time.
Project Stages
We can segregate the product architecture based on tools used:
- HTML, CSS - Site user interface (site’s layout)
- React - Site’s core functionality and frontend features
- Hosting services like Heroku, Firebase, Netlify, etc.
High-Level Approach
This module consists of the following milestones:
- Creating the structural aspect of code-editor using HTML, CSS
- Implementation of core functionalities and other frontend features using React
- Publish to GitHub and finally host your deployed code-editor.
The desired end result of this project is like this:
Applications
Some of the applications of online code editors are-
- For online interviews/hiring: With online code editors, you can do interviews with ease. It helps to see candidates’ approach towards solutions and work with code.
- Prototyping: You can validate your ideas and get instant feedback from users as sharing and collaboration options are available and saves you from the pain of local setup.
Getting Started
First validate the idea by doing a low level implementation (Proof of Concept) of the components involved in the project.
This helps you to:
- Get more clarity around the unknowns.
- Get a better understanding of the stages involved in the project.
Explore various aspects of the terms mentioned in the preceding sections and also understand the preference to use React over Angular or Vue, XML vs HTML, why use HTML5/CSS3 and not the other versions, etc.
Requirements
- Ideally this is a React app. So start by creating one and keep only the relevant files needed for the project (starter files are shown below).
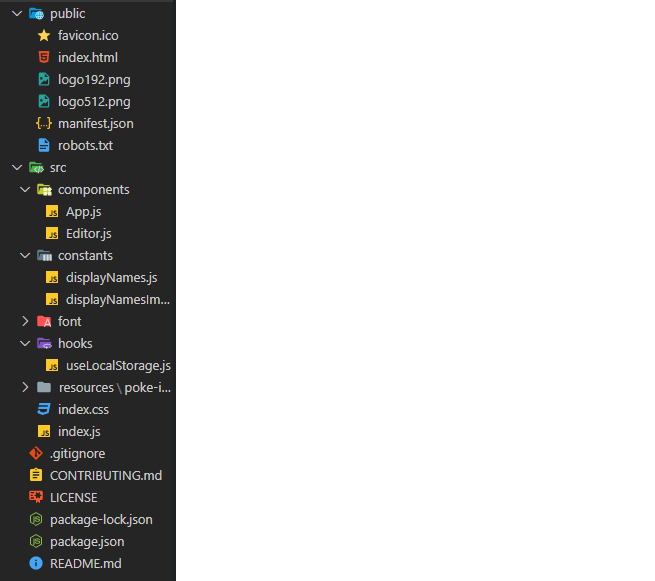
- Install necessary dependency packages (you may refer and use the ones mentioned below) using npm. Codemirror dependency is the text editor (npm) package and react-codemirror2 is used to have custom controlled components of codemirror.
"dependencies": {
  "@fortawesome/fontawesome-svg-core": "^1.2.31",
  "@fortawesome/free-brands-svg-icons": "^5.15.0",
  "@fortawesome/free-solid-svg-icons": "^5.15.0",
  "@fortawesome/react-fontawesome": "^0.1.11",
  "@testing-library/jest-dom": "^4.2.4",
  "@testing-library/react": "^9.5.0",
  "@testing-library/user-event": "^7.2.1",
  "codemirror": "^5.58.1",
  "react": "^16.13.1",
  "react-codemirror2": "^7.2.1",
  "react-dom": "^16.13.1",
  "react-scripts": "3.4.3"
},
References
- Why use React? and not angular,vue
- Quick tutorial for React, want a lighter tutorial?
- 5 things you need to know for React
- Don’t know what the .gitignore file is? No problem, just refer to this.
Tip
To run the react application simply type npm start in the terminal and you will get a live server started.
Create the site’s main layout
In this task the basic structure of the code-editor is built (excluding the core functionality) using HTML and React.
Requirements
- There are two panes in this code editor- One where the code is run (upper half of the app that contains the three code containers) and the other where the output is displayed (lower half ‘result’ code window). So, create two divisions in
app.jsto accommodate them. - Create a custom component called
Editor(preferably) which will be used in taking input of HTML, CSS, JS code snippets in their respective code containers.
<div className="pane top-pane">
        <Editor /*HTML code editor*//>
        <Editor /*CSS code editor*//>
        <Editor /*JS code editor*//>
</div>
- To render a web page within another web page an
iframeelement must be used.
<div className="bottom-pane">
        <iframe
          srcDoc={srcDoc}
          /*Title option*/
          /*sandbox option*/
          /*frameBorder option*/
          /*width-height option*/
          /*Title option*/
        ></iframe>
</div>
- Fill in dummy test code in Editor function
editor.jsand import it to yourapp.jsto check whether the custom componentEditoris working or not.
export default Editor;

import Editor from "./Editor";
References
Expected Outcome
Since only a dummy text is being returned by the editor function, at the end of this milestone the app should look something like this (NOTE: The iframe is not rendering anything now, so it has no effect) -
.png)
Create the editor component
Start building the code-editor by creating the Editor component that will be taking care of the code fed into respective sections (i.e. HTML, CSS, JS code snippets).
The ‘editor’ component will be responsible for validating the code in their respective sections (code containers) and storing it for further uses.
Requirements
- It is recommended to use the codemirror package for this component so that you can have controlled usage for the code editor which will then help in controlling your input/output values and event handlers. So, import the code-editor (Controlled) component from the
react-codemirror2package.
import "codemirror/lib/codemirror.css";
import "codemirror/theme/material.css";
import /* codemirror XML (HTML) mode */
import /* codemirror CSS mode */
import /* codemirror JS mode */
- Create buttons for each code container for opening (expanding) and closing (collapsing) individual code-editors. The expand/collapse buttons will function like this (only focus on the buttons’ working now, all other features will be implemented as you progress through the following milestones).
- Implement the controlled usage for the editor which should contain the event handlers (like onChange), values and other necessary arguments that create the editor as indicated below.
<ControlledEditor
        onBeforeChange={/* Pass in a custom made function that will handle the change */}
        value={/* Give the value */}
        className= /* Give an appropriate name for styling reference in CSS */
        options={{
         /* Give all relevant options */
        }}
/>
- Export this component as a function with appropriate arguments such as language name, value, onChange event handler (a separate function to be made, you may reuse the following code).
function handleChange(editor, data, /* An argument that handles the value of this function */) {
    onChange(/* The passed in argument that decides this function's value (argument) */);
  }
Tip
- Use state in the main app code to pass in values and event handler values, for individual editor components.
- Create hooks (useState) for each language and set the
useStatehook as null. This step will be used for the editor tag’s value and onChange event handler’s arguments. - Create state variables (preferably by using useState hook) in the main app code to pass in values and event handler values, for individual editor components (i.e. language specific) and other relevant features.
- Every custom ‘Editor’ component needs to have at least a language name, it’s display name, a language specific value and language specific onChange event handler.
Expected Outcome
Now that the custom component Editor is in place, the code-editor should look something like the image below. Try inputting some sample code and see if syntax highlighting has been implemented or not. Of course the inputted code won’t be rendered now.
[NOTE: Your output may look different due to styling variations, but it will look same in the end as you keep progressing]
.png)
Style the code-editor
Without styling, the appearance will be bland and not appealing. Thus, this task deals with the required styling needed to beautify the code-editor using only CSS.
Requirements
- Go back to your existing code divisions/classes and give appropriate class names to every relevant sub-structure of the code-editor.
- Observe the sample code-editor image and also visit codepen.io and implement similar (and better) styling to your code-editor.
- Style each of the sub-structures like body, top-pane, top-pane header, individual code-editors, editor components and so on.
- This is an iterative task and needs to be done again when some more new features are added.
Tip
- Your site’s code containers may not cover the whole upper half on zooming in-out of the screen. Make sure you include the following code
.CodeMirror {
  height: 100% !important;
}
- If you’re confused with the naming to follow for division and classes you may refer this
body {}
.top-pane {}
.top-header {}
.top-header .clear-all-btn {}
.top-header .clear-all-btn:hover {}
.pane {}
.editor-container {}
.editor-title {}
.editor-container.collapsed {}

.editor-container.collapsed .CodeMirror-scroll {
  position: absolute;
  overflow: hidden !important;
}

.CodeMirror {
  height: 100% !important;
}

.code-mirror-wrapper {}
.expand-collapse-btn {}
.ct {}
.ti {}

@font-face {
  font-family: "Roboto";
  src: local("Roboto"), url(./font/Roboto-Regular.ttf) format("truetype");
}
Expected Outcome
After implementing the styling the code-editor should look something like the image given below. Keep improving the styling as you wish, but before that move on to the next milestones first to complete the code-editor.
.png)
Implement the core functionalities
Implement the the core functionality of the code-editor, i.e. render the webpage corresponding to the code inputs (by implementing the code of iframe element mentioned in milestone 1)
Requirements
- We need a ‘source’ document in the main App function in
app.jsthat needs to be used inside theiframeelement to render the website. To render any website a HTML code is sufficient with all of HTML, CSS, JS codes wrapped properly in it. So, create this variable (which is ideally a template string) such that it understands language specific inputs and accordingly creates a HTML page with the relevant source code of each language wrapped in its tag (like <body> for HTML) . - On using this ‘source document’ variable in the
iframeas one of its arguments you will be able to render pages. - Further set a time-delay between code input and output (to avoid data execution cluttering when your site is hosted).
Tip
- Create state variables (preferably by using useState hook) in the main app code to pass in values and event handler values, for individual editor components (i.e. language specific) and other relevant features.
- The logic of implementing
source documentvariable: The tag that binds HTML code is<body>...</body>, tag that binds CSS is<style>...</style>and for JS is<script>...</script>. Using a template string, the contents of each of tags can be input as variables/expressions.
const srcDoc = `
<html>
  <body>${html}</body>
  /* CSS code */
  /* JS code */
</html>
`
- For time-delay use
useEffectreact component
useEffect(() => {
    const timeout = setTimeout(() => {
     /* Source Document Code as function */
    }, 250);

    return () => clearTimeout(timeout);
  }, [html, css, js, /* Source document function call so that the site responds again to new code changes */]);
Expected Outcome
Now that the core functionalities are implemented the code-editor is good to use now. So the webpage rendered by the code-editor should look something like this
.png)
Implement expand/collapse feature button of code-editor panes and refresh option button
Expected Outcome
The refresh button feature along with all the icons will look and function as shown in the demo below.
Retaining the data on direct page reloads and adding some other edgy features
The editor should not lose its data on a direct page reload (i.e. other than the refresh button option). To save them in local storage for one particular instance of code run, using a hook is an easy, straightforward solution. Also the site buttons will look plain as of now. Use fontawesome icons of React library to convert them into edgy icons.
Requirements
- To implement the main feature of this task, create a custom useLocalStorage hook in
useLocalStorage.jsfile. - This hook will ideally take two parameters-namely a key and an initialValue. The key will be pointing towards the language pane.
- Using this key, extract the JSON value (via useState function) and check if it’s null or contains some value. If null, JSON needs to be returned (after parsing it obviously).
- Check if the initialValue is of type function or not. Accordingly return the initialValue.
- Also use the
useEffecthook to make sure that when the value (associated with useState hook) or the key value changes, the key is set as the stringified version of value (JSON). - Finally use this hook in the main App function of
app.jsin place of previously used useState of all language-specific useState’s defined before. - Now install fortawesome/fontawesome (for react) after selecting appropriate icons from the font awesome site to plug-in all relevant icons to complete your code-editor!
import { FontAwesomeIcon } from "@fortawesome/react-fontawesome";
import { faCompressAlt, faExpandAlt } from "@fortawesome/free-solid-svg-icons";
import { faHtml5, faCss3Alt, faJs } from "@fortawesome/free-brands-svg-icons";
Tip
- Refer this and this for useLocalStorage references.
- In case of any problem with
useLocalstorage.jstry completing the below code. Then try your own logic.
import { useState, useEffect } from "react";

const PREFIX = /* To prefix your key so that you can easily identify your localhost instance */;

function useLocalStorage(key, initialValue) {
  const prefixedKey = PREFIX + key;

  const [value, setValue] = useState(() => { /*Use states*/
    const jsonValue = /*Get the items from local storage based on the prefix key */;

    if (jsonValue != null) return /* Parsed value of jsonValue */;

    if (typeof initialValue === "function") {
      return /* initialValue as a function*/;
    } else {
      return /* initialValue as a variable*/;
    }
  });

  useEffect(() => {
    if(!value) setValue(/* Set to null */)
      localStorage.setItem(prefixedKey, JSON.stringify(value));
      /* Set the localstorage's prefixed key with the new stringified json of value */
  }, [prefixedKey, value]);

  return [value, setValue];
}

export default useLocalStorage;
Expected Outcome
Your final code-editor should function as shown in the demo below. Do keep improving your code-editor once this stage has been reached.
Publish your work to GitHub and host your website live
Finish your work in complete style.
Publish your work on GitHub with proper folder structure and a good README for people to get to know of your work. Make sure you add a .gitignore file and mention all dependency folders like node_modules in it.
Since this is a React application, go one step further by using a hosting service like Heroku, Firebase or Netlify to host your app and get a live URL.
Share this link among your peers and add this project (with the link and proper documentation) to your resume and voila, you have just boosted your resume.