You will develop a web application that will auto-generate a nice and properly formatted Resume from the information filled up in a form.
Objective
Project Context
Creating a resume is a bit tedious task for any working professional from any industry. One has to keep it short, simple, and with the latest work experience, and constantly update it over a while.
This project will help you through the process that can be followed to build your resume-builder using ReactJS and NodeJS. Implementing the project will give you the satisfaction of auto-generating it on your own and helping working professionals with the same.
Build a Resume-Builder Web App and add it to your resume to get recognized !! Isn't that interesting? Let's get started then!
Project Stages
This project consists of following stages:

High-Level Approach
- Create a basic client-server setup of Node & React and install necessary libraries required.
- Build a React form by making modularized components using Material UI and React-Boostrap & calling these components in sequence to get required input data to generate resume.
- Process the information on the server(Node) and using some HTML to PDF libraries to generate the resume.
- Finally, make it auto-download on client side.
Project Demo:
Objective
You will develop a web application that will auto-generate a nice and properly formatted Resume from the information filled up in a form.
Project Context
Creating a resume is a bit tedious task for any working professional from any industry. One has to keep it short, simple, and with the latest work experience, and constantly update it over a while.
This project will help you through the process that can be followed to build your resume-builder using ReactJS and NodeJS. Implementing the project will give you the satisfaction of auto-generating it on your own and helping working professionals with the same.
Build a Resume-Builder Web App and add it to your resume to get recognized !! Isn't that interesting? Let's get started then!
Project Stages
This project consists of following stages:
High-Level Approach
- Create a basic client-server setup of Node & React and install necessary libraries required.
- Build a React form by making modularized components using Material UI and React-Boostrap & calling these components in sequence to get required input data to generate resume.
- Process the information on the server(Node) and using some HTML to PDF libraries to generate the resume.
- Finally, make it auto-download on client side.
Project Demo:
Proof of Concept
First validate the idea by doing a low level implementation (Proof of Concept) of the components involved in the project.
This helps you to:
- Get more clarity around the unknowns.
- Get a better understanding of the stages involved in the project.
Requirements
-
Visit https://resumebuild.com/ and https://zety.com/resume-builder to get a better understanding about the project idea and its workflow. Also, try generating a sample resume on it.
-
Revisit the basics of ReactJS and NodeJS to have frustration-free project development (less silly mistakes) and anyways having good and in depth knowledge indeed helps!
Bring it On!
- Try sketching a rough UI diagram of your application to be more specific. Develop basic template(s) using HTML & CSS for your project.
Expected Outcome
The main purpose of this task is for you to revise the basic concepts and understanding the workflow of a similar application.
Setting up the project
A well-defined folder structure is an initial step in every project development, which will make the multiple files & folders in your project manageable and searchable. You should always name your files/folders with relevant & logical names. Let's get started !
Requirements
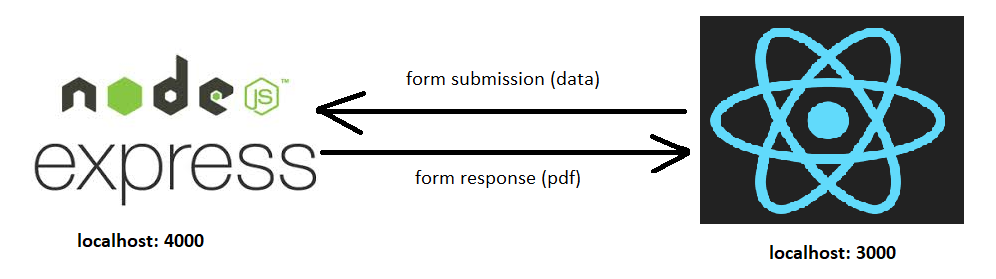
- Let's first setup a server (any web application is always a client-server interaction). Refer to the image below for server folder structure.

- Install necessary dependency packages (you may refer and use the ones mentioned below) using npm.
"dependencies": {
    "body-parser": "^1.19.0",
    "concurrently": "^5.0.1",
    "cors": "^2.8.5",
    "express": "^4.17.1",
    "fs": "0.0.1-security",
    "html-pdf": "^2.2.0"
},
"devDependencies": {
    "nodemon": "^2.0.2"
}
-
Now, create a react-app using npm.
-
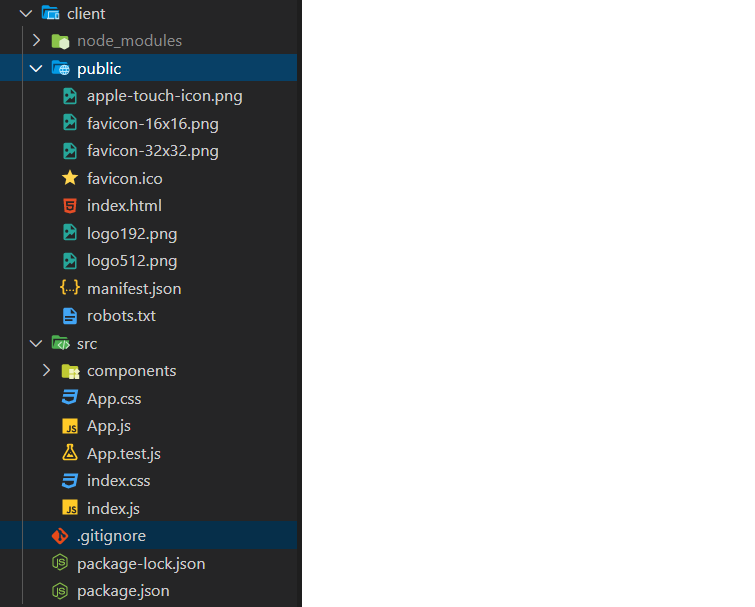
Refer to the image below for client folder structure.
- Install necessary dependency packages (you may refer and use the ones mentioned below) using npm.
"dependencies": {
		"@date-io/date-fns": "^1.3.13",
		"@material-ui/core": "^4.7.2",
		"@material-ui/icons": "^4.5.1",
		"@material-ui/pickers": "^3.2.8",
		"@material-ui/styles": "^4.7.1",
		"axios": "^0.19.0",
		"bootstrap": "^4.4.1",
		"cra-template": "1.0.0",
		"file-saver": "^2.0.2",
		"react": "^16.12.0",
		"react-bootstrap": "^1.0.0-beta.16",
		"react-dom": "^16.12.0",
		"react-scripts": "3.3.0",
		"reactstrap": "^8.2.0"
	},
	"proxy": "http://localhost: 4000",
-
REMEMBER: You will have to add "proxy" to redirect the URLs to the server you point to. This works in development environment.
-
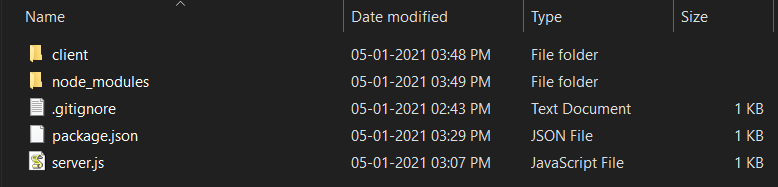
After setting up both client and server, your project folder structure should look similar to image below
Expected Outcome
You should be able to set up the project with the required dependencies.
Developing the React components
Developing modularised code makes each module easier to understand, test and refactor independently of others. In this task, you will be developing your own custom components which will be tied together into your root component.
Requirements
- Create your main component say "Resume" component which will call all other components in sequence. Create the state object to store property values inputted in the form which belongs to the component. When the state object changes (user puts in his details), the component will re-render with the updated values.
 state = {
    step: 1,
    firstname: '',
    lastname: '',
    email: '',
    phone: '',
    github: '',
    linkedin: '',
    facebook: '',
    instagram: ''
 }
- You need to create some common methods for all components for easy back and forth navigation without the loss of already inputted details.
nextStep = () => {
    const {step} = this.state;
    this.setState ({
        step: step + 1,
    });
};

prevStep = () => {
    const {step} = this.state;
    this.setState ({
      step: step - 1,
    });
};

handleChange = ({target: {value, name}}) => {
    this.setState ({[name]: value});
};
-
Build your first component, let's say "Profile" component for inputting personal details like firstName, lastName, email, mobile, personal website link, Facebook, LinkedIn, Twitter, etc.
-
Similarly create other basic components to take the Education, Experience, Projects and other extra details which you wish to add to your resume.
A sample part of input component you will be developing:
<Paper className={classes.padding}>
  <Card>
    <CardHeader title="Education Details" />
  </Card>
  <CardContent>
    <div className={classes.margin}>
      <Grid container spacing={2} alignItems="center" lg={12}>
        <Grid item md={4} sm={12} xs={12} lg={4}>
          <TextField
            margin="dense"
            variant="outlined"
            name="college"
            label="College/University"
            style={{width: '80%'}}
            required
            value={values.college}
            onChange={this.props.handleChange}
            InputProps={{
              endAdornment: (
                <InputAdornment position="start">
                  <SchoolIcon />
                </InputAdornment>
              ),
            }}
          />
        </Grid>
      </Grid>
    </div>
  </CardContent>
</Paper>
- Once, you are done with developing these components, now it's time for an XMLHttpRequest to the NodeJS server for dynamically processing and formatting the resume in the template. To do so, you have to make XMLHttpRequests from browser (Client) side to your server. Explore various methods available to perform this subtask. One simple method is to use axios.
References
-
You may refer to How to build React Multi-Step Form for complete understanding & developing of multi-step form.
Tip
-
You need some count/step value which will help will exactly render a particular page/step of your multi-step form.
-
Clicking on "Continue to Next Step" button will submit a form by default. You will have to prevent this nature of the same. To do so, use preventDefault() method.
-
You may use following Material UI icons to style the form:
- LinkIcon
- FacebookIcon
- LinkedInIcon
- TitleIcon
- SchoolIcon
- DescriptionIcon
Expected Outcome
You should be able to develop modularized components as well as manage and handle the state properly, also integrating these components.
Developing server side logic
Most of the code logic developed to support a dynamic website must run on the server. Any client-server model is usually a request-response model. The browser either requests for web pages (GET) or sends some data to the server (POST) for performing some action. Most of the websites today on the web have some kind of forms, say for login/register form, contact-us form, feedback form, etc. The data entered in this form is passed to the server for further processing and then perform suitable actions. In this task, you will be creating GET and POST routes for handling the requests and sending appropriate responses.
Requirements
-
Create a basic server setup using NodeJS and ExpressJS (as a middleware). Use BodyParser which will parse incoming request bodies in the middleware before the handlers.
-
You need to create POST route for handling the submitted form data and parsing it properly to extract the actual information.
-
Now pass the data to your HTML template, properly format it so there are no errors.
`
<html>
  <body>
    <div class="rela-block caps greyed">Education</div>
    <h3 class="mb-0">${college}</h3>
    <p class="text-muted light mt-0 mb-1">${fromyear1}<span class="mx-2">to</span>${toyear1}</p>
    <p class="justified mt-0 mb-1" style="font-size: 17px;">${qualification1}</p>
    <p class="justified mt-0 mb-3" style="font-size: 17px;">${description1}</p>

    <h3 class="mb-0">${school}</h3>
    <p class="text-muted light mt-0 mb-1">${fromyear2}<span class="mx-2">to</span>${toyear2}</p>
    <p class="justified mt-0 mb-1" style="font-size: 17px;">${qualification2}</p>
    <p class="justified mt-0 mb-1" style="font-size: 17px;">${description2}</p>
  </body>
</html>
`;
-
The above code block is a part of a sample HTML template. The values like
college,toyear1,qualification1,description1are received from the submitted form. You can use template strings which will allow you to embed expressions or variables. -
You might have explored various HTML to PDF conversion libraries. Now use it for format conversion. You may use html-pdf which has various customizable options like orientation, format, height, width, pagination, etc. provided.
-
Now send the generated PDF to the client as the HTTP response. You might need convert the received response to PDF again (if you used axios for XMLHttpRequest), as the file received will either be in the
bloborarraybufferformat, so you need to re-convert it to PDF. For doing this, use saveAs library on the client side. -
Using axios, you can do it as follows:
createAndDownloadPDF = () => {
  axios
    .post ('/create-pdf', this.props.values)
      .then (() => {
        axios
          .get ('fetch-pdf', {responseType: 'arraybuffer'})
          .then (res => {
            const pdfBlob = new Blob ([res.data], {type: 'application/pdf'});
            saveAs (pdfBlob, `${this.props.values.firstname}'s Resume.pdf`);
          })
          .catch (err => {
            console.log (err);
          });
      })
      .catch (err => {
        console.log (err);
      });
};
Expected Outcome
You should be able to generate error-free & well-designed resume in PDF format using pre-built templates.