You will be building a real-time web chat app (basic Slack clone) using React-Redux and deploying that app using Firebase.
Objective
Project Context
Slack is one of the leading messaging platforms which is used by working professionals for work related communication and is popular among college students too. Slack has many benefits over other messaging platforms in the market.
For a professional, applying for a software role, their resume needs to have credible eye-catching self-made projects and this is exactly one such project. As an individual, it is a mammoth task to make a ‘perfect’ slack clone because there are many minute aspects that need a lot of implementation time. Thus, you are not expected to build the ‘perfect’ one. A web messaging app that resembles its major features is the outcome of this project.
This project is a challenging project for beginners, the perfect project idea for intermediates and a routine project for professionals. This project uses an intermediate-advanced level of React-Redux concepts and foundational basic knowledge of Firebase databases. Reason for following this tech-stack is that these languages are easy to use and are also fast in terms of execution time.
Product Stages
We can segregate the product architecture based on tools used:
- React - Application’s frontend and core-functionalities
- Redux - Efficient state management of the application
- Firebase - Used for the site’s realtime database, and then for deploying the app and hosting it live
- GitHub - To publish your work
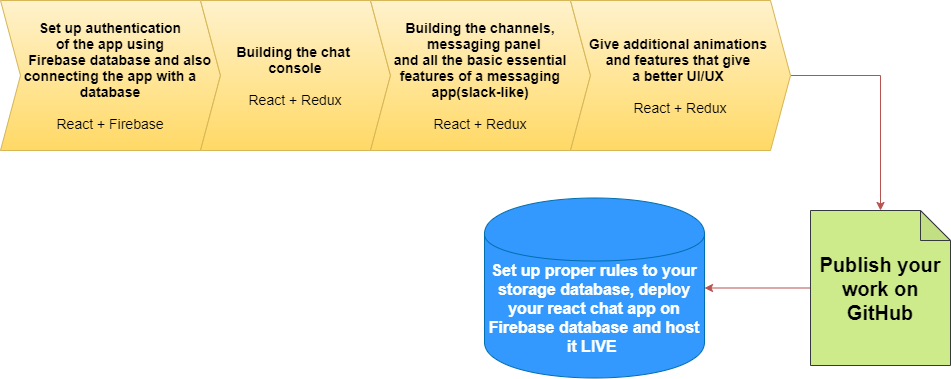
High-Level Approach
- Set up your database on Firebase, create the basic skeleton (all endpoints) of the app starting from validating the user to the endpoint of the UI of the web app.
- Build the UI of the app: the messaging panel, side panel, metadata panel.
- Create extra features like editing/changing a user’s avatar, notification messages, change background colour palette, keyboard shortcuts and some more animations for better user experience.
- Publish to GitHub and finally host your deployed web application using Firebase tools.
The desired end result of this project is like this:
Primary goals
- Build the slack-clone chat app from scratch using React-Redux and secure the app with proper authentication using Firebase as a database.
- Quality testing, Enhancement of features, publishing on GitHub and deploying it on the web to get your hosted URL!!!
Objective
You will be building a real-time web chat app (basic Slack clone) using React-Redux and deploying that app using Firebase.
Project Context
Slack is one of the leading messaging platforms which is used by working professionals for work related communication and is popular among college students too. Slack has many benefits over other messaging platforms in the market.
For a professional, applying for a software role, their resume needs to have credible eye-catching self-made projects and this is exactly one such project. As an individual, it is a mammoth task to make a ‘perfect’ slack clone because there are many minute aspects that need a lot of implementation time. Thus, you are not expected to build the ‘perfect’ one. A web messaging app that resembles its major features is the outcome of this project.
This project is a challenging project for beginners, the perfect project idea for intermediates and a routine project for professionals. This project uses an intermediate-advanced level of React-Redux concepts and foundational basic knowledge of Firebase databases. Reason for following this tech-stack is that these languages are easy to use and are also fast in terms of execution time.
Product Stages
We can segregate the product architecture based on tools used:
- React - Application’s frontend and core-functionalities
- Redux - Efficient state management of the application
- Firebase - Used for the site’s realtime database, and then for deploying the app and hosting it live
- GitHub - To publish your work
High-Level Approach
- Set up your database on Firebase, create the basic skeleton (all endpoints) of the app starting from validating the user to the endpoint of the UI of the web app.
- Build the UI of the app: the messaging panel, side panel, metadata panel.
- Create extra features like editing/changing a user’s avatar, notification messages, change background colour palette, keyboard shortcuts and some more animations for better user experience.
- Publish to GitHub and finally host your deployed web application using Firebase tools.
The desired end result of this project is like this:
Primary goals
- Build the slack-clone chat app from scratch using React-Redux and secure the app with proper authentication using Firebase as a database.
- Quality testing, Enhancement of features, publishing on GitHub and deploying it on the web to get your hosted URL!!!
Getting Started
First validate the idea by doing a low level implementation (Proof of Concept) of the components involved in the project.
This helps you to:
- Get more clarity around the unknowns; For example: What features Slack does or does not have over other chatting apps such as WhatsApp, Telegram, Instagram, Snapchat, etc.
- Get a better understanding of the stages involved in the project; Eg: By doing a proof of concept, you can understand that there are multiple stages in the project such as setting up database, validating the user (using proper authentication), creating the app’s UI and features and finally deploying it to finally host it live.
Requirements
-
Explore the Slack app.
-
You may follow npm (recommended) or yarn to get started with the project.
-
Search for React dev tools and Redux dev tools in Chrome extensions and add them for your own testing purpose.
-
Use react developer tools throughout the project to debug your code better. If new to it refer this to understand how to use it. Also check this out!
-
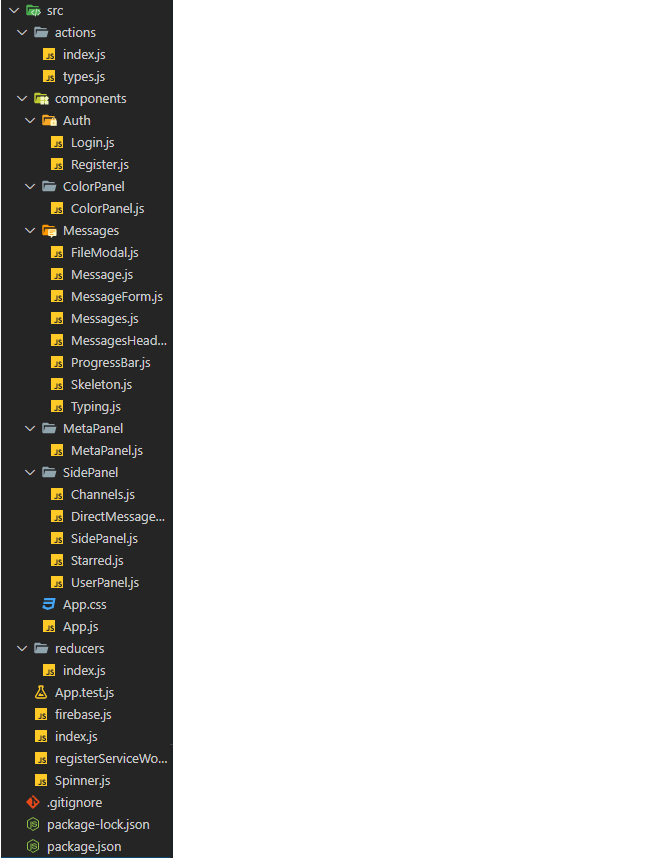
Ideally, this is a React app. So start by creating one and keep only the relevant files needed for the project (all major files are shown below).
-
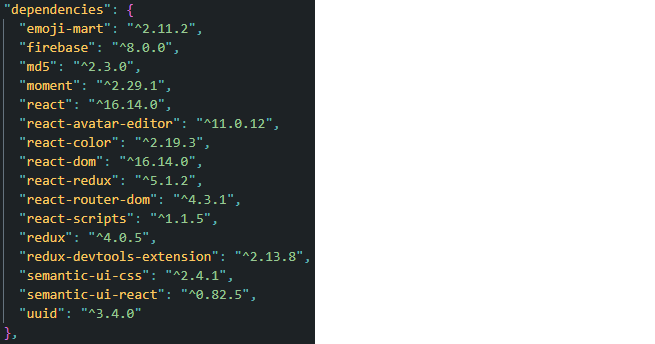
Install necessary dependency packages (you may refer and use the ones mentioned below) using npm (or yarn).
References
- Why use React? and not angular,vue
- Quick tutorial for React , want a lighter tutorial?
- Redux quick reads- 1, 2 , 3
- Firebase quick reads - 1, 2
- .gitignore
User authentication with Firebase
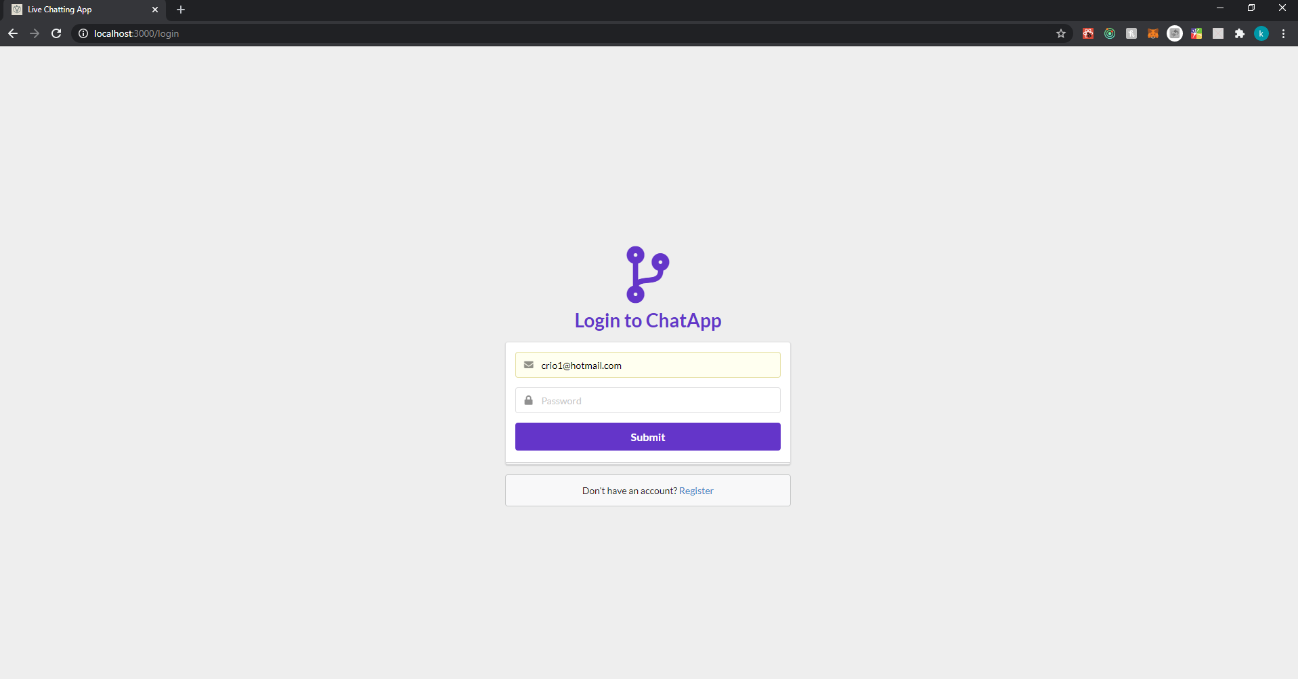
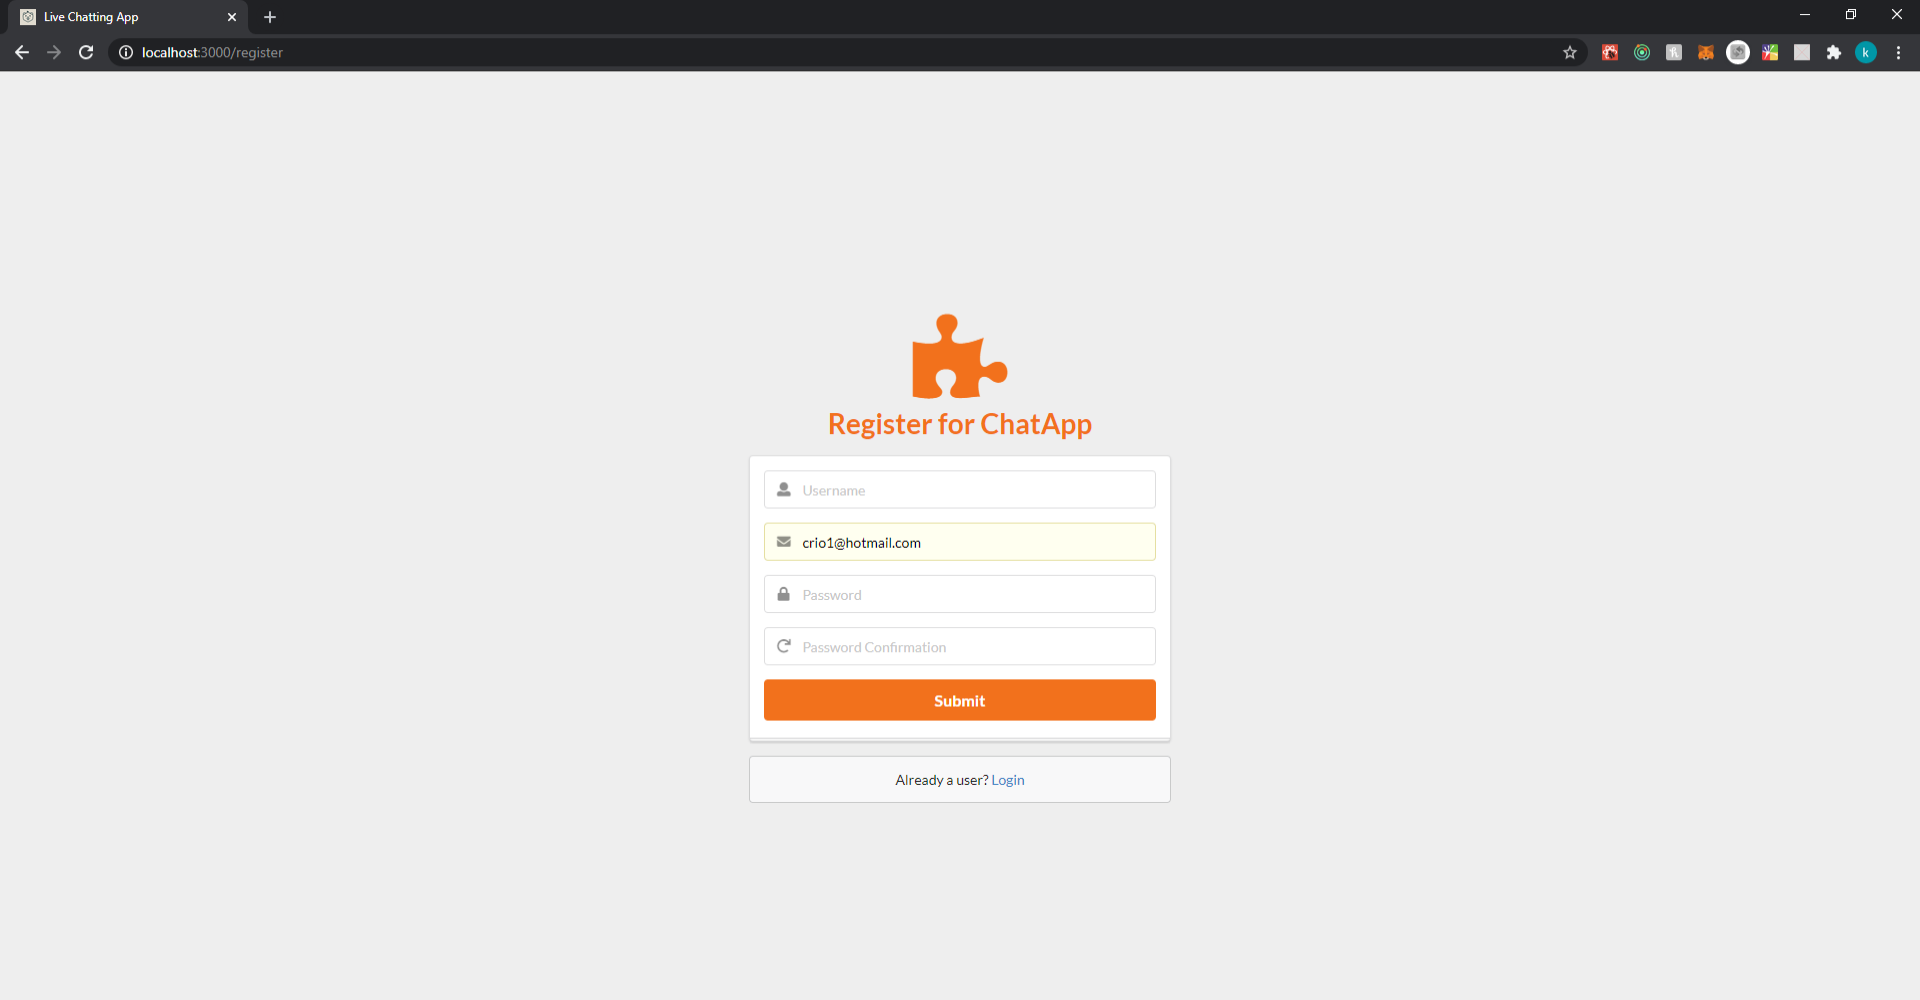
When you visit a website for the first time can you guess which page appears first? Yes, it is exactly what you are thinking. It is the registration page! Set up your database and create login and register forms using React. Further, complete its form validation and authentication error handling by enabling registration of users using email/password through Firebase authentication. The login/register pages should look like these:
Requirements
-
Create basic (UI) forms(like this for starters) for registering and logging in a user using react (you can use semantic-ui react for faster styling). Give specific endpoints for the two forms.
-
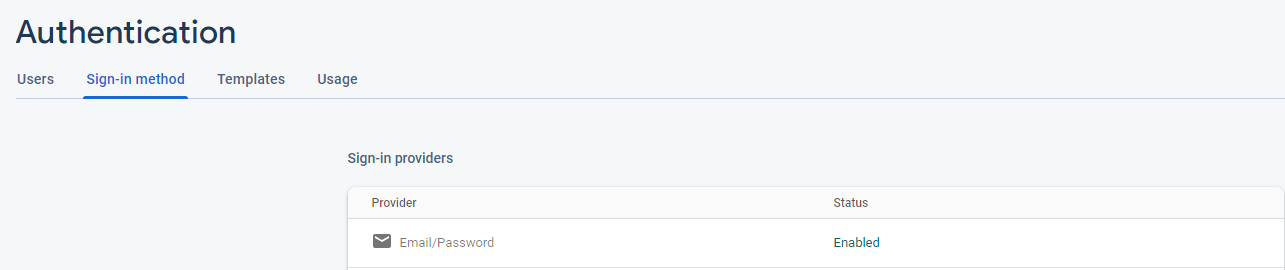
To add functionality to it, register users with email and password and authenticate the user into the database by enabling email/password sign-in method in Firebase. Extend this step further by adding google, Facebook and other sign-in methods too.
-
After registration, make the login page functional, i.e. it should redirect the user to the app page (blank as of now). In case of error in any of the credentials, the appropriate error must be displayed.
-
In the process, make sure that the user is added to the database and the form reloads on submission and clear errors upon successful registration/login.
-
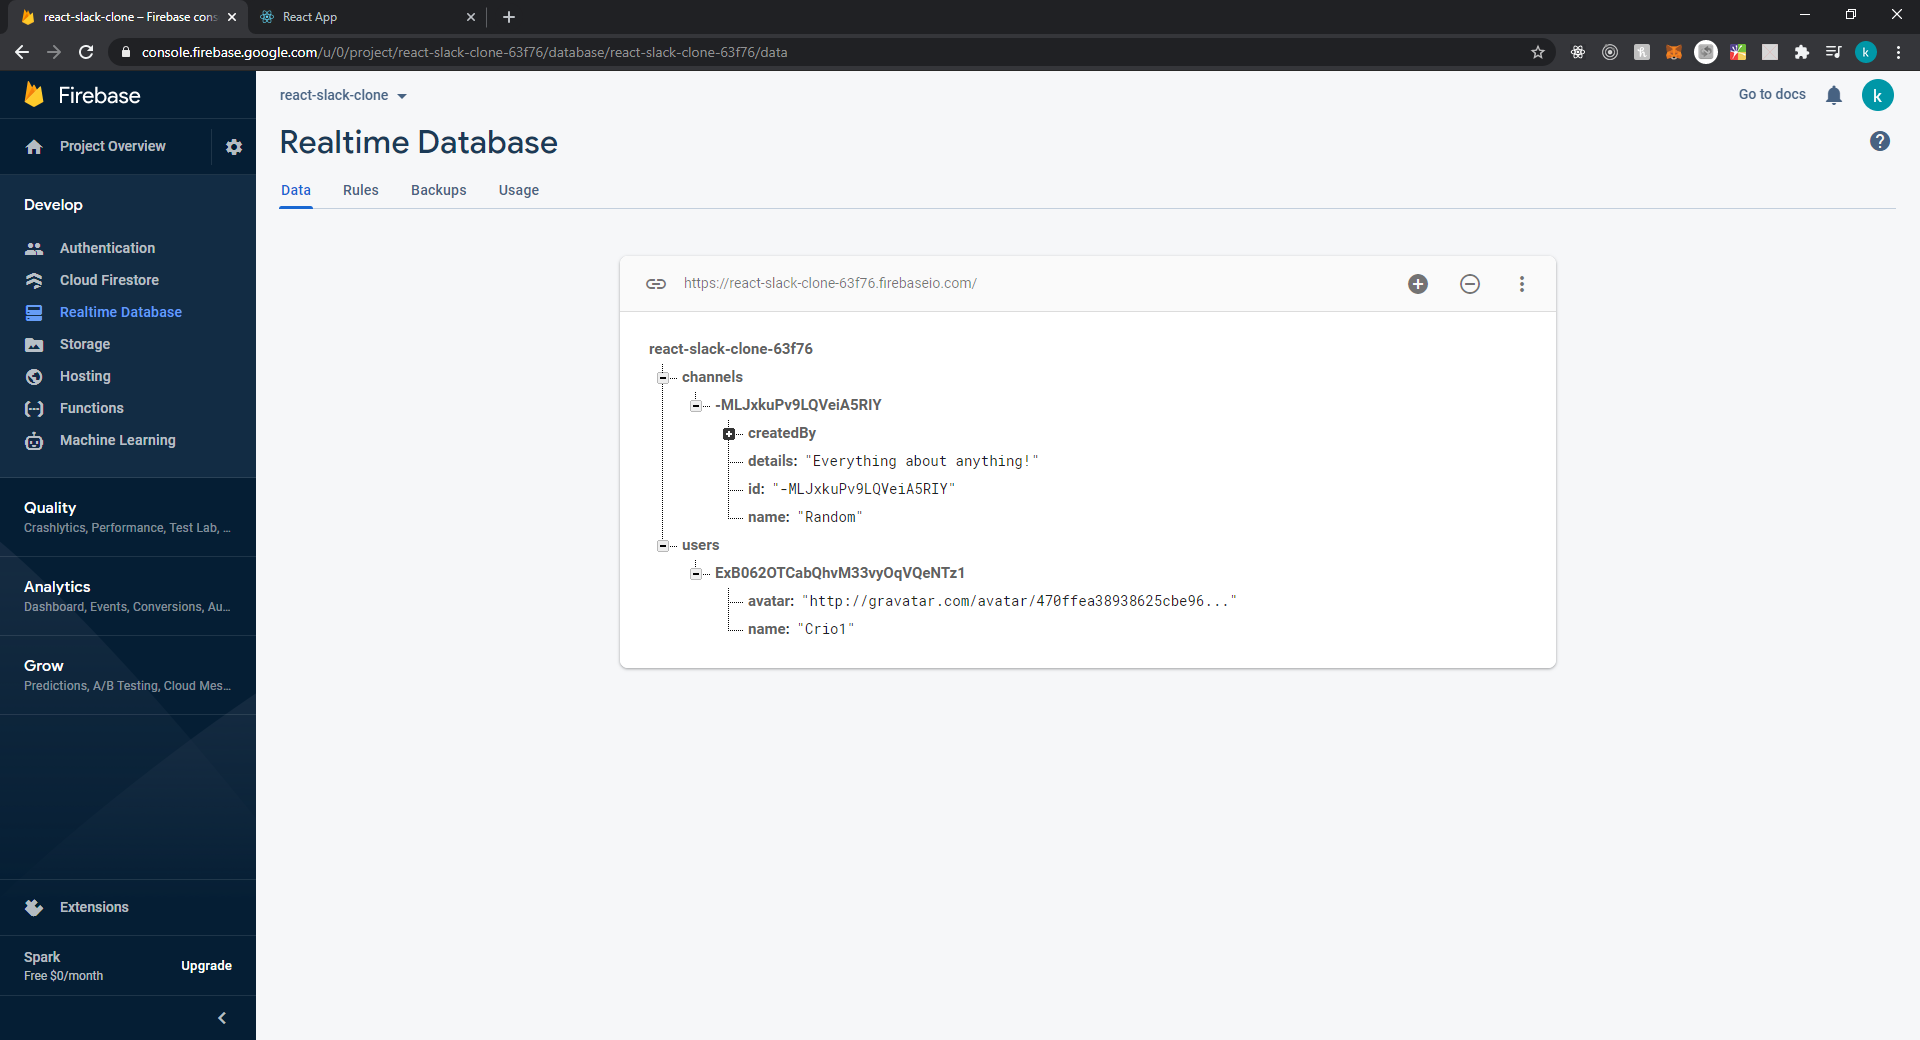
The following figure is what your realtime database (entries) of your application should look like (with respect to the parameters assigned to each user, channel, message,etc.).

References
- Setup up database and connect it to your application, additional reference
- The entire structure of a modern React app
- Validation form template
- Create validation forms using Semantic UI
- Example but using JQuery
- Firebase authentication - 1, 2
- Exceptional handling in React
- Error handling in React
Expected Outcome
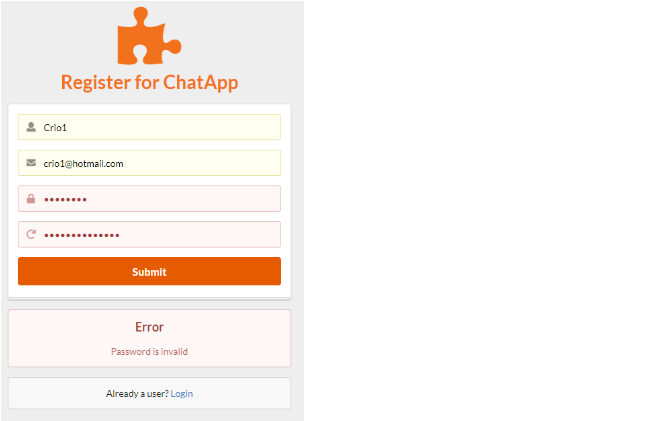
At this point the login/register pages must be made along with its error handling. Also the user must be redirected to the main app page (a dummy one for now) upon successful login. Check for all sorts of errors (email, password, password confirmation error) in the forms and give appropriate errors for each. Test the form to ensure that any user will be registered uniquely and after that will only be allowed to login (no duplicate registrations). Try making different permutations of errors possible to test your app’s functionality. One such error is shown below when passwords are wrong-
Getting user data into Global state and creating app components
Make the user data available on global state and then build the basic app components like side panel (which will consist of all the user info, channels info), metadata panel (a fancy channel-specific component which gives information about the channel, like its details, posters, etc.) and finally the messages section (in the middle, where all the messaging will take place).
Requirements
-
Use a firebase listener to see whether a user is logged in or not and redirect them to the main application page.
-
Use redux to make user data available on global state. This will pass the props from parent to grandchild components without having to pass the props through all child components.
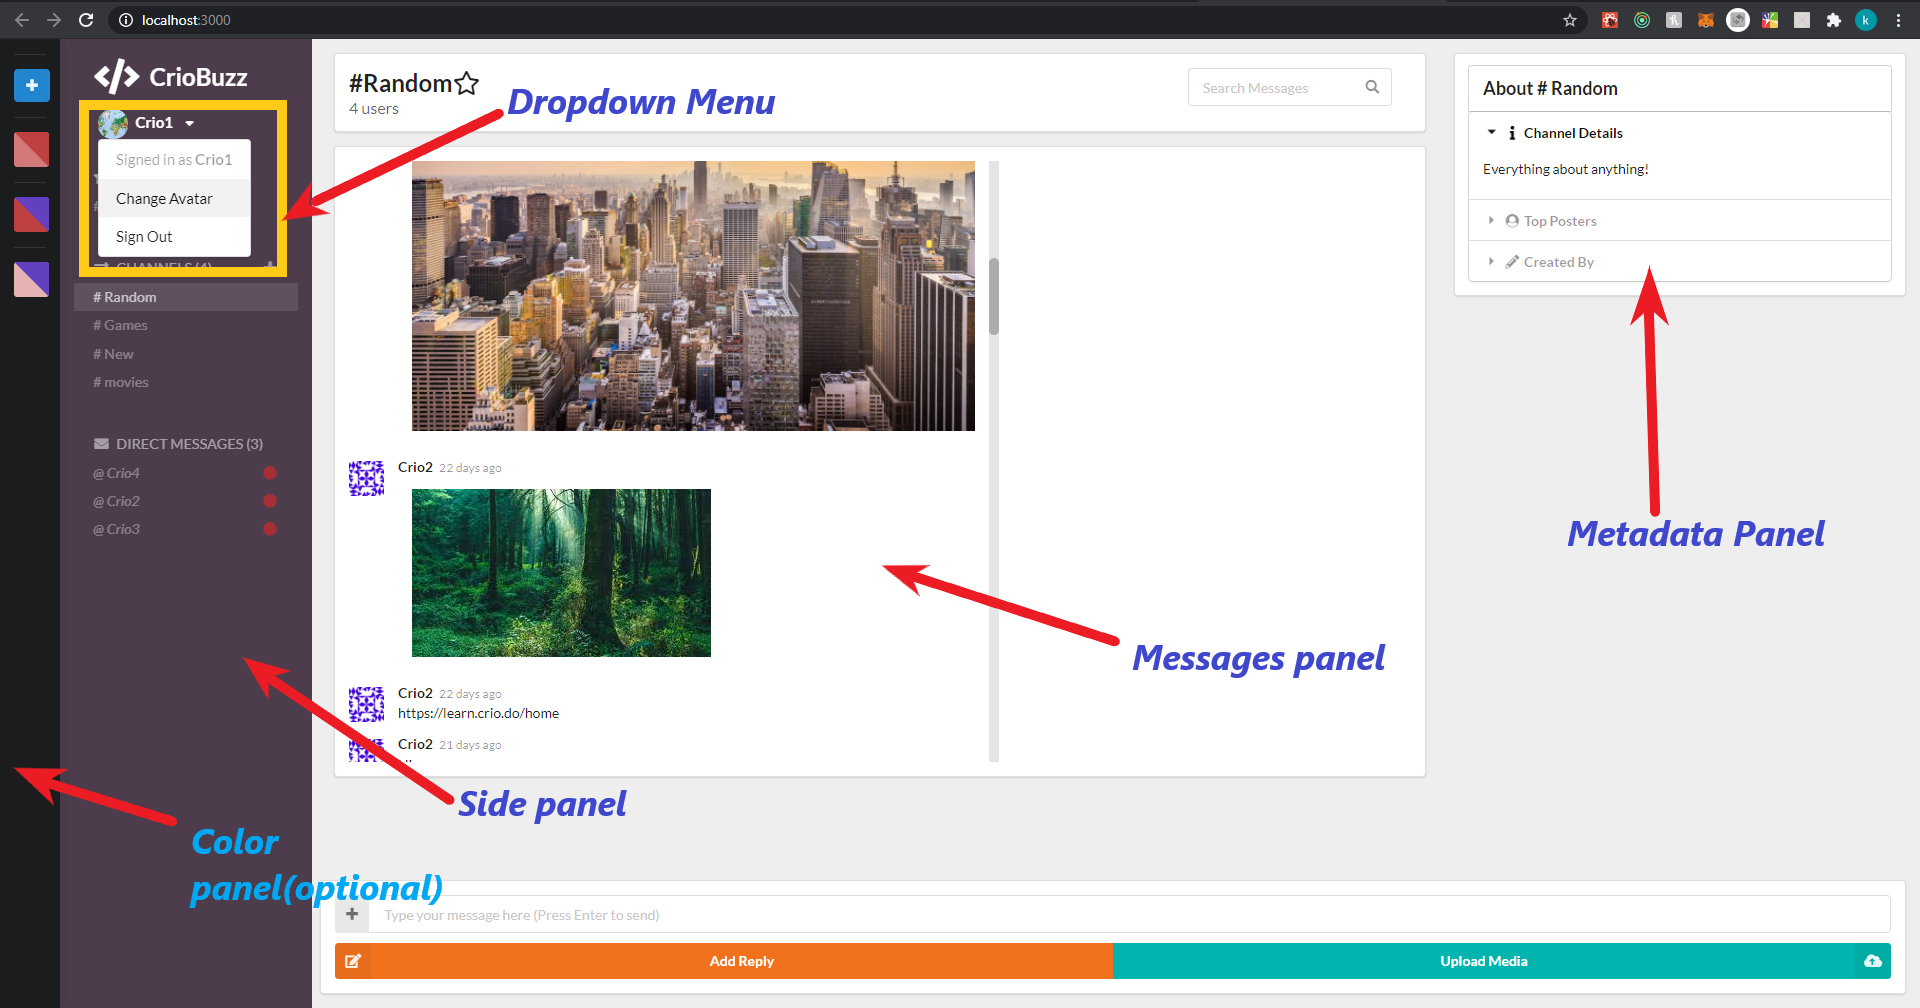
-
Then start scaffolding the app components as shown in the following image (side panel, messages, metadata panel and user). Scaffolding here refers to creating the skeleton form on which the functionality work is to be done.
-
Build the app header and the dropdown of the user panel.
-
In the dropdown, add sign-out functionality, avatar (only mentioned now) and make a mention (using redux state via props) of the user details that are signed in currently.
-
All the components mentioned in the previous point will have its place in the final app like this-
-
Don’t get intimidated but rather get excited after looking at the above image. This image is just to give you a familiarity of the terminologies followed.
Bring it On!
Make a spinner animation to keep the user engaged while the page is still loading.
Expected Outcome
The UI of the app should pretty much look like the image given below.
Test your app – Login/sign-out to see the buttons work. After successful login, all login/register pages should take you directly to the app. Check if user information is loaded in the database (with all necessary parameters you feel are important like name, avatar, etc.). See if you are able to display the correct details of the user that is signed in.

Adding channels (public) into the side panel
Create the most essential part of the app, the channels (public in this milestone). Do this by first making modals for adding channels. Make it fully functional; in the sense that the channels’ exact metadata (all that are relevant like channel name and description for starters) should be fed into your database once a user creates one. After successful creation of a channel, the channel (public) must be displayed on the side panel as shown in the images ahead.
Requirements
- Add channels component; create a modal for adding channels and then add them to the database as and when a user creates one. Using modals will enable screen overlay and have better visual appeal.
- Display channels (may use child_added listener) and put it on global state (using reducers is recommended).
- Important step to be done – Set the first channel as default on page load. Users should not see a blank page on reload but instead a default channel.
Bring it On!
Take care of critical exceptions like when a channel component is mounted, a listener function should be toggled. But when the component is unmounted, those listeners should also be removed.
Expected Outcome
Run the Script and monitor the behaviour of your channels and compare it with that of Slack. Users should be able to create channels (public only) in which they can chat (yet to be implemented).
-
Database with added channels
-
Channel modal (template example)
.png)
-
Final UI after addition of channels

Messaging section
Start building the messaging section now. Start just like milestone 3. Scaffold the message components. Create a message collection and add your first message to the database. Further, give the additional feature of uploading media files as messages into the messaging panel.
Requirements
- Scaffold the message components and form a skeleton UI as desired in the final app.
- Create message collection in your database using custom components and props and add your first message to the database.
- Make sure that the submit button is disabled on sending a message and the message is cleared from the input messaging panel using controlled input.
- Now the message is stored in the database collection. Display them in the messaging panel using componentDidMount lifecycle method.
- Create a file (photo for starters) modal to upload photos. Keep the media file in state, use a validation step to ensure it is a file. You may use MIME type validation to indicate specific file types like .png and .jpg/.jpeg.
Bring it On!
Develop a progress bar to indicate the percentage of file upload that has been completed.
Expected Outcome
Since the messaging functionality has been implemented the output (display in the messaging panel) of your first message should look something like this -
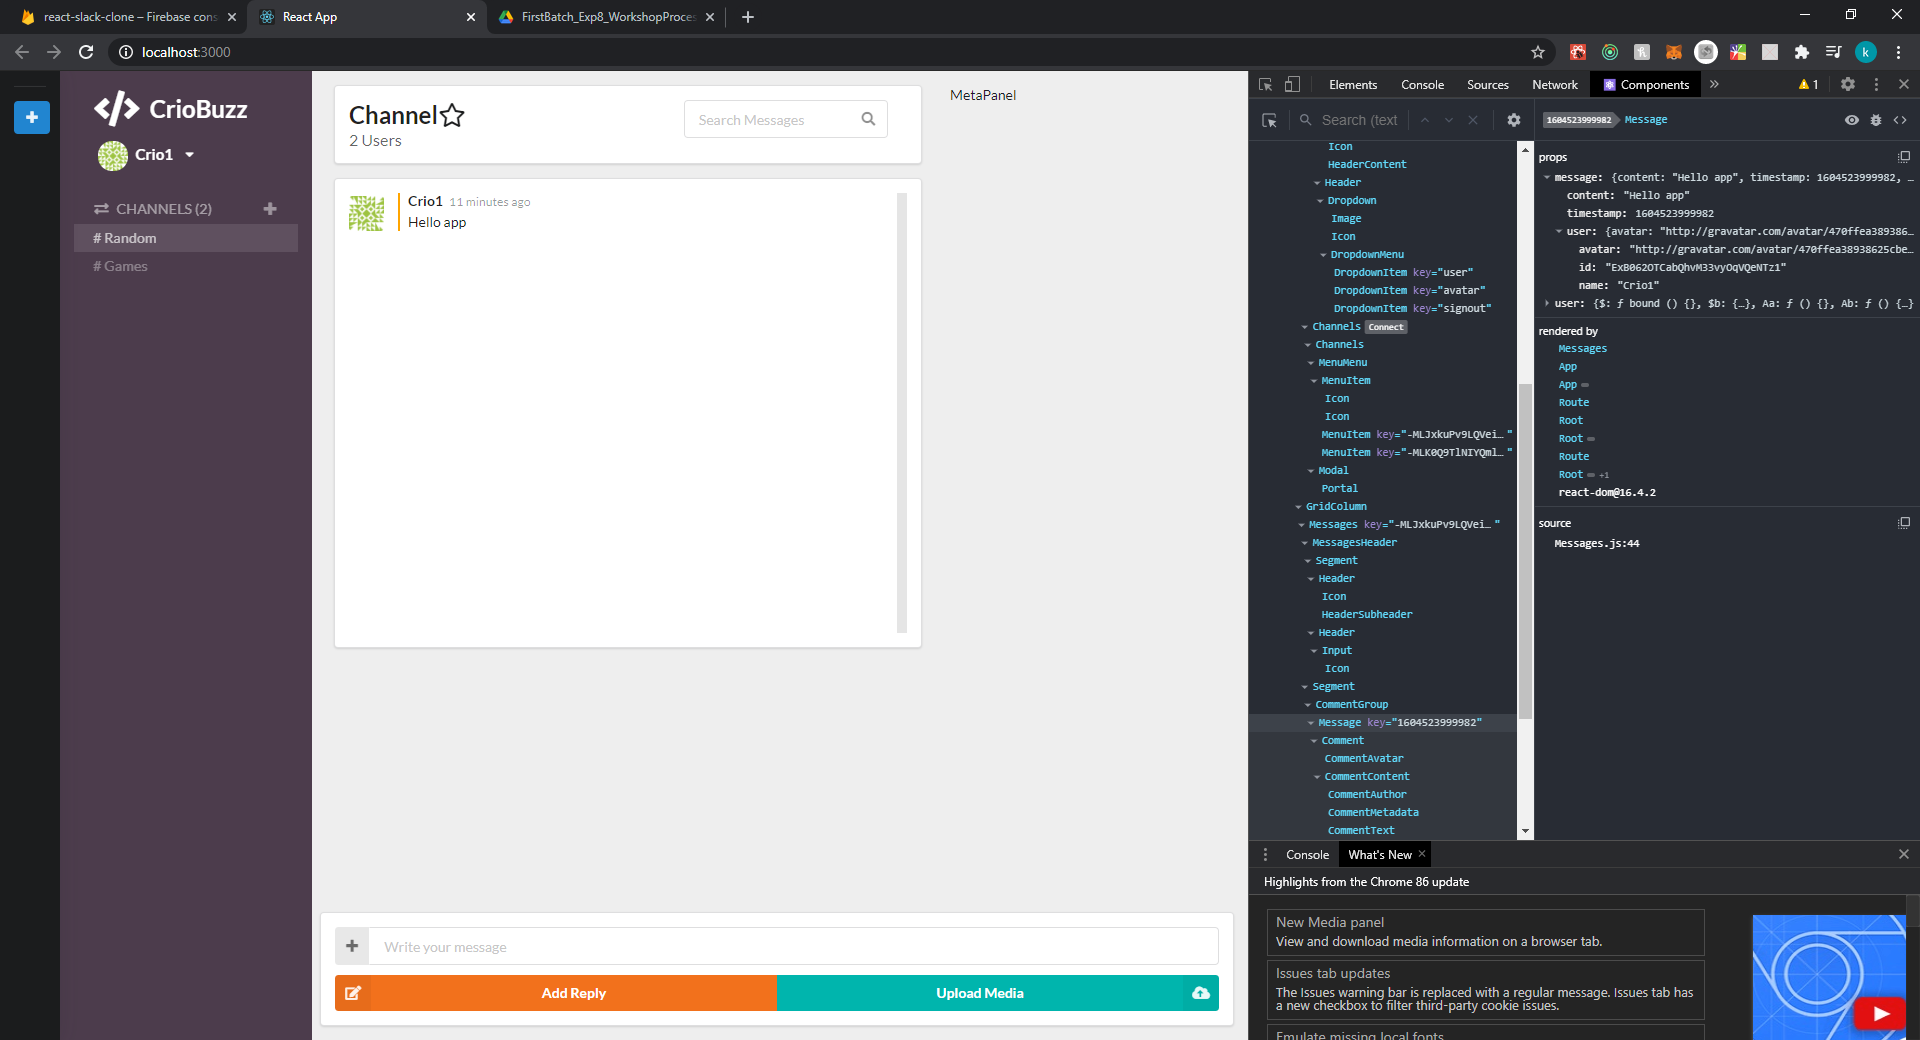
Use react dev tools (components) to track every component. This is a good practice for debugging. You may start by tracking your messages, i.e. by seeing the contents that are being stored in the props for a particular message and how you can use/correct it; something like this (check out the ‘messages’ highlighted selection and its corresponding properties on the right side) -
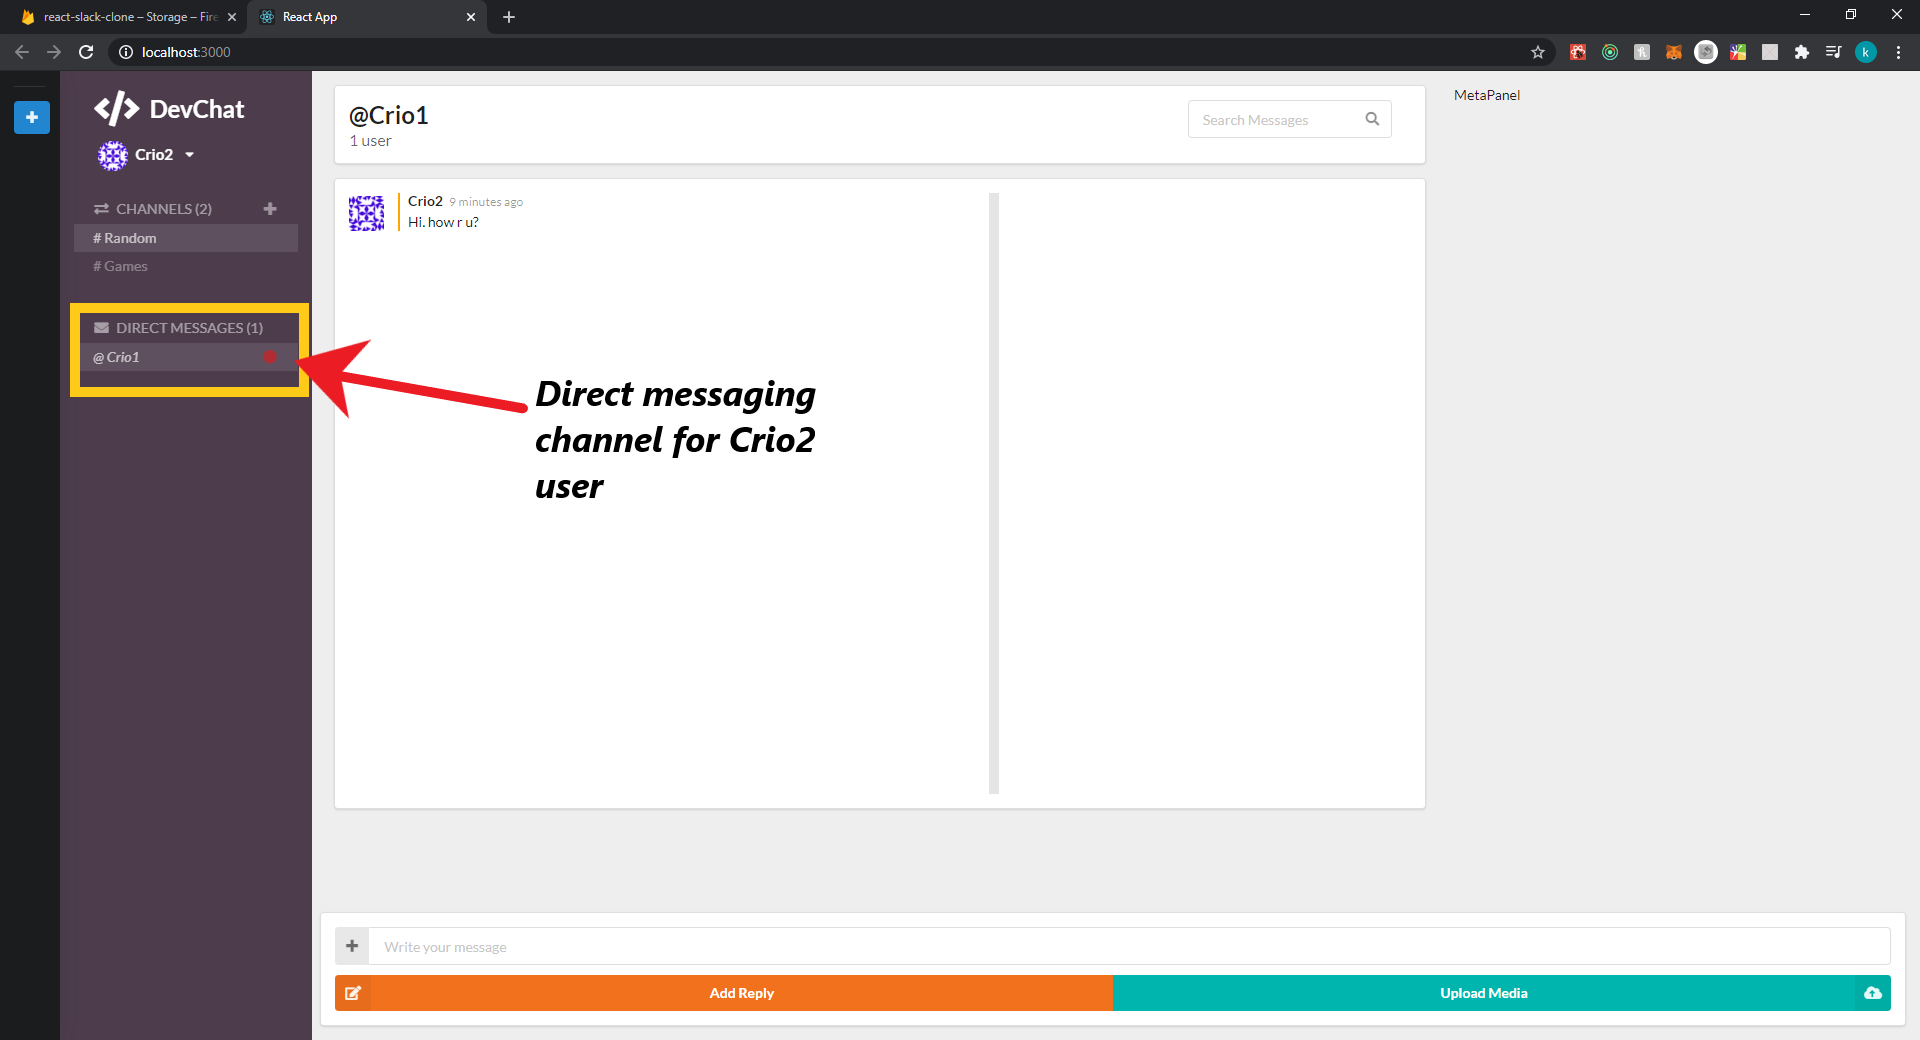
Private DM messaging section
Similar to messaging apps, we need a feature of messaging directly and privately to some other user, which is called a Direct Message (DM)
Requirements
- Just like in milestone 4, start by creating a channel for Direct Messages. Add all users to the DM channel (that is convenient for now).
- Keep the data of the DM channel in the global state and set it as private.
- Finally implement the messaging functionality. Point to be noted here is that each set of messages of a private channel should be limited to that channel’s scope only. So, implement the private class to all such relevant areas.
Bring it On!
- Display if the user is online/offline
- Display active message channel
Expected Outcome
The direct messaging feature of the app should look like this -
Enhance your application by implementing some more cool features
Till now, you have set up your web chat app’s basic form. Now it’s time to spice up the app by adding some cool interesting features.
Note: This is an optional milestone for those who want to go that extra mile.
Requirements
Here are some recommendations you can adopt to make your app even better:
- Users should be able to change their avatars
- Users should be able search messages - Use regex and searching algorithms
- Users should get notified for new messages
- Users should have the option of starring (bookmarking) their favorite/important channel
- There can be a metadata panel which displays the metadata of a specific channel such as the channel’s creator, posters, and description
- Users should have the feature of adding emojis while writing a message
- The app can have some keyboard shortcuts, like pressing one key to send a new message or press a combo-key to type in a new line
Expected Outcome
Your final application should function similar to the demo shown below. Do keep improving your app post this stage.
Deploy the application and Host it Live!
It’s time to put your app out in the world by hosting your app live on the web. Give appropriate database and storage rules. Then build your app and deploy it on firebase. Finally host it live.
Requirements
-
Use firebase tools to build your app. Give appropriate rules to your realtime database and storage, similar to these
.png)
.png)
-
Then deploy the app on Firebase.
-
Finally host it to get your own URL.
Share your unique URL among your peers and proudly mention it in your resume and be one-step ahead of the crowd.