An end to end application which demonstrates how we can implement authentication in an application using Node.js and JSON Web Tokens and some good practices.
Objective
Project Context
Authentication is the primary requirement of any application (web/mobile). To start using an application today authentication is the first step we need to pass. It is the most important step in any application as it keeps the app secure by ensuring the users are verified. In this project, we will first implement the most basic form of authentication i.e. user-id and password based authentication. Whenever we log in to any application by giving our credentials (user-id & password) we are allowed to access the different pages of the application without us re-entering our credentials in each and every page.
Think this over - If HTTP is a stateless protocol (i.e. every request to the server is independent of the previous request and server doesn't know anything about client) then how will the server know that the client is requesting for something is valid (i.e. authenticity of the user and the request)?
Example - Let's say we are using Gmail. To access our emails via our Gmail account we need to give our credentials (email-id & password) to get past the security steps. Here what happens is that a request is sent to the server and since the request contains the credentials (in some form), the server can verify the authenticity of our request, and give us access to our Gmail accounts. But let's suppose we again type 'gmail.com' in the browser after sometime i.e. we are again sending a request to the server for our account access, and as before the server doesn't know anything about us. So, logically the server will ask you again for your credentials (i.e. email-id & password) but do we need to re-enter our credentials again? We don't. Server will give us the required access again this time too without us re-entering our credentials.
But how this is possible because the second time also the server doesn't know anything about the user. How did it give access to the Gmail account again without verifying who the user is?
In this project you will understand this by implementing the authentication system using Node.js. You will learn about different methods of authentication. Implement them, evaluate and identify their downsides and then look at ways to improve them.
Project Stages
We will build the following -
- Some APIs using
Node.js. Specifically, some public and 1 private API. - Implement the entire Authentication in the backend.
- See each version of your implementation in action by testing it on a pre-built frontend application.

High-Level Approach
- Setting up
Node.jsand learnnpm - Understanding how to create a web server and create some basic REST APIs
- Introduction to
Express.jsframework and simplifying REST APIs - Setting up the frontend of our application and implement public/private APIs
- Introduction to
JWTand improving our authentication logic - Learn and implement some good practices
Objective
An end to end application which demonstrates how we can implement authentication in an application using Node.js and JSON Web Tokens and some good practices.
Project Context
Authentication is the primary requirement of any application (web/mobile). To start using an application today authentication is the first step we need to pass. It is the most important step in any application as it keeps the app secure by ensuring the users are verified. In this project, we will first implement the most basic form of authentication i.e. user-id and password based authentication. Whenever we log in to any application by giving our credentials (user-id & password) we are allowed to access the different pages of the application without us re-entering our credentials in each and every page.
Think this over - If HTTP is a stateless protocol (i.e. every request to the server is independent of the previous request and server doesn't know anything about client) then how will the server know that the client is requesting for something is valid (i.e. authenticity of the user and the request)?
Example - Let's say we are using Gmail. To access our emails via our Gmail account we need to give our credentials (email-id & password) to get past the security steps. Here what happens is that a request is sent to the server and since the request contains the credentials (in some form), the server can verify the authenticity of our request, and give us access to our Gmail accounts. But let's suppose we again type 'gmail.com' in the browser after sometime i.e. we are again sending a request to the server for our account access, and as before the server doesn't know anything about us. So, logically the server will ask you again for your credentials (i.e. email-id & password) but do we need to re-enter our credentials again? We don't. Server will give us the required access again this time too without us re-entering our credentials.
But how this is possible because the second time also the server doesn't know anything about the user. How did it give access to the Gmail account again without verifying who the user is?
In this project you will understand this by implementing the authentication system using Node.js. You will learn about different methods of authentication. Implement them, evaluate and identify their downsides and then look at ways to improve them.
Project Stages
We will build the following -
- Some APIs using
Node.js. Specifically, some public and 1 private API. - Implement the entire Authentication in the backend.
- See each version of your implementation in action by testing it on a pre-built frontend application.
High-Level Approach
- Setting up
Node.jsand learnnpm - Understanding how to create a web server and create some basic REST APIs
- Introduction to
Express.jsframework and simplifying REST APIs - Setting up the frontend of our application and implement public/private APIs
- Introduction to
JWTand improving our authentication logic - Learn and implement some good practices
Setting up environment and start learning Node.js fundamentals
In this module we will learn about Node.js. Then we will install all the required things and initialize an empty project.
Requirements
- Install the following required things -
- Install
Node.json your machine from here. This will automatically install npm. - Install any code-editor of your choice. I have used 'Visual Studio Code' and have attached screenshots from that.
- Download Postman and learn how to use it for API testing. You can get started on using it by referring this.
- Install
- Learn what is
npmand how it works from here. - Learn what is
Node.jsand how it works. This video will help you. - Familiarise yourself with basic
npmcommands and try them on your own. This is a good article to get started with it. After that -- Create an empty node project
- Install dependencies jsonwebtoken, dotenv and express for your project
- Initialise a git repository. As you have learned, the
node_modulesfolder can be re-built using thepackage.jsonfile. So, you don't need to push thenode_modulesfolder to your git repo(as it is usually big). So, add thenode_modulesfolder to '.gitignore' file.
Tip
- I am using node version 14. Though the project can be implemented using any node version but it is recommended to use node version 14+.
- Visual Studio Code has an integrated terminal. To open it use
ctrl + `. - Trouble setting up Node.js? - Video showing how to install node
- I am assuming you have gone through basic-
npm-commands. Use the following commands to reach the stage (refer expected outcome section) I am currently in -
npm init --yes
npm install --save express jsonwebtoken dotenv
Bring it On!
- Delete
node_modulesfolder and figure out how you can rebuild it.
Expected Outcome
- After successfully installing
Node.js, open your terminal and typenode --version. If you will get your version in return, you are good to go.

- After you completed the aforementioned tasks your newly formed
package.jsonfile should be like this (w.r.t. the dependencies section) -
{
  "name": "basic-authentication",
  "version": "1.0.0",
  "description": "",
  "main": "index.js",
  "scripts": {
    "test": "echo \"Error: no test specified\" && exit 1"
  },
  "keywords": [],
  "author": "",
  "license": "ISC",
  "dependencies": {
    "dotenv": "^8.2.0",
    "express": "^4.17.1",
    "jsonwebtoken": "^8.5.1"
  }
}
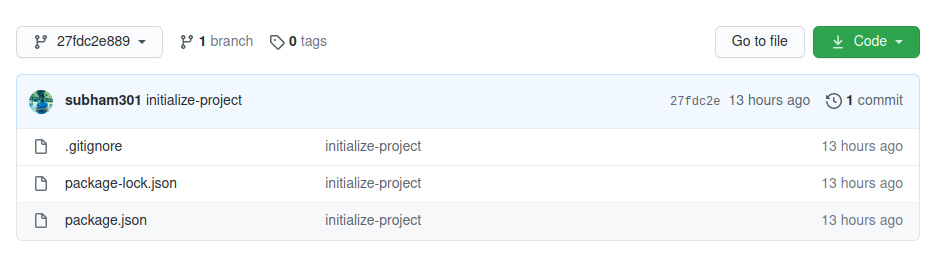
- You should have the following files in your git repository. Note that you don't have
node_modulesfolder here
Understanding how to create a web server and create some basic REST APIs
To get an understanding of the backend of an application we need to understand a few concepts like HTTP module, servers and using them to create APIs. In this task you will learn about web app servers, connecting your app to a target server and run the app on localhost to test out the app. Also the concept of API will be briefed here.
Requirements
- Get a basic understanding of Event and Event Emitters in
Node.jsby going through this video. - Understand the HTTP module in
Node.js. This video should be a good start. After that try to go through the official documentation. - Create a server listening to any port. For the rest of the project, we will stick to port
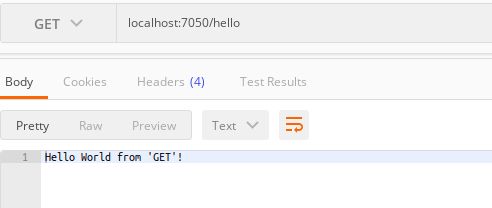
7050. - To understand server creation, using HTTP modules create a REST API with URL endpoint
/hello. This API should output "Hello World!" in the web browser on the specific port that the server is run on. Check the output using Postman API or at the URL-http://127.0.0.1:7050. - Study what query and path parameters are in an URL and how we can use them, then learn them. This video should help you to get started.
References
- Crio Bytes (free) - HTTP, REST
- REST API
- Hello World! REST API
- Video explaining Event Loop in Node.js
- SOAP vs REST API
Tip
- How to access the request method using the
HTTPmodule? - HTTP request method - How to use query parameters using
HTTPmodule? - You can access the entire uri path usingrequest.url. And after that try to think of some way to access query parameters by splitting the string after "?".
Bring it On!
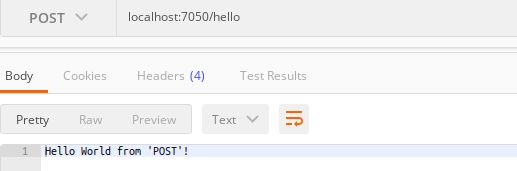
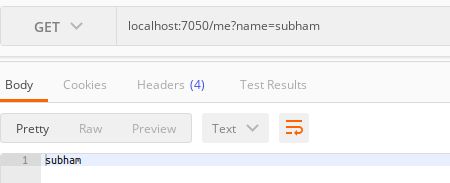
- Try to implement the following simple APIs -
| Endpoint | Response | Description |
|---|---|---|
GET /hello |
Hello World from 'GET' | |
POST /hello |
Hello World from 'POST' | |
GET /me?name=<YOUR_NAME> |
<YOUR_NAME> | name is a query parameter |
GET /me/<YOUR_NAME> |
<YOUR_NAME> | name is a path parameter |
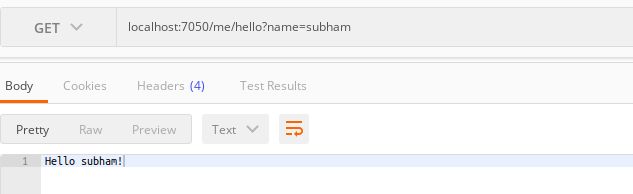
GET /me/hello?name=<YOUR_NAME> |
Hello <YOUR_NAME> | name is a query parameter |
GET /me/hello/<YOUR_NAME> |
Hello <YOUR_NAME> | name is a path parameter |
Expected Outcome
- GET /hello
- POST /hello
namequery at /me
- /me path

namequery at /me/hello
- /me/hello path

Introduction to Express.js framework and simplifying REST APIs
Requirements
- Learn how to build an API using
Express.jsframework ofNode.js. This video helps you to get started with it. Also go through the official documentation. - Implement all the APIs you built in the previous module again using
Express.jsframework to understand how well the code can be written using this framework.
References
Expected Outcome
- As in previous module, you should get the following output
| Endpoint | Response | Description |
|---|---|---|
GET /hello |
Hello World from 'GET' | |
POST /hello |
Hello World from 'POST' | |
GET /me?name=<YOUR_NAME> |
<YOUR_NAME> | name is a query parameter |
GET /me/<YOUR_NAME> |
<YOUR_NAME> | name is a path parameter |
GET /me/hello?name=<YOUR_NAME> |
Hello <YOUR_NAME> | name is a query parameter |
GET /me/hello/<YOUR_NAME> |
Hello <YOUR_NAME> | name is a path parameter |
Setting up the frontend and implement the public/private APIs
We will be building a small part of Linkedin where a user can register themselves and everyone on the platform will be able to see the profile of other users and the user will be able to update their details as well. A few points to keep in mind -
- A user can view every profile even when the user is not logged in.
- User details' edit access will only be limited to that user only. Administrator access implementation is something you should work on later.
Requirements
- Set up the frontend that we will be using for our testing by following instruction mentioned here
- Learn about HTTP response status codes and different HTTP methods then build the following APIs using Express.js -
-
Register API with following specifications -
- Take
username,password,name,college,year-of-graduationand register the user - If the
usernameis already taken by some other user, this should return a400error response
- Take
-
API to get list of all the users registered with us
Your response should look something like this - [ { "username": "subham301477", "name": "Subham Agarwal", "college": "Jadavpur University", "year-of-graduation": 2020 }, { "username": "deepak97", "name": "Deepak Baid", "college": "Regent Education", "year-of-graduation": 2021 } ] -
API to update the user-details
- This API will differ from above APIs as this API should succeed if the user sending the request is legitimate. The simplest way is that whenever a user sends this request, they will send
usernameandpasswordalong with the information they want to update. - A sample request will look something like -
{ "username": "subham301477", "password": "my_password", "college": "Updated College Details", "name": "Subham Agarwal", "year-of-graduation": 2019 }- Notice that we are sending all the information even of those which we don't want to update. This API should return
401status code in caseusername/passwordis incorrect otherwise it will return200response.
- This API will differ from above APIs as this API should succeed if the user sending the request is legitimate. The simplest way is that whenever a user sends this request, they will send
-
References
Tip
- To retain the information of the user you can maintain a global array.
- How to retain the information? Or how to implement the register API?
  const usersData = [];

  app.post("/register", (req, res) => {
    // Do the necessary stuffs to check whether we have everything required or not in the request
    ....

    // Do the necessary checks (like whether username already taken by anyone else)
    ....

    const currentUserData = {
      "username": ...,  // fill this value by taking from the request
      "password": ...,
      "name": ...,
      "college": ....,
      "year-of-graduation": ...
    };

    // push the data to the global array, so that it is visible (and can be used) by other APIs as well
    usersData.push(currentUserData);

    res.send({message: "Successfully registered!"});
  })
- Trouble building the user Lists API?
  const usersData = [];

  app.post("/register", (req, res) => {.........});

  app.get("/profiles", (req, res) => {
    // clone the 'usersData' so that we don't change the global data
    const usersDataCopy = JSON.parse(JSON.stringify(usersData));

    /*
    * Write the code to remove the 'password' field from each of the user.
    * As this API is for public use and we don't want to expose 'password' publicly
    */
    ....


    res.json(usersDataCopy);
  })
- How to create API which will update info for a legitimate user?
  const usersData = [];

  app.put("/profile", (req, res) => {
    // Check whether all the information required is present in the request or not
    ....

    // Check whether the mentioned username and password exists in our list of registered users
    let isValid = false;
    let requestedUserIndexInGlobalArray = -1;

    for (let i = 0; i < usersData.lenth; i ++) {
      const currentUser = usersData[i];

      // If the currentUser's username and password matches with the provided username and password
      // then set the 'isValid' flag and 'requestedUserIndexInGlobalArray' and break from the loop
      ...
    }

    if (!isValid) {
      res.status(401).json({message: "Invalid username or password!"});
    }
    else {
      // update the user's details corresponding to the found user
      usersData[requestedUserIndexInGlobalArray].name = .....
      ....
    }
  });
Note
- As we are using global memory, every time we restart the server all the previous data will be lost. It is similar to what happens when we rerun our
JAVAorC++code again, we start from fresh, all the previously allocated memory are now lost. - If you want to persist the state, you can store the data in some file and then read it everytime we get a new request. But it has its own challenges.
Expected Outcome
After you have implemented the project till here, your app should function like this -
Introduction to JWT and improving our authentication logic
Now that we know a way legitimate users can update their profile i.e. we have implemented one private API. But, one issue here is that every time a user wants to update his profile, he needs to enter their credentials again and again. This is not at all a good user experience (think how will you feel when every time you type gmail.com we have to re-enter your credentials every time). In this module we will try to fix this behaviour.
The idea is that instead of sending username and password with each request, we will send username and password in the first request. The server then sends us a token which is valid for a particular duration. Now, every time we need to send a request to a private API, we will send the token instead and if the token is valid, the server will know that the user requesting the info is legitimate.
Requirements
- Set up the frontend to be used for this module by following instruction mentioned here
- Learn how JWT works. You can first go through this article and then go through this video to understand it in detail.
- Learn how we use
JWTinNode.jsby going through this article. - Go through the official documentation of
jsonwebtokenpackage and use it's different methods. You can use this website to encrypt or decrypt yourJWTtokens.- Learn the three different sections of
JWTand what information they contain. You can again use this go get a clear picture of it's different sections and how they work together.
- Learn the three different sections of
- Implement the following -
- A
/loginAPI which takesusername&passwordand returnsJWT(valid for an hr) in the response header with the key namedauth-token - Refactor
PUT /profilesAPI so that it authenticates usingJWTsent in the request header
- A
References
NOTE
-
It is a good idea to always send
JWTin headers. It will help in separating the logical request with the authentication part. -
To test whether the
JWTreally expires or not, you can set the expiry to 1 minutes and test the same instead of waiting for it to expire after 1 hr. -
Remember, the information encoded with
JWTis publicly accessible. So, never include sensitive information in your token. -
It is recommended to use the 3rd optional argument in
JWTlibrary instead of manually setting the expiry in the payload.jwt.sign({ data: 'foobar' }, 'secret', { expiresIn: 60 * 60 });Though at the end it will add a few arguments in the payload only. It has a few advantages -
- It will take care of timezone issues. Suppose you set the expiry time in some timezone and then your server runs in some other time zone in future, then expired token may pass the validation in the other server.
- It will help in separation of concerns i.e. actual data is not mixed with the expiry thing logically. Note the word
logicallyhere. Because at the end that argument will be setting some extra fields in the payload we are encrypting.
Tip
- Need help to create
/loginAPI?
const secretKeyForJWT = "FDaFdsFDafsFdasfFDSAsd";

app.post("/login", (req, res) => {
  // Sanity check - does the request contains the required parameters or not
  ...

  // Check whether the given username and password exists in our collection
  ...

  // returns 400 status in case the username or password is incorrect
  ....

  // build the JWT which is valid for 1 hr

  // Remember to include enough information to uniquely identify the user with token only
  // In our case 'username' is unique across all user, so
  const dataToSign = {
    "username": ...,
  };
  const token = jwt.sign(dataToSign, secretKeyForJWT);

  // send the JWT in the header
  ...
});
- Need help to implement Updated
PUT /profileAPI?
app.put("/profile", (req, res) => {
  // Sanity check - does the request contains the required parameters or not
  ...

  // Extract JWT from the header and check whether it is valid or not
  ...

  // returns 401 status in case JWT is invalid or expired
  ....

  // decrypt the JWT data to get 'username'
  ....

  // update the user information corresponding to 'username' fetched in the previous step
  ...
});
Expected Outcome
After you have successfully implemented the APIs, the app behaviour will look something like below -
Learn and implement some good practices by dealing with some exceptional problems
We have almost finished our backend APIs. A few things to solve for -
- You might have noticed that if we push our code to our git repo, then our PRIVATE KEY used during JWT token generation is also pushed to our git repo and it is public.
- Another thing to note that the logic for authentication is the same for all the private APIs and currently we need to duplicate it across all the private API that we build in future. Look at this video to understand the point I am trying to make here.
In this module we will primarily fix these 2 issues.
Requirements
- Learn about environment variables from here.
- Move your private key in the environment variable and refactor your API implementations accordingly. If you are new to environment variables and how to access it in
Node.jsyou can watch the first 2 minutes of this video. - If you have noticed a small issue in the previous step only and fixed it then good otherwise go through the rest of the video to understand how to avoid the repetitive step of setting the environment variables on the new terminal session.
- Learn about Express middlewares by going through this article and/or this video.
- Refactor the entire logic of authentication to a middleware and use it while writing any private API.
Tip
- Make sure to
add .env file to the .gitignore file, so that we don't push it to our publicly available git repo by mistake. - Trouble refactoring authentication to middleware?
const authenticationLogin = (req, res, next) => {
  // Extract JWT from the header and check whether it is valid or not
  ...

  // returns 401 status in case JWT is invalid or expired
  ....

  // token is valid and verified.
  // We will then decrypt the token and put the value into some field in 'req'
  // so that it is accessed afterwards by any other middleware/the request handler
  req.userInfo = decodedInfo;
};

app.put("/profile", authenticationLogic, (req, res) => {
  // Sanity check - does the request contains the required parameters or not
  ...

  // extract the 'username' from decrypted json token information from the 'userInfo' field of the 'req'
  const username = req.userInfo.username;

  // update the user information corresponding to 'username' fetched in the previous step
  ...
})
Expected Outcome
The app should behave like before after you have successfully implemented the APIs -
Implement Administrator (restricted) APIs
You might have seen several services which send you an email whenever you login or perform some actions on the application. Suppose you want to build similar functionality for your application. As you might have noticed, we might need to send email in a lot of use cases. So, let's build a separate API which just sends an email. Everyone should not be able to access this internal API. That API should be accessed only by us and by our other APIs. How do you prevent other users accessing this API?
In this module you will learn the basic idea of building an API which can only be accessed internally or by us.
Requirements
- Implement the email sending API having url
POST /send-emailwhich will take the email content in the request body. For simplicity, just useconsole.loginside the API instead of actually sending an email. - Secure the
/send-emailAPI by using shared-secret by checking the value of the key received from the request with the defined shared-secret.- As discussed in the earlier module, it is a good idea to share the
secret-keyin the headers of the request. Feel free to choose any headers of your choice, I will be usingx-private-api-keyheader. - If the
x-private-api-keyheader is not found, send 400 response. - If the
x-private-api-keyis invalid, return 401 response - Remember to move the
shared-secret-keyto environment variables.
- As discussed in the earlier module, it is a good idea to share the
- Refactor the
/loginand/registerAPI such that it will call/send-emailAPI with all the details, everytime someone calls them.- If you don't know how to call an API in Node.js, you can go through this article.
- You can call the
/send-mailAPI either synchronously or asynchronously. - Remember to pass the header so that the
/send-mailAPI will be able to authenticate your call.
References
Tip
- Make sure to
add .env file to the .gitignore file, so that we don't push it to our publicly available git repo by mistake. - Need help to set up
/send-mailAPI?
const sharedSecretKeyForPrivateAPIs = process.env.SHARED_SECRET_KEY_FOR_PRIVATE_API;

app.post("/send-mail", (req, res) => {
  const authenticationToken = <FETCH_THE_'x-private-api-key'_FROM_THE_REQUEST_HEADERS>;

  // check whether the authenticationToken is present in the header or not
  if (authenticationToken === undefined || authenticationToken === null) {
    // send 400 response to the client
    ....
  }

  // check whether the authenticationToken received from the request is valid or not
   if (authenticationToken !== sharedSecretKeyForPrivateAPIs) {
    // send 401 response to the client
    ....
  }

  // send the email (simply logging in this case)
  const { emailBody, emailSubject } = req.body;
  console.log(emailBody, emailSubject);
});
- Need help in creating refactored
/loginAPI?
const sharedSecretKeyForPrivateAPIs = process.env.SHARED_SECRET_KEY_FOR_PRIVATE_API;

const secretKeyForJWT = "FDaFdsFDafsFdasfFDSAsd";

app.post("/login", (req, res) => {
  // Sanity check - does the request contains the required parameters or not
  ...

  // Check whether the given username and password exists in our collection
  ...

  // returns 400 status in case the username or password is incorrect
  ....

  // build the JWT which is valid for 1 hr

  // Remember to include enough information to uniquely identify the user with token only
  // In our case 'username' is unique across all user, so
  const dataToSign = {
    "username": ...,
  };
  const token = jwt.sign(dataToSign, secretKeyForJWT);

  // attach the JWT in the header
  ...

  // call the email sending API (we can either wait for it's completion or send the response to the user and it will complete in background
  // i.e. asynchronous / synchronous
  axios.post("/send-mail", {emailSubject: "Someone just logged in!", "emailBody": `Here are the details - ${JSON.stringify(req.body)}`});

  res.json({ message: "Successfully logged in!" });
});
Bring it On!
- Call the
/send-mailAPI using Postman and see if you are able to access it. - Add appropriate headers while calling
/send-mailAPI and verify if you are able to call it now.
Expected Outcome
Everytime you call /login or /register API, the request will be logged in the console.