You will implement the backend of a simple web application where you can create, edit, delete ToDo lists. This is a basic backend project for CRUD-based projects built with Adonis.js, a modern Node.js MVC framework. After completion of the project, you will learn the essential fundamentals of CRUD applications, REST API and MVC design pattern. You will also get well-versed with ES6 Javascript and Adonis.js framework by implementing this project.
Objective
Project Context
Day by day, the tech-stacks are evolving. Currently, one of the best frameworks for backend development is Adonis.js which uses MVC design patterns. Here you will be learning the basics of this framework while building the backend of ToDo web application. Also, you will be learning how backends can be developed independent of the frontend for any full-stack application with help of REST API. Building a UI (User Interface) for this particular application is beyond the scope of this project and Though we will keep features at a basic level, you are welcome to add more features & make your ToDo backend more dynamic.
The main context of this project is to learn building the backend for any API driven CRUD application using modern Node.js frameworks.
This project is a good challenge for beginners and the perfect exercise for professionals who have dabbled in Node.js/Javascript frameworks before. The experience of using Adonis.js will be challenging as it would involve a lot of research and learning but in turn will be helpful in mastering the other frameworks easily, so keep exploring!
Project Stages
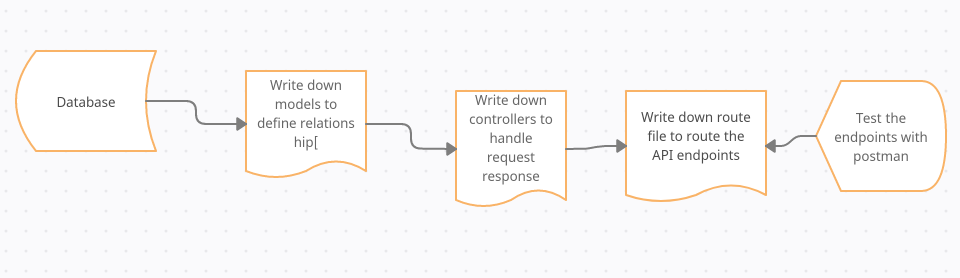
The product Architecture can be divided into 5 stages as follows:
- Design the database schema
- Create models which will communicate with the database
- Create controllers to handle requests and responses
- Create route files to steer the endpoint requests to correct controllers.
- Test the APIs with any API client tester to check whether the APIs are working or not
A flowchart of the above sequence of implementation is as follows:
High-Level Approach
- Database Design: For a ToDo web app, there will be different users. Each user will have many projects and each project can have many TODOs. A user should have an email-id (
primary key) along with a password as attributes for user account credentials. A project should have an id (primary key), a user-id (foreign key) and title as attributes. A TODO task should have an id (primary key), a project-id (foreign key) and description as attributes. So the Entity Relationship diagram would be like below:
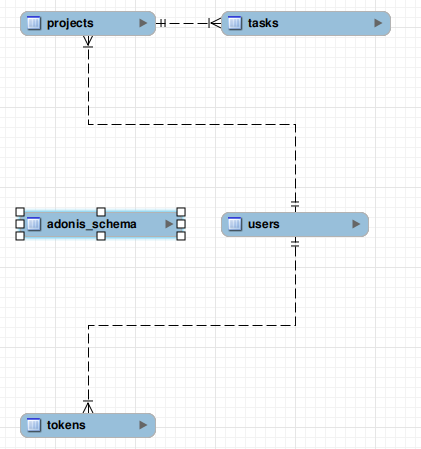
You must be confused about the extra table named Tokens in the above diagram; we will come to that later while discussing the task modules.
- Once the database design is ready, write controllers for project and task tables to execute CRUD operations. For the user table, a controller is needed for registration and login purposes only. Once controllers are ready, test the API endpoints with help of
Postman(a popular API client testing tool).
Final backend's (of the app) testing -
Primary goals
- A user should be able to register and login
- A user may have multiple projects and each project may have multiple Tasks.
- A particular user should not be able to see other users' projects/Tasks.
- A user shouldn't be able to see his projects without logging in.
- A user should have the privilege to create, read, update and delete projects; where for each project's tasks the user should have the privilege to perform similar CRUD operations.
- While deleting a project all the associated tasks should be deleted from the database.
Objective
You will implement the backend of a simple web application where you can create, edit, delete ToDo lists. This is a basic backend project for CRUD-based projects built with Adonis.js, a modern Node.js MVC framework. After completion of the project, you will learn the essential fundamentals of CRUD applications, REST API and MVC design pattern. You will also get well-versed with ES6 Javascript and Adonis.js framework by implementing this project.
Project Context
Day by day, the tech-stacks are evolving. Currently, one of the best frameworks for backend development is Adonis.js which uses MVC design patterns. Here you will be learning the basics of this framework while building the backend of ToDo web application. Also, you will be learning how backends can be developed independent of the frontend for any full-stack application with help of REST API. Building a UI (User Interface) for this particular application is beyond the scope of this project and Though we will keep features at a basic level, you are welcome to add more features & make your ToDo backend more dynamic.
The main context of this project is to learn building the backend for any API driven CRUD application using modern Node.js frameworks.
This project is a good challenge for beginners and the perfect exercise for professionals who have dabbled in Node.js/Javascript frameworks before. The experience of using Adonis.js will be challenging as it would involve a lot of research and learning but in turn will be helpful in mastering the other frameworks easily, so keep exploring!
Project Stages
The product Architecture can be divided into 5 stages as follows:
- Design the database schema
- Create models which will communicate with the database
- Create controllers to handle requests and responses
- Create route files to steer the endpoint requests to correct controllers.
- Test the APIs with any API client tester to check whether the APIs are working or not
A flowchart of the above sequence of implementation is as follows:
High-Level Approach
- Database Design: For a ToDo web app, there will be different users. Each user will have many projects and each project can have many TODOs. A user should have an email-id (
primary key) along with a password as attributes for user account credentials. A project should have an id (primary key), a user-id (foreign key) and title as attributes. A TODO task should have an id (primary key), a project-id (foreign key) and description as attributes. So the Entity Relationship diagram would be like below:
You must be confused about the extra table named Tokens in the above diagram; we will come to that later while discussing the task modules.
- Once the database design is ready, write controllers for project and task tables to execute CRUD operations. For the user table, a controller is needed for registration and login purposes only. Once controllers are ready, test the API endpoints with help of
Postman(a popular API client testing tool).
Final backend's (of the app) testing -
Primary goals
- A user should be able to register and login
- A user may have multiple projects and each project may have multiple Tasks.
- A particular user should not be able to see other users' projects/Tasks.
- A user shouldn't be able to see his projects without logging in.
- A user should have the privilege to create, read, update and delete projects; where for each project's tasks the user should have the privilege to perform similar CRUD operations.
- While deleting a project all the associated tasks should be deleted from the database.
Let's Get Started with Our Backend application's working environment
Here, you will set up your application's environment and all necessary tools/softwares needed.
Requirements
-
Install MySQL workbench in your local system as we will be using MySQL for our DB
-
Install npm which is our package manager (download the version labelled as
LTS) -
Install Adonis.js globally (adonis 4.1)
-
Install Postman and create a new collection for the API endpoints for future testings as follows -
-
Two endpoints for user
POST: auth/register POST: auth/login -
Five endpoints for projects
GET: projects GET: projects/:id PUT: projects PATCH: projects/:id DELETE: projects/:id -
Five endpoints for tasks
GET: tasks
GET: tasks/:id
PUT: tasks
PATCH: tasks/:id
DELETE: tasks/:id
-
-
Create the adonis boilerplate by
adonis new server -
Create an SQL schema in MySQL workbench and save the credentials, schema name in the .env
-
Feel free to change the server running PORT in .env if needed
Congrats!! your initial set up for the backend is done.
Bring It On!
Can you change the message to be shown on the home page (localhost::PORT_NO) ? Dig through the route.js file.
Expected Outcome
Check the versions of adonis.js, whether you have successfully installed it or not.
adonis --version
Also your project's boilerplate should look as shown below (a recommended example)
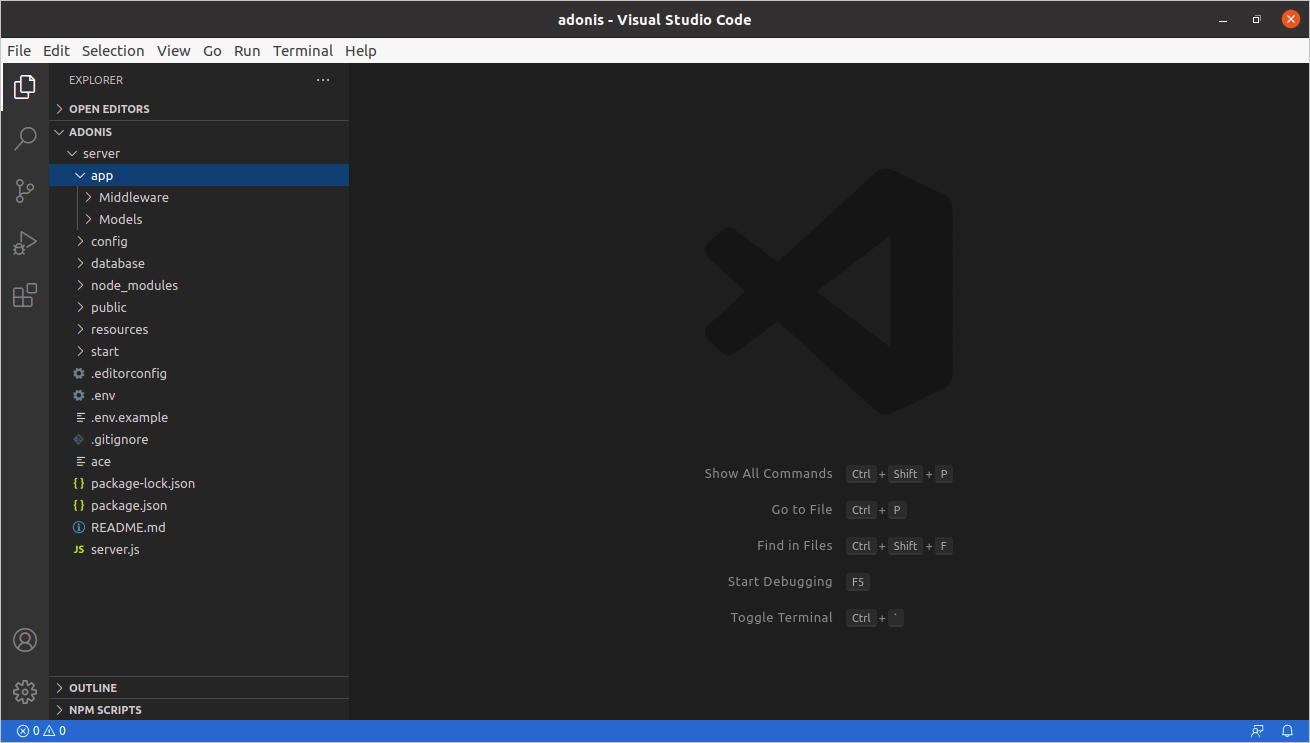
P.S. Visual Studio Code has been used in this above image.
Also if you run the server (boilerplate is already created) using -
adonis serve --dev
you should find the server running on the PORT configured in .env file. By default, it shows "It works" message
Create Models and Database Migrations
Here, we will see how to create database models, migration scripts which will help communicate with the database and als get introduced to the lucid model. Adonis has a very easy way to create new models, migrations. By default,the boilerplate has two models and database script for your reference.
Requirements
- Adonis has a very strong feature of lucid models which helps to communicate with the database without writing SQL queries directly.
- Migrations are scripts that help to create, reset refresh database tables. Migrations are very useful since you don't have to create tables manually. To learn more about migration & model, follow the references given.
- As you have the adonis boilerplate already, you will find there is a user and token model already along with their migration scripts. Similarly, we need our project & task model with all the relationships defined & migration scripts with the attributes. Following are my tables. Feel free to add more attributes if you want to.

- To create a migration script for a table,
adonis make:migration <table name>
- After the migration scripts are ready, run the migrations.
adonis migration:run
Below is an example to refer to creating the project migration script.
class ProjectSchema extends Schema {
  up () {
    this.create('projects', (table) => {
      table.increments()
      table.integer('user_id').unsigned().references('id').inTable('users')
      table.string('title', 5000)
      table.timestamps()
    })
  }

  down () {
    this.drop('projects')
  }
}
- Create your models accordingly for projects, tasks, users to define the relationship. Discussing the relationship,
- a user can have many project (HasMany<->BelongsTo)
- a project can have many tasks (HasMany<->BelongsTo)
Below is the example you can refer to:
class Project extends Model {

    user(){
        return this.belongsTo('App/Models/User');
    }
    tasks () {
        return this.hasMany('App/Models/Task')
    }
}
References
Tip
- The migration scripts should be created in order. For example, a task needs a project_id, so project migration script has to be created first and then the task migration script. Otherwise while running the migrations, it may lead to failure. So the order of creating migration should be : users -> projects -> tasks
Bring It On!
By default, the id is incremental which means it will start from 1 and will keep incrementing. You can also go for a randomly generated id. Research a bit to know how you can generate random user ids.
Expected Outcome
If your migration runs are successful, you will see the tables created in the MySQL workbench.
Handling HTTP requests and sending responses back via Controller functions
Here, we will learn what is the role of a controller in a MVC design pattern & how we handle incoming HTTP requests or send responses back via a controller. Here you will handle the routing also.
Requirements
- Since Adonis follows MVC design pattern, controllers are there to handle requests and responses. Controllers collect requests & run lucid query builders to communicate with the database and send the response back. You can create a controller for the corresponding model by
adonis make:controller <Model_name> --type http
- For a CRUD operation, there are mainly 5 types of requests. For example, in the projects table we will have,
GET: projects - request to return all projects

GET: projects/:id - request to return a particular project (id given in params)

PUT: projects - request for creating a project (payload to be provided in the request body)

PATCH: projects/:id - request for updating a project (payload to be provided in the request body, id given in params)

DELETE: projects/:id - request for deleting a project
So the project controller should have functions to handle all these requests and should be routed through created endpoints.
- Create controllers for projects and tasks similarly to handle the CRUD operations and return applicable responses. Write the lucid query builders to communicate with the database. Use Lucid query builders like below:
/**
   * Create/save a new project.
   * POST projects
   *
   * @param {object} ctx
   * @param {Request} ctx.request
   * @param {Response} ctx.response
   */
  async store({ request, auth, response }) {
    try {
      const user = await auth.getUser();
      const { title } = request.post();

      const project = new Project();
      project.fill({
        title,
      });
      await user.projects().save(project);
      return response.status(200).send({
        project,
        message: 'Successfully Added project'
      })

    } catch (error) {
      return  response.status(error.status | 500).send(error);
    }


  }
- For users table, you don't need CRUD endpoints. Hence you only need -
POST: auth/register
POST: auth/login
So write functions to register a user and implement login facilities. Use auth functions like below:
 async login({request, auth, response}){

        try {
            const { email, password } = request.post();
            const token = await auth.attempt(email, password);
            return token;
        } catch (error) {
            return  response.status(error.status | 500).send(error);
        }

    }
- Route the endpoints towards correct controller functions by editing the
route.jsfile. In theroute.jsfile specify the mapping between urls & corresponding function to handle like below
Route.group(()=>{
  Route.get('/', 'ProjectController.index').middleware('auth');
  Route.put('/', 'ProjectController.store').middleware('auth');
  Route.get('/:id', 'ProjectController.show').middleware('auth');
  Route.post('/:id', 'ProjectController.update').middleware('auth');
  Route.delete('/:id', 'ProjectController.destroy').middleware('auth');
}).prefix('v1/project')
References
- Crio Bytes (free) - HTTP, REST
- Creating controllers
- Routing
- Lucid query builder
Tip
- Use --resource while creating a controller to have the standard function structures present already.
Expected Outcome
Once your controllers are ready, run the server (in development mode) by
adonis serve --dev
Test with Postman whether routing is happening or not by printing debug messages onto the console. You will have a detailed testing module in the tasks ahead to check whether the backend is working or not.
Auth Middleware to handle authentication
In this module, we will see some detailing about authentication and how we can do authentication by using the auth middleware.
Requirements
-
Middlewares are something that hooks into the request lifecycle. There are a set of functions to be executed in sequence to transform the request/response. A middleware can be named, global or server. Check out the references to know more about middlewares.
-
Here we will use
authas middleware which will serve the authentication purpose. 'auth' uses different authentication schemes such as basic, jwt, session etc. You can use 'jwt' as the authenticator scheme. -
Add the middleware in your routing file so that request goes through
authfirst. -
Whenever there is a request at the user registration endpoint, it should send back a jwt token in the response which will be used for further authentication purposes. This token should be used in sending further requests for that user. You can include the jwt token in the request header.
-
Add support in controllers so that a controller keeps check of authentication. For instance, a user should not be able to fetch other users' projects. As a practice you can first fetch the user of the requested project and check whether the corresponding jwt token matches with the header jwt token or not. This is a standard practice of doing authentications.
Bring It On!
Add logic to your controller for 403 forbidden access and 404 resource not found responses. Handling these types of exceptions would make the simple ToDo backend a robust one. Also, think of other possible exceptions and add support for that. You can create exception handler separately by,
adonis make:exception <file_name>
Expected Outcome
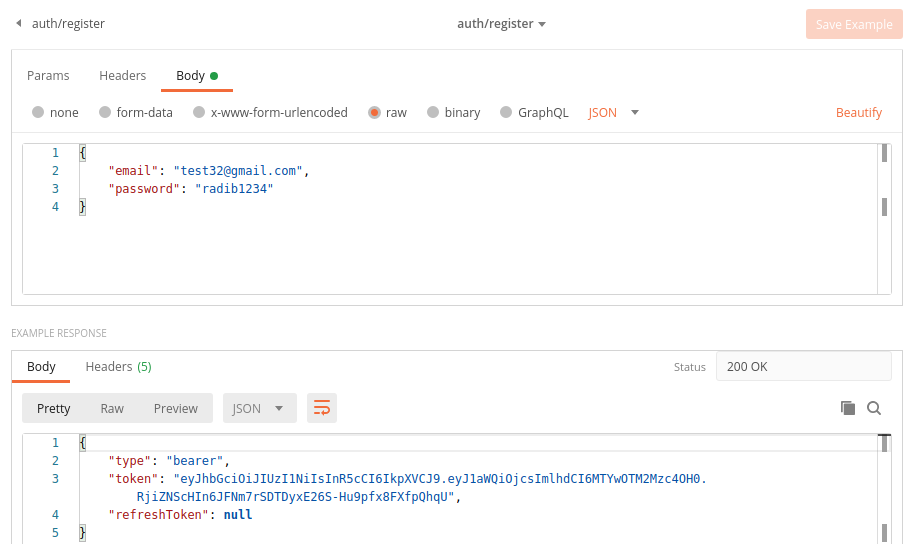
Once auth is added after requesting at 'auth/register' endpoint the response data should include jwt token. Head on to https://jwt.io/ to decode the jwt token and you should find the user id in the decoded message.
Transactions to delete all associated tasks whenever a project is deleted
As we discussed, an important feature of our backend is whenever we delete a project all the related tasks should also be deleted. That's why we need transactions.
Requirements
- Whenever you delete a project for a user, all the tasks associated with the project should be deleted.
- You need to write a transaction and use that in the
destroymethod in the controller. Learn more about writing transactions from the references.
References
Expected Outcome
Once the transactions are written, you shouldn't find the tasks associated with a deleted project in the database.
Let's test what you have done so far :)
Now we shall start the intensive testing of the API you have built using Postman. API testing involves testing the application programming interfaces (APIs) directly and as part of integration testing to determine if they meet expectations for functionality, reliability, performance, and security. In API Testing, instead of using standard user inputs (i.e. using some kind of GUI) and outputs, you use software to send calls to the API, get output, and note down the system's response.
Requirements
-
In this module you will test all the APIs you have developed so far. This is a mandatory step before proceeding towards the front end part. Make sure all your endpoints are working as per expectation. Check out the responses you are receiving are correct or not.
-
First create a user by sending a request to the endpoint
{{url}}/auth/registerwhere {{url}} is an environment variable you should save in postman. Check out the environment tab on your upper left side. {{url}} is the base url by default
http://localhost:3333. It should be the same as what is in your .env file.
As a response, you should get back the jwt token and then onwards use this auth token in the header (Authentication) to send a request to other endpoints. For instance, log in with the registered user by using the jwt token you got. say, you want to send a project PUT request for this user then, add this jwt token in the header (Authentication) to pass the auth middleware.
References
Tip
- Use the authentication token in the header as a variable so that you don't have to copy-paste it every time.
Bring It On!
-
Try accessing other users projects. For example, the project with id 5 belongs to user-2. While sending GET to request to {{url}}/projects/5 send the jwt token of user-1 in the header. Check what you are getting as a response. You should get 403 forbidden access (obvious but you need to implement this logic from the preceding task)
-
Due to the backend being so extensive, the frontend has been left to your own vivid implementations. So do not stop here and try to build a simple frontend for this app to complete your ToDo app.
Expected Outcome
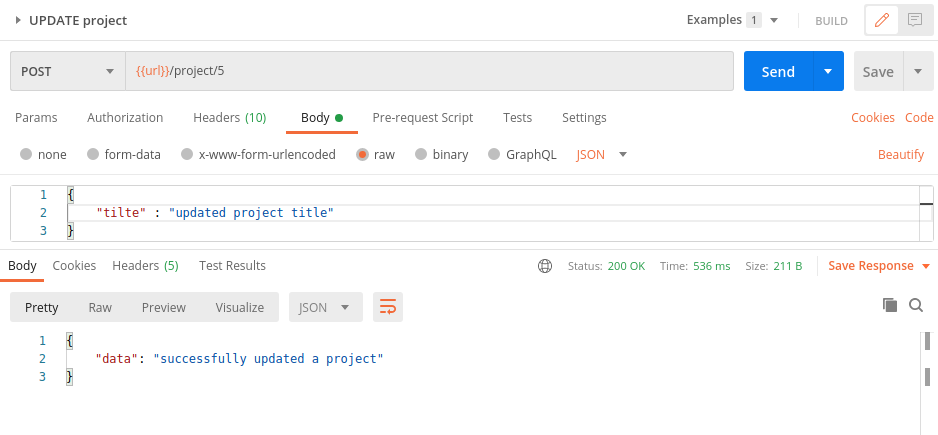
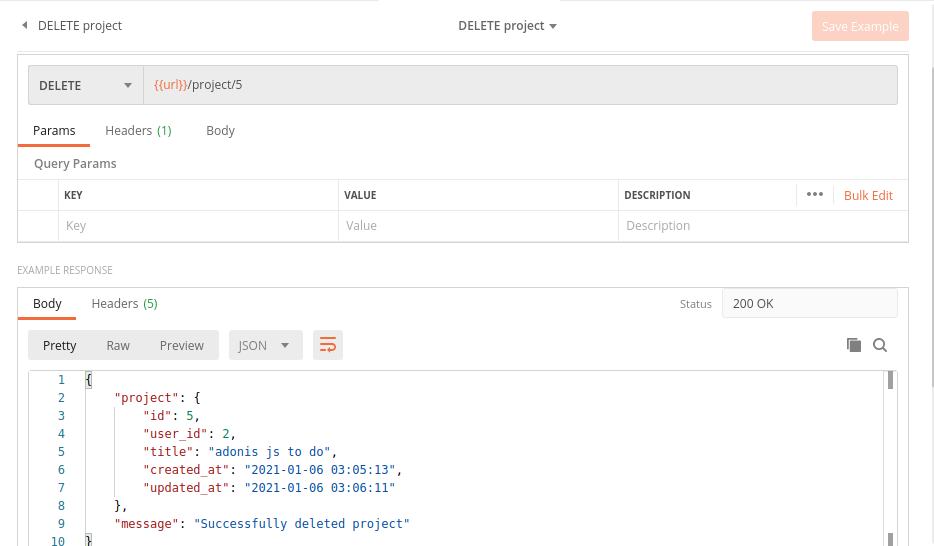
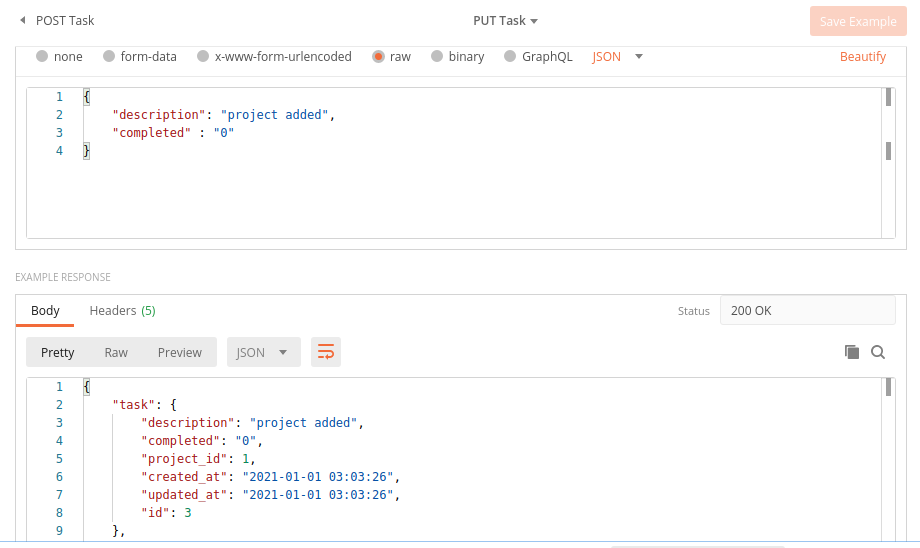
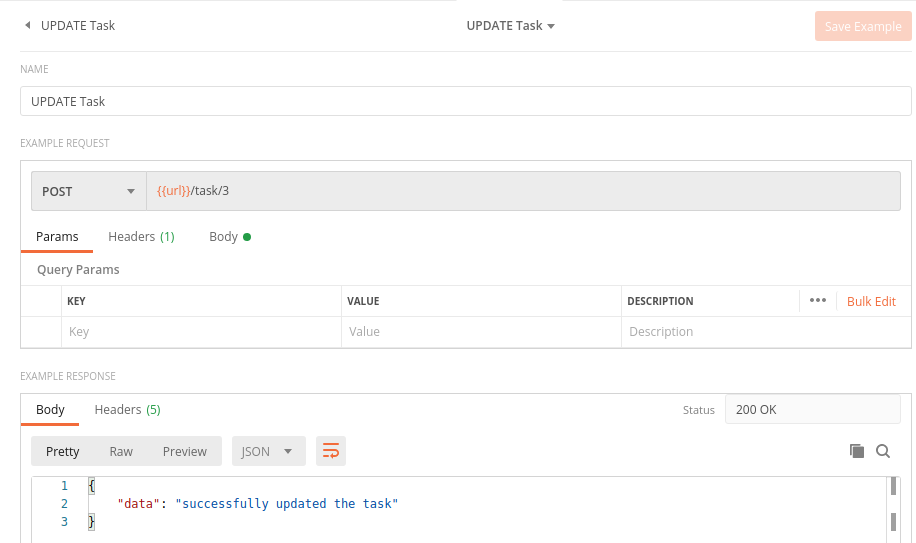
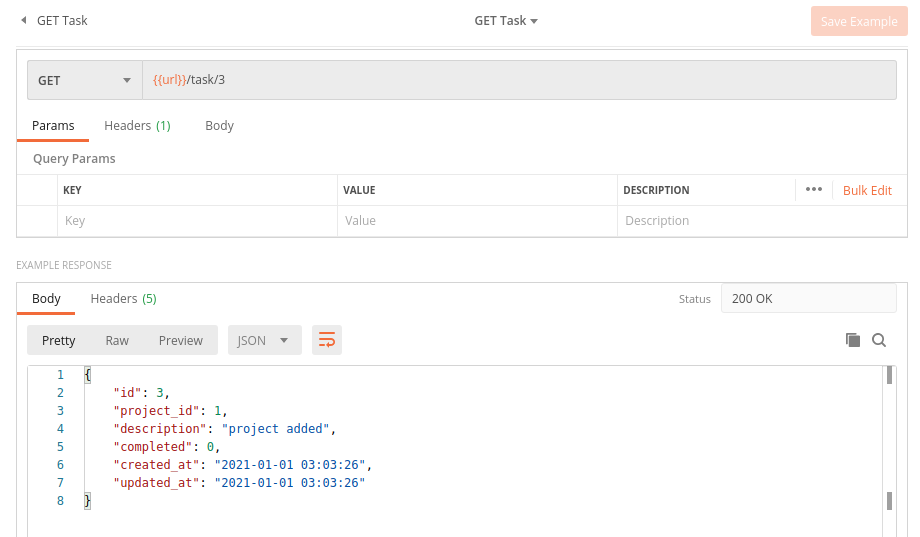
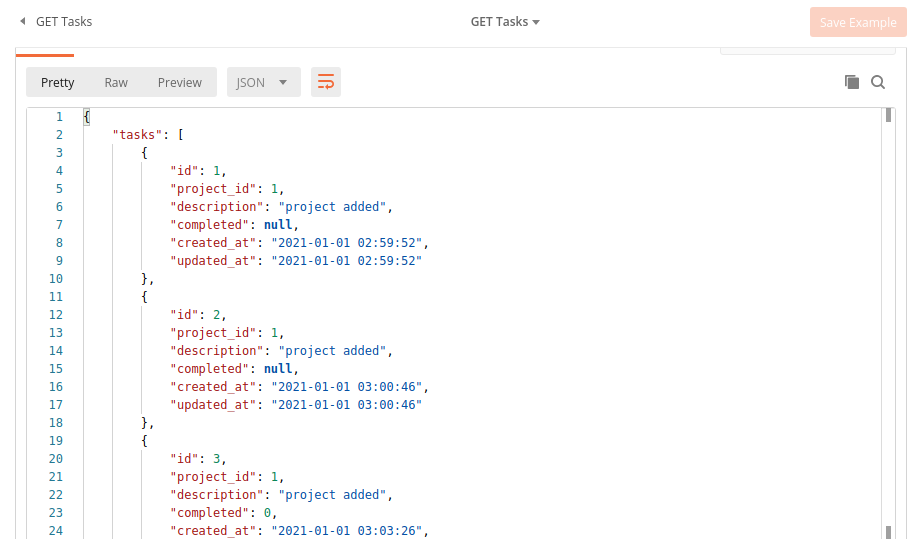
Below are few of the Postman testing outcomes which are expected.
- auth/register endpoint
- auth/login endpoint

- PUT Project endpoint

- PATCH project endpoint
- GET project endpoint

- GET projects endpoint

- DELETE project endpoint
- PUT Task endpoint
- PATCH Task endpoint
- GET Task endpoint
- GET Tasks endpoint
- DELETE Task endpoint

Backend demo with postman
Here is the demo on how the backend (of a ToDo app) is working. This is tested again with the help of Postman.