Is the Login Button complex?
You have to pass through a login button to get the most out of the majority of online experiences. Well-designed website login pages should elicit a sense of security. With User Experience (UX) playing such a crucial role in user retention, the login journey has to be smooth and straightforward.
Data security and privacy have to be taken care of at the same time. Because of the various components at play, the login and sign-up component of the service, which may appear to be a minor component at first, becomes a significant component.
Security and UX are usually at two sides of the compromise battle. Imagine going into a high-security place like the Parliament of India; the security checks and other security features would make the process of just entering the facility cumbersome.
It would be easier for members to visit the Parliament if there was reduced scrutiny, but this would come at the cost of increased vulnerability. As a responsible developer with security at priority, it is important to take care of security while designing the user's identity on the website via login and sign-up.
People commonly reuse a small number of passwords, owing to their ease of remembering and entering. After discovering an access point that allows for endless login attempts, a hacker may automate high-speed, high-volume dictionaries(A password dictionary is a file that contains a list of potential passwords) attacks. Hackers can readily attack using ever-larger dictionaries or automated algorithms with infinite permutations if there is no rate restriction.
Two Factor Authentication offers the user and system administrator peace of mind by ensuring that even if the user's password is hacked, the account cannot be accessed without knowing the second factor and having access to it, such as a dynamically created one-time password (OTP). It's growing more important in today's world as more and more areas of our lives, both personal and professional, move to digital platforms, where threats like hacking, theft, and loss of access may have fatal consequences.
A CAPTCHA is a Turing test used to distinguish between humans and bots. It's simple for people to figure out, but it's more difficult for "bots" and other malicious software to figure out.
CAPTCHA is a security feature that protects the website from fraud and misuse. In order to prevent unwanted abuses of the website, CAPTCHA uses an advanced risk analysis algorithm and dynamic challenges. Legitimate users will be allowed to log in, make purchases, see websites, and establish accounts in the meanwhile, while bogus users will be prohibited.
One of the mistakes developers make in terms of security is not protecting both front-end and back-end both. It is like having a home with a gate but without a boundary and expecting the house to be safe because all users would come via the entrance, and no one would come via the other area where there isn't a boundary.
Loopholes like these make the system insecure, and it is essential not just to protect the frontend with authentication but also the server. The frontend and server should be independently secure.
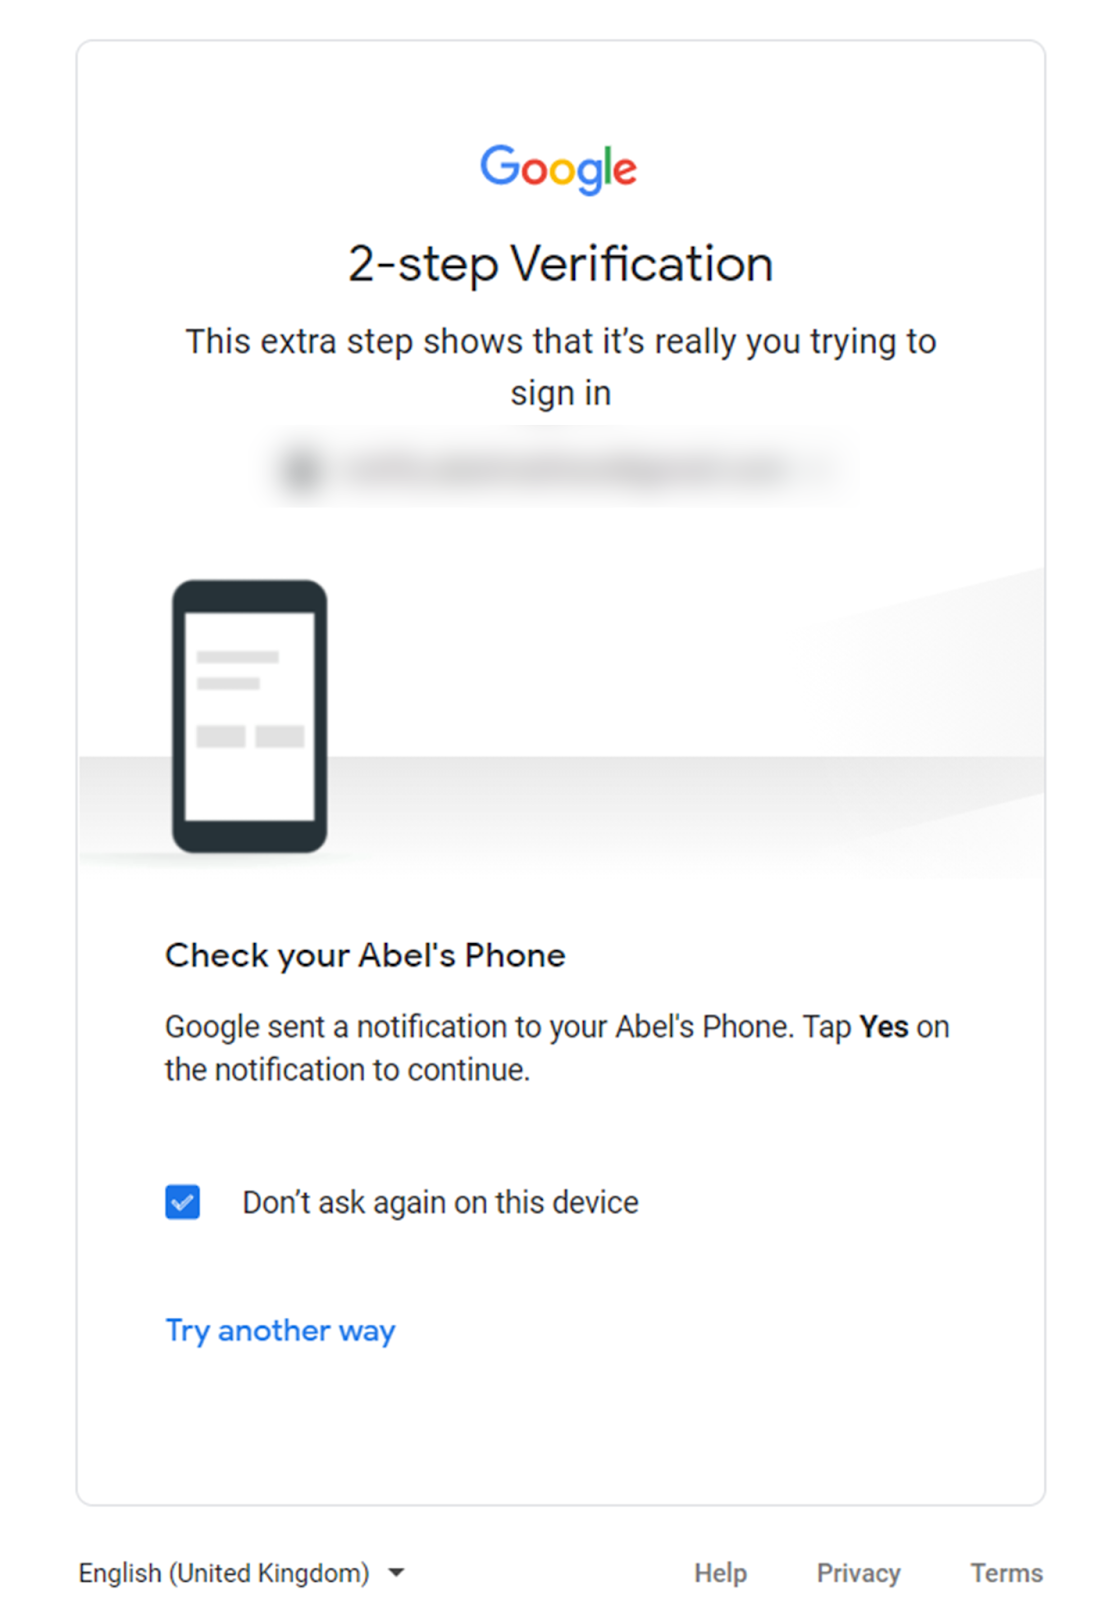
Let us understand how these security checks are incorporated in Google Mail, one of the most widely used mail systems. With a vast user base, it is crucial to have security as the top priority.
Try it yourself
For this activity, it is recommended to use a Gmail account that you have access to but not your primary account as it may cause temporary access issues if you try many times.
To understand how Gmail is protected against dictionary attacks or brute-force attacks, try to input the wrong password multiple times. After a threshold of over a dozen or so entries, it would pop up a CAPTCHA to reduce automated attacks' speed and require human intervention. Additionally, for accounts with 2FA (2 Factor Authentication) enabled, an OTP is required to sign in along with the password. The second factor usually requires a mobile device that you possess (other forms of 2FA also exist, like a hardware key).


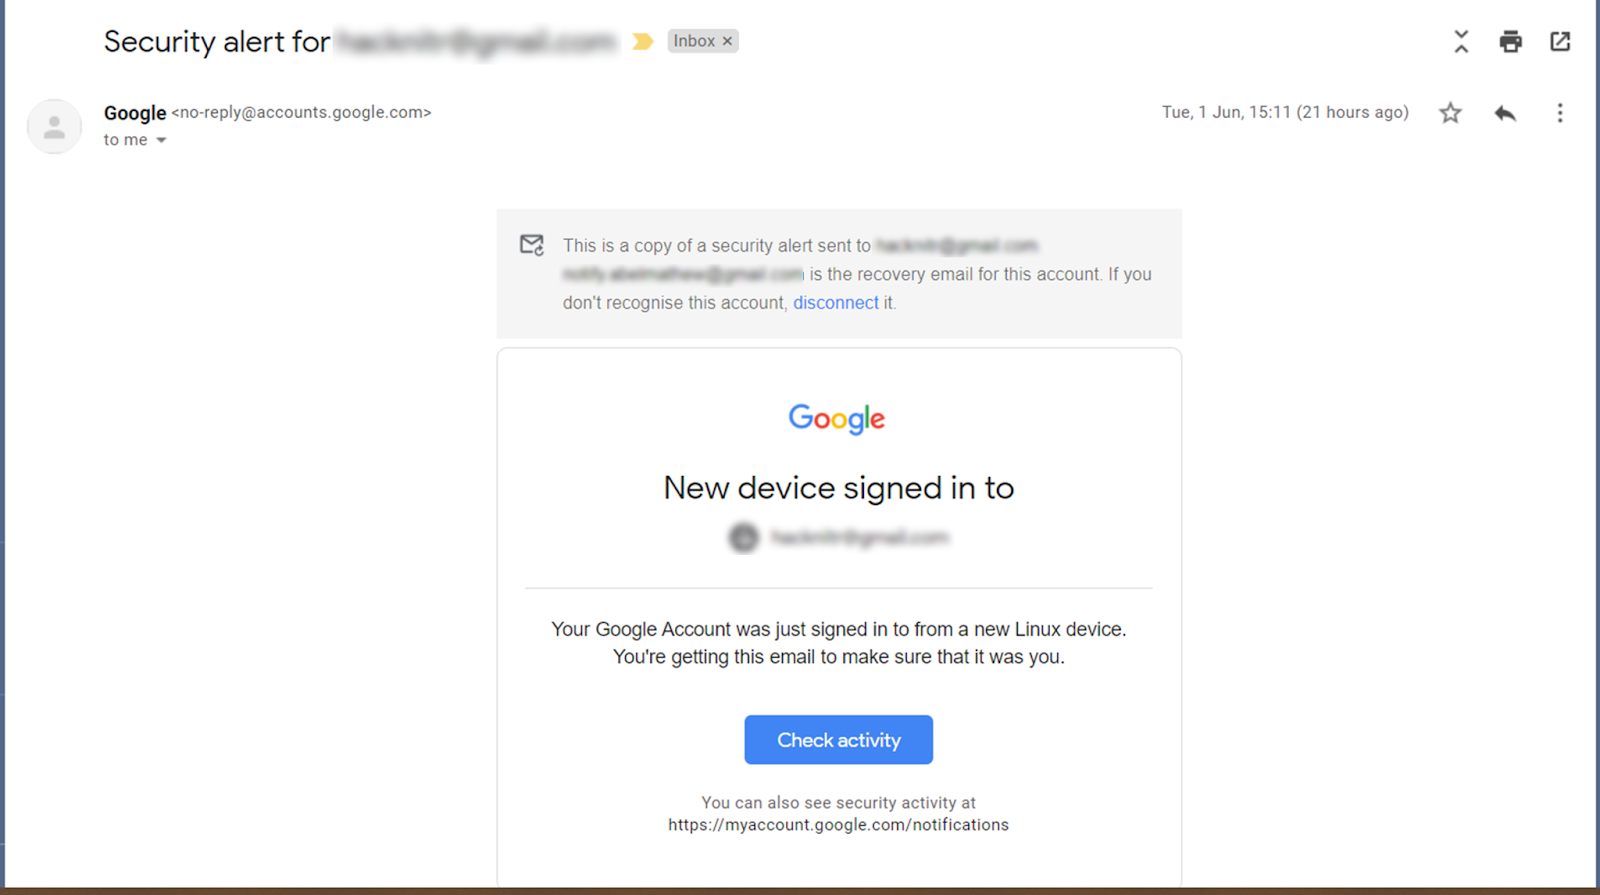
Additionally, Gmail has more security features. One of the most prominent features is security alert emails. These mails make sure that all new logins from different devices are informed to the owner.
Step by step breakdown of the authentication flow
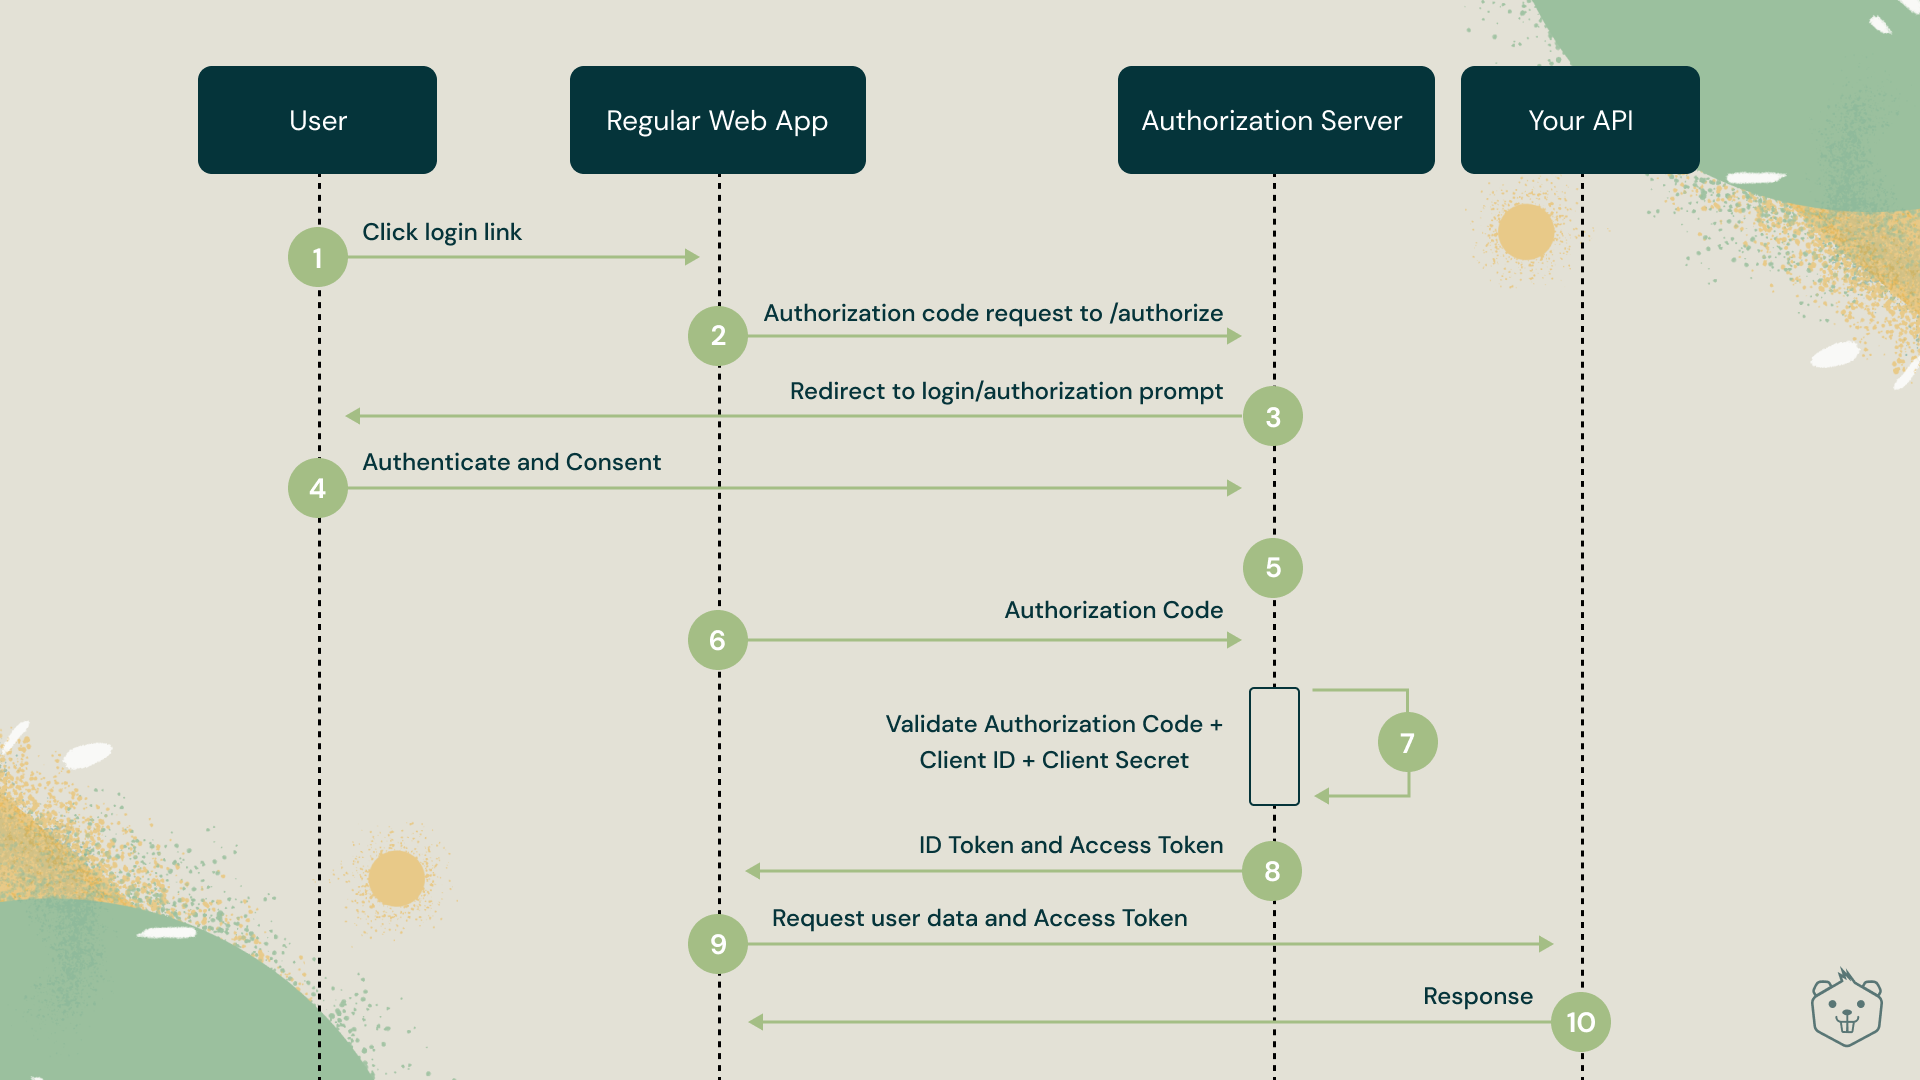
Once a user clicks the login button, a series of network calls happen between the authorization server and the API server.
- The basic flow starts with the user entering the credentials and the authorization server confirming it.
- The authorization server responds with a response to the client, which the client can later utilize.
- The client calls the server to verify if the user's identity is legitimate.
- The client uses the user's Access Token to call the server on behalf of the user.
Try it yourself
Head over to Crio.Do so that you can analyze the network requests to understand the flow of authentication.
Open the browser's console and head over to the Network tab.
Wait for the page to finish loading and clear the network logs.
Make sure "Preserve log" is enabled to prevent records from getting removed on navigation.
Once the page finished loading, the network tab is open, and network requests are cleared, hit the login button. In the list of requests, look for these three requests
- verifyAssertion?key=xxxx
- getAccountInfo?key=xxxx
- login
The first request is triggered after a user does Google Sign-in and returns to the Crio website. This request calls the authorization server (Google in this case) to verify if the Google Sign-in successful response that the website received is from a legitimate user.
The second request gets the Tokens from the authorization server, verifying and confirming the user's identity while calling the APIs. It contains the short-lived Access Tokens and also the Refresh Tokens to get new Access Tokens on expiry.
The third request calls the server maintained by Crio with the above-received Tokens to validate the user.
Keeping the user signed in across different pages
If a user is signed in to a website, the user may wish to stay signed in if the user navigates to a separate page on the website or closes and re-opens the website. It is necessary to save information about a user to keep them logged in. Server-side sessions and client-side sessions are the two main implementations.
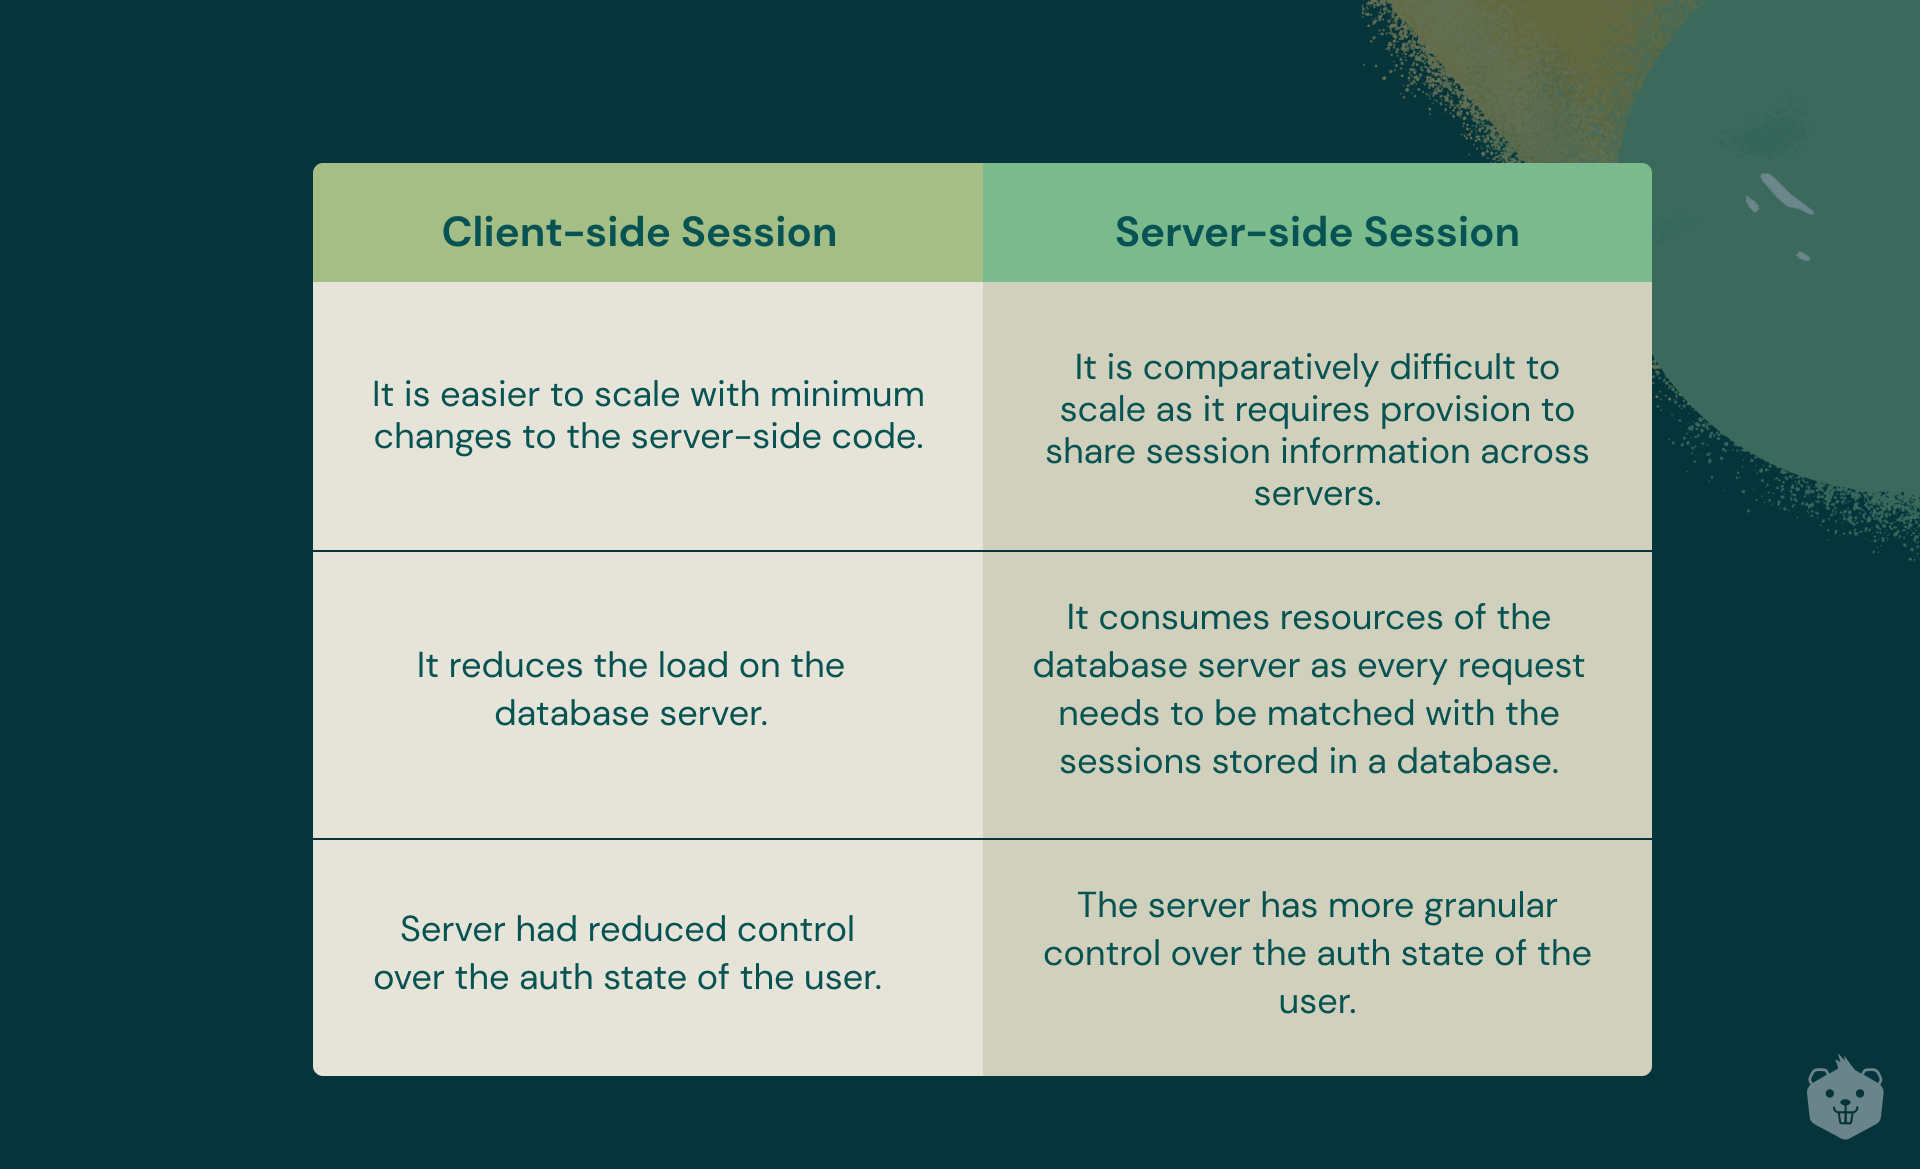
When using server-based authentication, the server handles all of the hard work on its own.
A client uses its credentials to authenticate and obtains a session id (which can be saved in a cookie) that it attaches with all subsequent requests. As it is the equivalent of a set of credentials, this may be termed a "token." This session id string, on the other hand, isn't fancy. It's only an identifier, and the server takes care of the rest. It's authoritative. It links the identification to a specific user account (e.g. in memory or a database). It can restrict or limit this session to particular operations or a particular time and invalidate it if security problems arise. More crucially, it can do all of this and adjust it on the go. It may also track the user's every step on the page. This gives the program greater precise control over the user's sessions. As the number of users grows, the server's scalability and memory utilization may become an issue.
In the client-side session, no state is persisted server-side (stateless). The first steps are the same for both. Credentials are transferred in exchange for a token, which is subsequently associated with each future request (it can also be stored in a cookie). In response to an authentication request, the server generates an access token. These access tokens are used to perform secure API requests that need authentication. In the JWT, they contain expiry dates indicated by the exp claim and security mechanisms like signatures. After getting access to a resource for the first time, or when the prior access token provided to them expires, a user often requires a new access token.
Try it yourself
Auth state persistence is handled differently by different apps. As a developer, the choice on how to persist is a decision made by taking into account the security and the UX of the application. Here is a screenshot of the developer page from Firebase, one of the widely used login systems, even at https://crio.do.
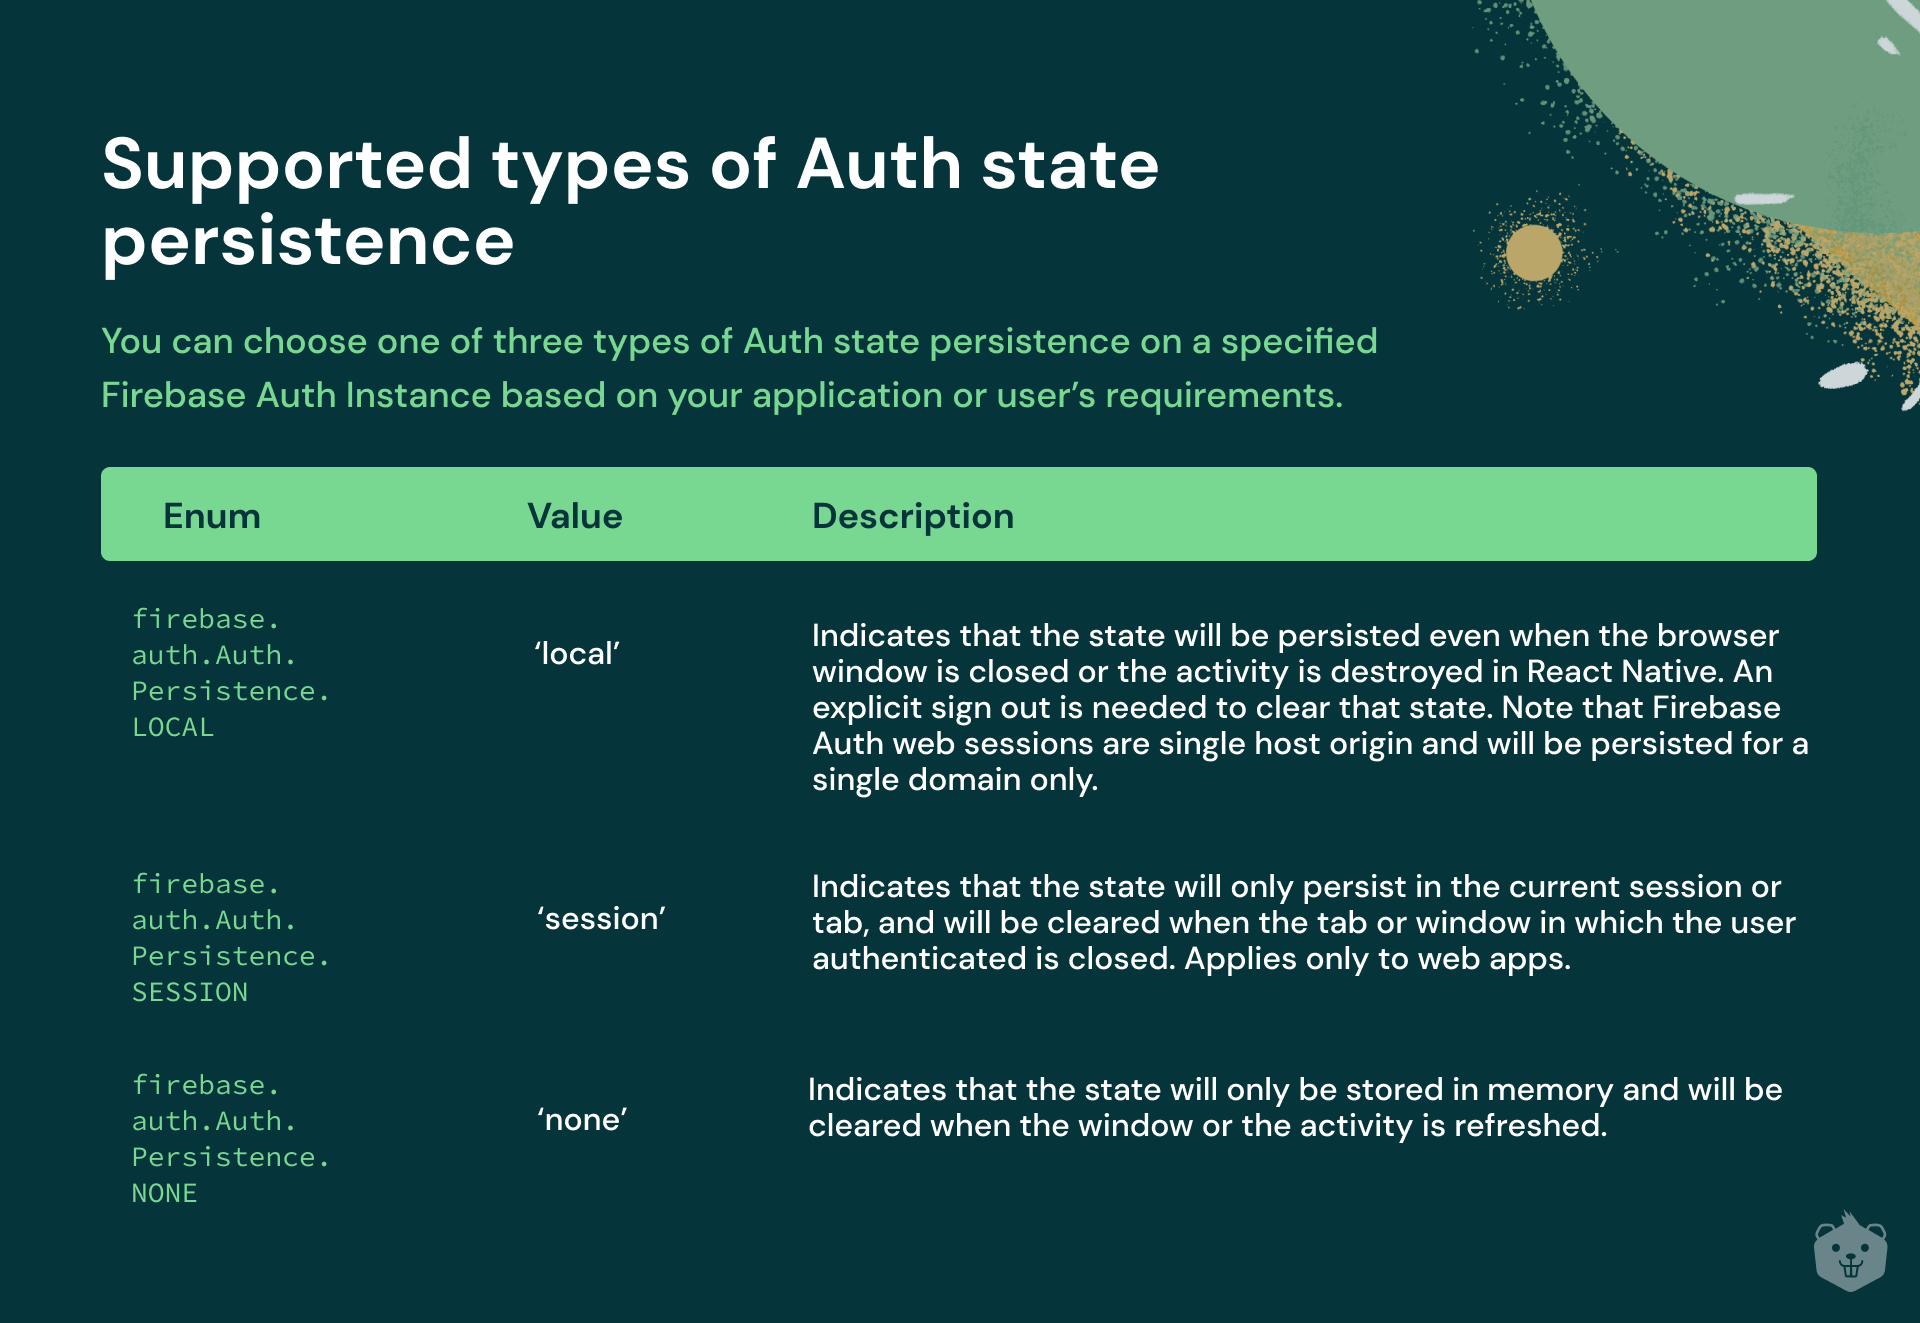
As you can see, the state of login can be modified and controlled by the application developer.
Try to log in to a bank website or IRCTC. See how the user gets logged out immediately when you refresh the page, whereas if you log in to Gmail, you would see that you stay logged in even after closing and re-opening the browser.
What is a JWT and how does JWT authentication work?
JWTs are used in practically every authentication scheme. JSON Web Token (JWT) is an open standard that specifies a compact and self-contained method for securely communicating information as a JSON object between parties.
Because it is digitally signed, this information can be checked and trusted. It can be supplied as a URL parameter, a POST parameter, or an HTTP header. To avoid accessing the database many times, it contains all of the needed information about the user.
The most common cause for utilizing JWT is authentication; after a user has signed in, each subsequent request will contain the JWT, allowing the user to access routes, services, and resources permitted with that token. Because the user state is never kept in the server memory, this is a stateless authentication scheme. The JWT should be sent whenever a user wishes to access a protected route, often in the Authorization header using the Bearer schema. As a result, the content of the title should be as follows.
Authorization: Bearer <token>
Header, Payload, and Signature are the three components of JWT.
It is not a standard JSON at first sight. It is base64url encoded JSON. base64url is a way to convert a human-readable string into URL friendly string. The header consists of information like the type of signing algorithm used to sign the JWT digitally.
The payload is the data required by the application to get information about the user. It consists of details like the user-id and other critical details like the expiry of the JWT.
The signature, a Message Authentication Code, is the final portion of a JWT (or MAC). Only someone with both the payload (including the header) and a specific secret key may create the signature of a JWT. An attacker could only impersonate a user if they stole both the user's username and personal login password or if they stole the Authentication server's secret signature key. As can be seen, the signature is a critical component of the JWT!
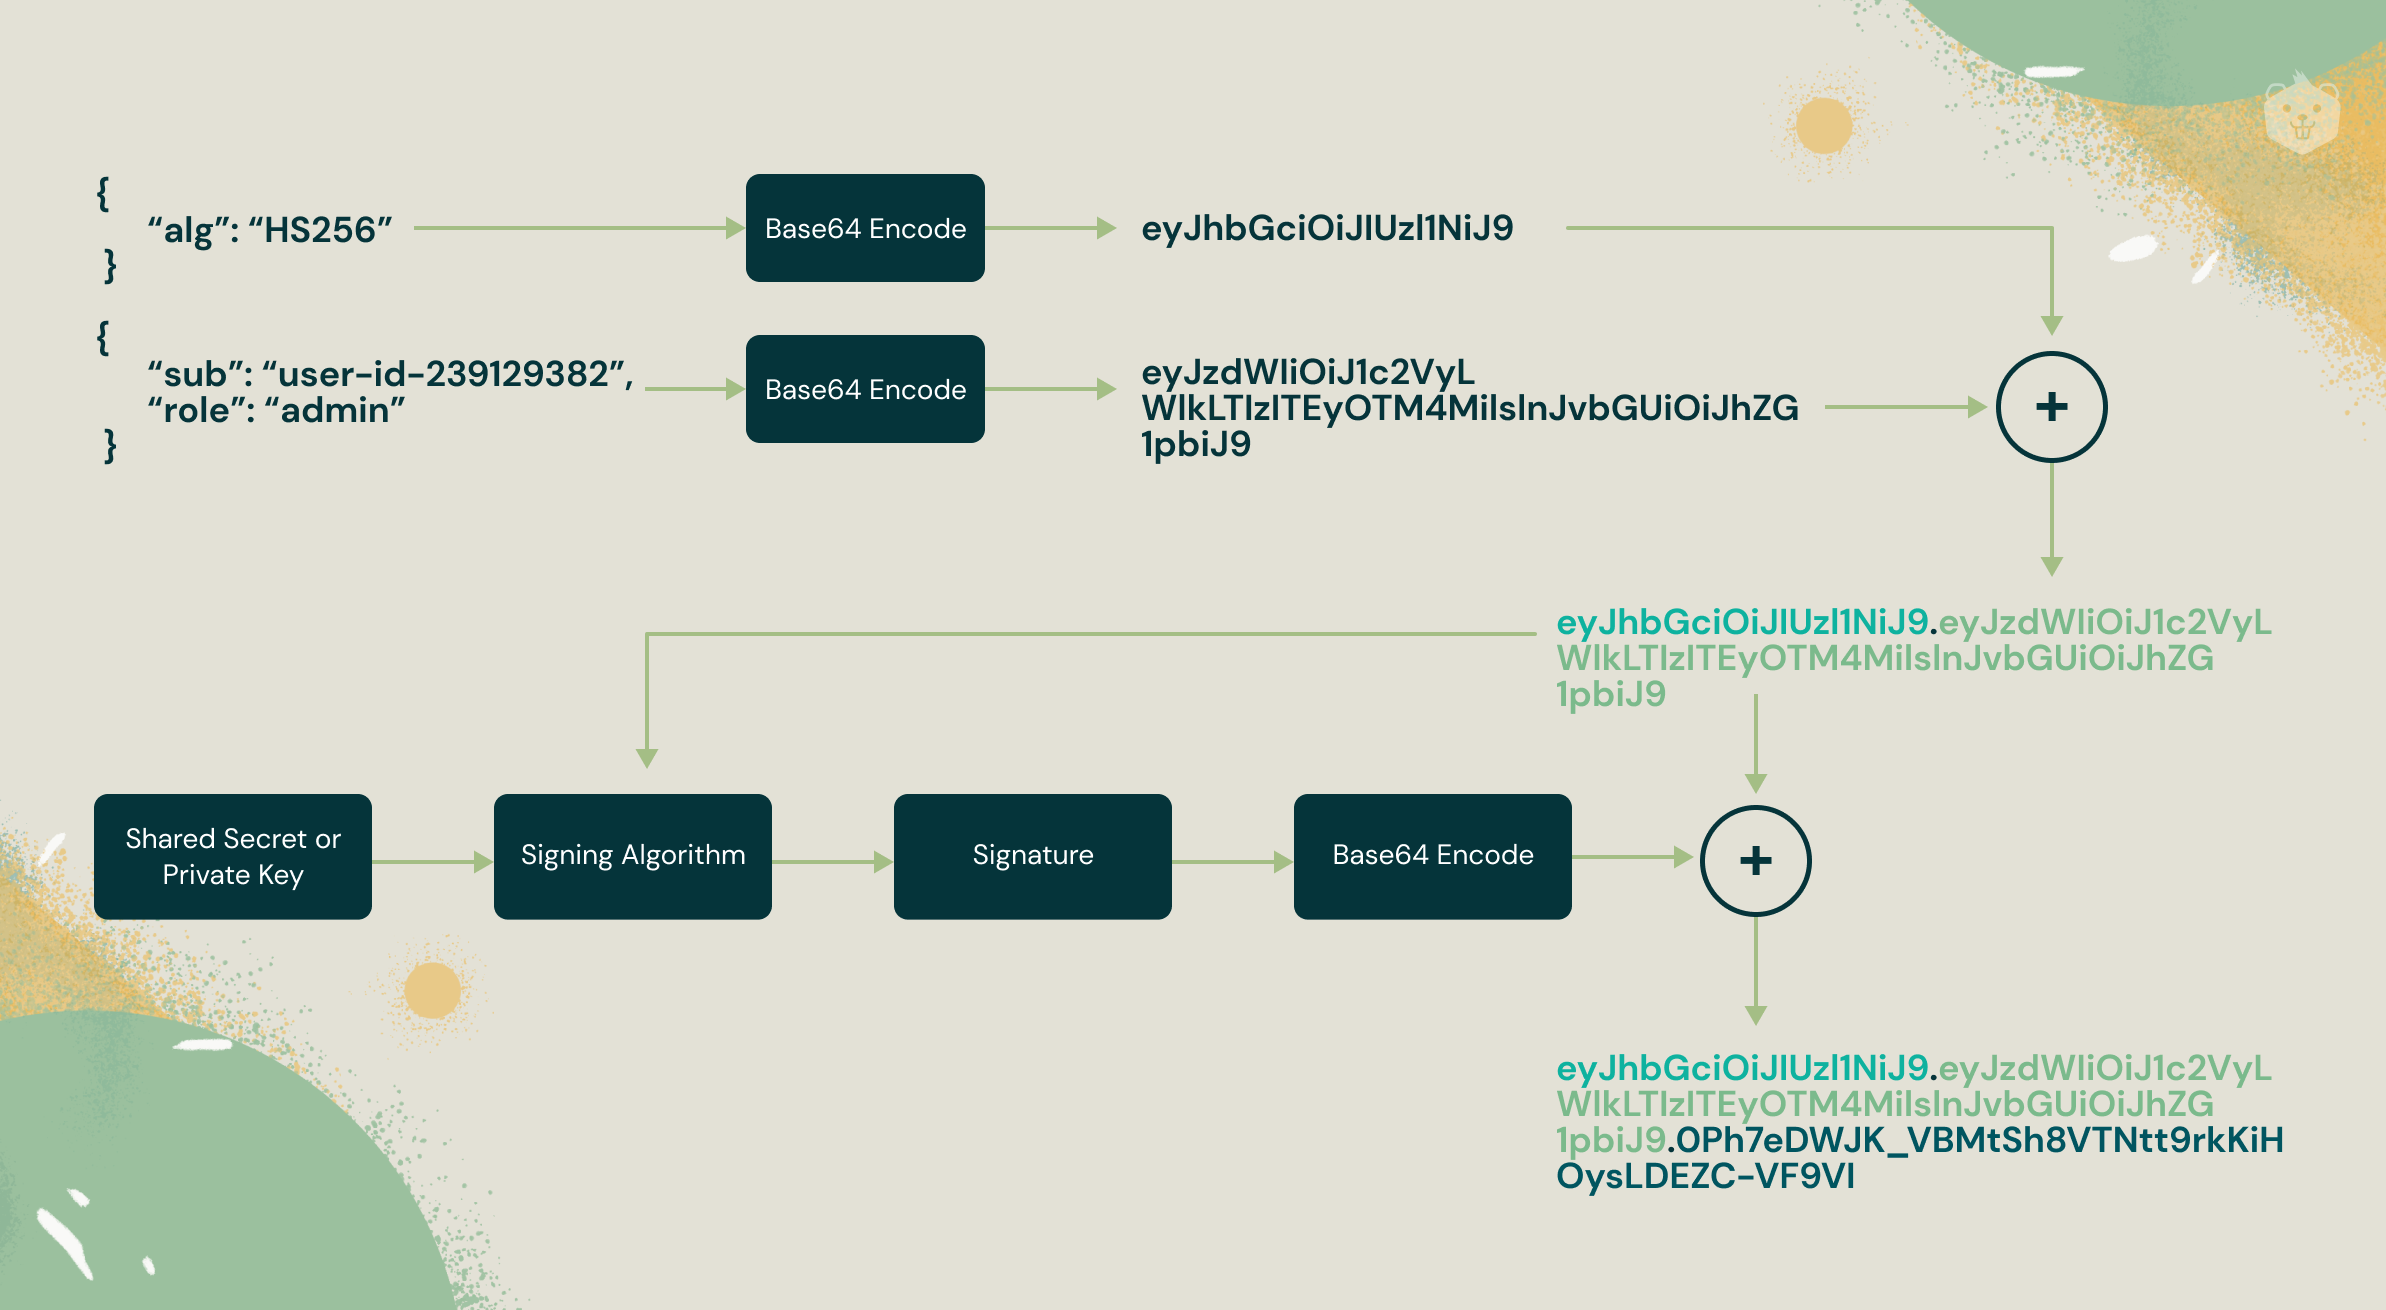
JWTs by design are digitally signed, preventing the scope of tampering with the data contained in them. The content of JWT is not necessarily hidden just because it is cryptographically signed. JWTs are like a tamper-proof ID card that is tamper-proof but not hidden. JWTs contain only necessary data required to identify a user like the user-id or mail-id and no confidential information like password. Additionally, to hide the content of the JWT, the JWT after cryptographic signing can be encrypted.
Try it yourself
For this activity, visit a JWT playground website at https://jwt.io.
Paste this into the encoded JWT section to decode: “eyJhbGciOiJIUzI1NiIsInR5cCI6IkpXVCJ9.
eyJzdWIiOiJDcmlvLmRvIGhlbHBzIHlvdSBsZWFybiBieSBkb2luZyEifQ.
QKVJvVR80IMeoRzcLPWh6AIceQs-HkNlMey4swkHOX0”
You would see that the payload contains a message for the readers.
The signature can be verified only with the possessor of the secret used to mark the JWT kept securely on the authentication server in an application. The secret for the above JWT is: "this is super secret info, but you know it". Paste it into the secret field on the right and paste the original JWT again to verify if the signature is correct.
Try to create your own JWT and test them for tampering. You will realize how efficient JWTs are at preventing tampering, making them useful for information exchange on the internet.
What is OAuth?
Take the scenario of sign in to https://crio.do; you want to use a Google account to sign in but do not want to share sensitive information like password or access to your Gmail with Crio. This is where OAuth comes in handy. OAuth 2.0, which stands for "Open Authorisation", is a standard designed to allow a website or application to access requested resources hosted by other web apps on behalf of a user. OAuth 2.0 is not an authentication protocol but an authorization protocol. It is designed primarily to grant access to a set of resources, for example, remote APIs or user's data.
OAuth 2.0 uses Access Tokens. An Access Token is a piece of data representing the authorization to access resources on behalf of the end-user. For Access Tokens, OAuth 2.0 does not specify a particular format. However, the JSON Web Token (JWT) format is often utilized. This enables token issuers to include data in the token itself. Also, for security reasons, Access Tokens may have an expiration date, as discussed above.
For the service's Login and SignUp flow, many external services (such as Firebase, Auth0, and Okta) can be utilized. As these external services use the OAuth 2.0 protocol for authorization, which is already an industry standard, this decreases the resources necessary for the userbase's security. Having a third-party firm handle the login and sign-up process has several advantages.
- The majority of users need to click and approve of using that service to sign up, which improves the user experience.
- The external service handles password hashing, IP rate limitation, password reset, and other activities directly, decreasing the developer's workload.
- Users have more faith in your favor since their sensitive login information is not saved by you but rather maintained by a reputable third-party provider.
Final thoughts
The security of a user is essential to developing a long-term and trustworthy brand. With the number of cyber-attacks on the rise, it is more important than ever to create security-first apps.
I hope that now that you have a better understanding of authentication systems, you will be better able to handle user authentication for your service. Please make sure you are constantly updated with new publications when making these judgments since security standards and procedures are modified regularly.
To get hands-on experience, you can complete this Crio Project which demonstrates how you can implement authentication in an application using Node.js and JSON Web Tokens and some good practices.